Most modern digital cameras are equipped with advanced autofocus systems that are often hard to understand. Whether you are shooting with an entry-level or professional camera, knowing how to use the autofocus system effectively is essential to get sharp images. A badly-focused, blurry image can ruin a photograph and you cannot repair it in post-processing.
If you learn how to focus correctly, you will end up with sharp, perfectly usable images each time, which will make yourself, your family, and your clients happy. Simply put, accurate focus translates to sharper images and that is something everyone is looking for in photographs today. I know some photographers will argue with me on this, saying that sometimes image blur yields a “creative” look, but it is one thing when you do it on purpose and another when you consistently mess up just because you don’t know how to focus well with your camera. Once you learn how to properly focus with your camera, you can then decide whether you want to blur something on purpose.

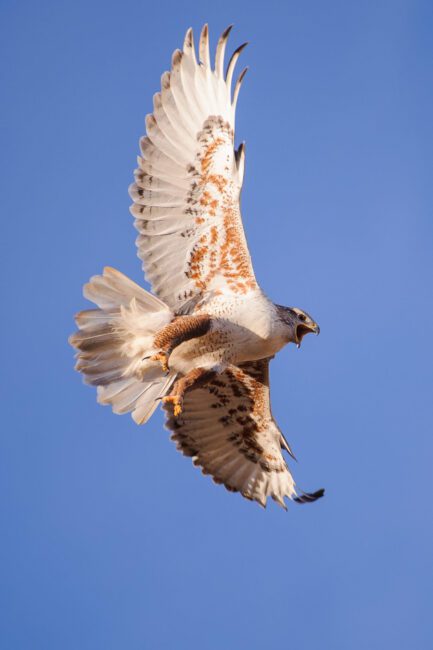
NIKON D700 @ 420mm, ISO 500, 1/2000, f/5.6
In this article, I will teach you everything I know about focus modes on modern DSLR and mirrorless cameras. Since autofocus functionality depends on what camera type and model you are using, I obviously cannot go over all the available AF modes, so I will only go through a few camera systems. Since I am a Nikon user, I will put a little more emphasis on Nikon cameras.
How Camera Autofocus Works
The nice thing about digital cameras today is that they come with all kinds of sophisticated autofocus features. If back in the day one had to master both manual focus and autofocus features of their cameras to get images that were in focus, today, one can simply switch to the correct autofocus mode and let the camera do all the hard work. Autofocus systems have gotten better and better over the last decade – even the cheapest cameras are now equipped with rather complex algorithms that are capable of automatically scanning the scene and identifying the subject. Some modern cameras can even perform face and eye detection in a scene, utilizing artificial intelligence and machine learning to accurately predict and calculate subject movement. To make all this happen, cameras need to utilize specific features and functions that are integrated into different components of the camera. Some of these are based on hardware, while others are based on complex software and algorithms. Let’s go over some of the basics, and see how modern autofocus systems work.
The Importance of Contrast
For autofocus systems to function properly, they need an area of high contrast. If you use your camera to focus on a white wall with no texture, or a blue sky without any clouds, your autofocus system will try to focus a few times and eventually give up. That’s because a blank white wall or a plain blue sky have no contrast or transitions that the camera can use to evaluate focus accuracy:

However, if you find an area of sudden transition on your wall (say where it goes from one distinct color to another), and you place your focus right in the middle of it (area of the highest contrast), your autofocus system will be able to snap into focus more easily:

The more contrast, the better – if you can provide more areas of contrast that incorporate both vertical and horizontal lines, your autofocus system will have no problem acquiring focus each time, very accurately:

The slight slanting of the edges in the above illustration allows any type of focus points (horizontal, vertical, or cross-type, explained further down in the article) to identify areas of high contrast. Try to focus right in the middle of the above chart – your camera should be able to focus without any issues.
Hence, autofocus systems heavily rely on the presence of areas of high contrast for focusing. Now you know that when a lens starts to “hunt” for focus and fails, it happens because there isn’t enough edge detail (contrast) in the focused area for the autofocus system to work properly. This is why it is always so much easier to focus on subjects with very distinct features!
Active vs Passive Autofocus
There are two types of AF (Autofocus) systems – Active and Passive. The “Active AF” system works by shooting a red beam on your subject, then bouncing that light back to your camera to figure out the distance between the camera and the subject. Once the camera knows what that distance is, it instructs the lens to adjust focus based on this information. The nice thing about Active AF is that it can be used in poorly-lit environments, where normal (passive) AF does not function. The bad thing about Active AF is that you can only use it for stationary, non-moving subjects and it only works for close subjects. If you use a Nikon or a Canon speedlight that has an “AF Assist” function, it will use the Active AF system.
On the other hand, the “Passive AF” system works very differently. Instead of relying on the red beam to find out the distance between the camera and the subject, it either uses “Phase Detection” or “Contrast Detection” (or a combination of both) for detecting contrast.
Note:
If your camera has an “AF Assist” lamp that occasionally turns on in low-light situations, it is not an “Active AF” beam – all it does is fire direct light at your subject like a flashlight would, so it still relies on your camera’s “Passive AF” system.
Many compact digital cameras and smartphones often only rely on Contrast Detection AF to acquire focus, while most modern DSLR and mirrorless cameras can use both Phase and Contrast-Detection to acquire focus. Let’s talk about these next.
Phase Detection AF vs Contrast-Detection AF vs Hybrid AF
Most modern DSLRs and mirrorless cameras come with several types of autofocus systems that rely on different software and hardware. The first type is Phase Detection AF, which uses an array of microlenses for focusing. As light passes through these microlenses, it splits up into a pair of images. The distance between these images is then measured to see how far front or back-focused the subject is. The camera can then use this information to send exact instructions to the lens on which way to turn its focus and by how much. As a result, Phase Detection AF is very fast, which makes it ideal for tracking fast-moving subjects.
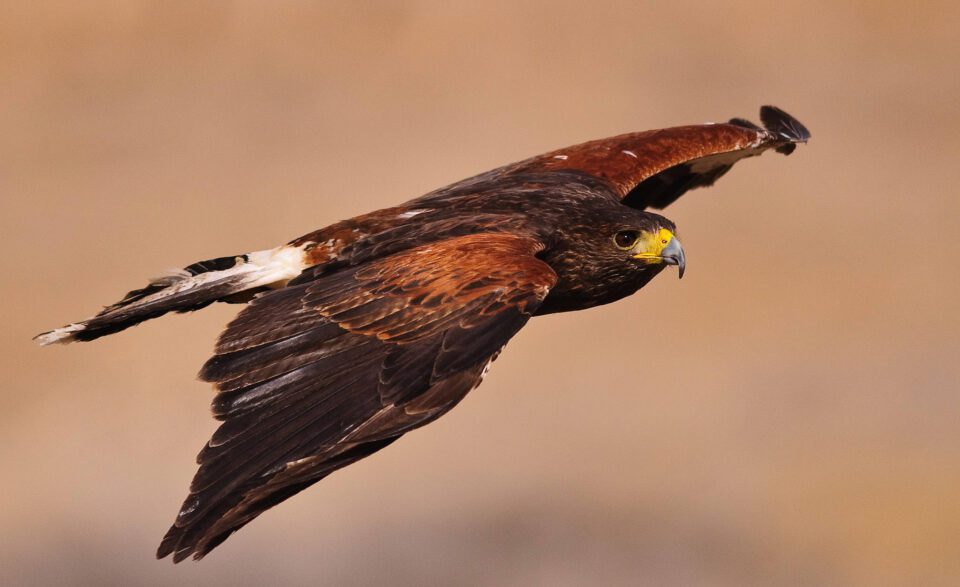
NIKON D300 @ 300mm, ISO 200, 1/3200, f/4
The second type of autofocus system is Contrast Detection AF. Unlike Phase Detection AF that uses hardware, Contrast Detection AF relies on software algorithms that “probe” through areas of an image for edge detail. Basically, the part of the scene that needs to be in focus is scanned by the camera – it uses the lens to rapidly change focus from foreground to background until the subject is perfectly sharp / in focus. Because of this focus probing methodology, Contrast Detection AF is generally known to be slow on most cameras.
At the same time, Contrast Detection AF can be much more reliable and accurate compared to Phase Detection AF when shooting in low-light conditions, which is why some cameras incorporate both. Such cameras can easily switch between Phase and Contrast Detection AF to be able to take advantage of both in different environments – this is known as Hybrid AF. Some cameras even have advanced intelligence built into their Hybrid AF implementations, and they are able to combine both Phase Detection and Contrast Detection AF data to get extremely fast and accurate results.
DSLR vs Mirrorless Autofocus Systems
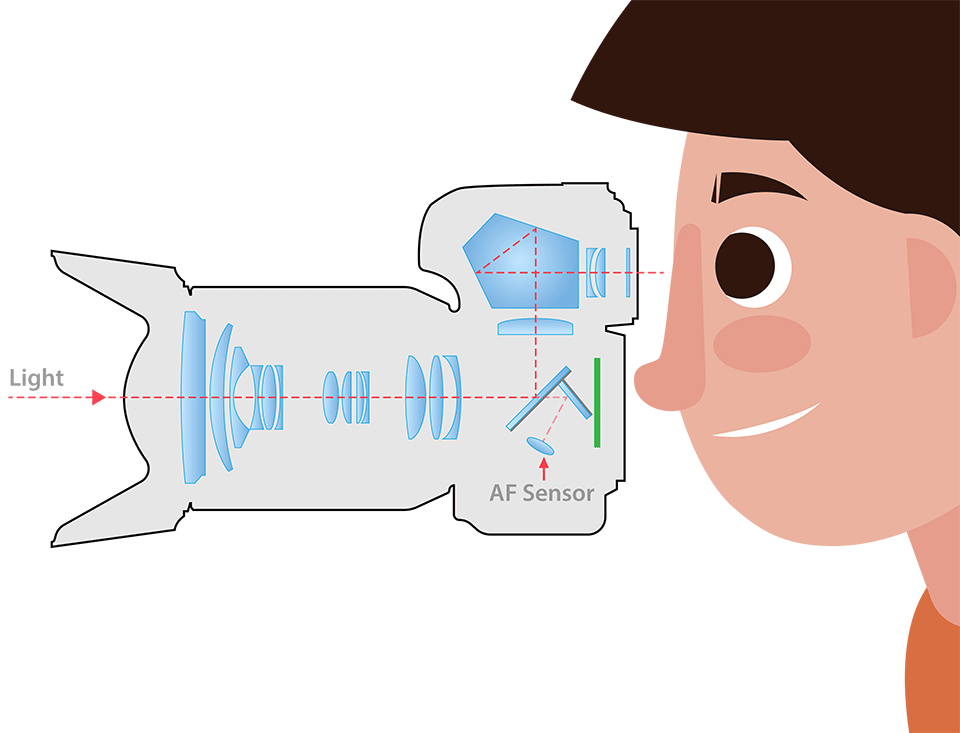
On DSLR cameras, light passes through the lens into the camera body, then reflects from the reflex mirror into the optical viewfinder (OVF). Part of that light passes through the semi-translucent part of the mirror into a secondary mirror, which then reflects the light into a separate AF sensor located down in the camera chamber. This AF sensor is a separate physical unit that is used exclusively for Phase Detection AF, as illustrated below:
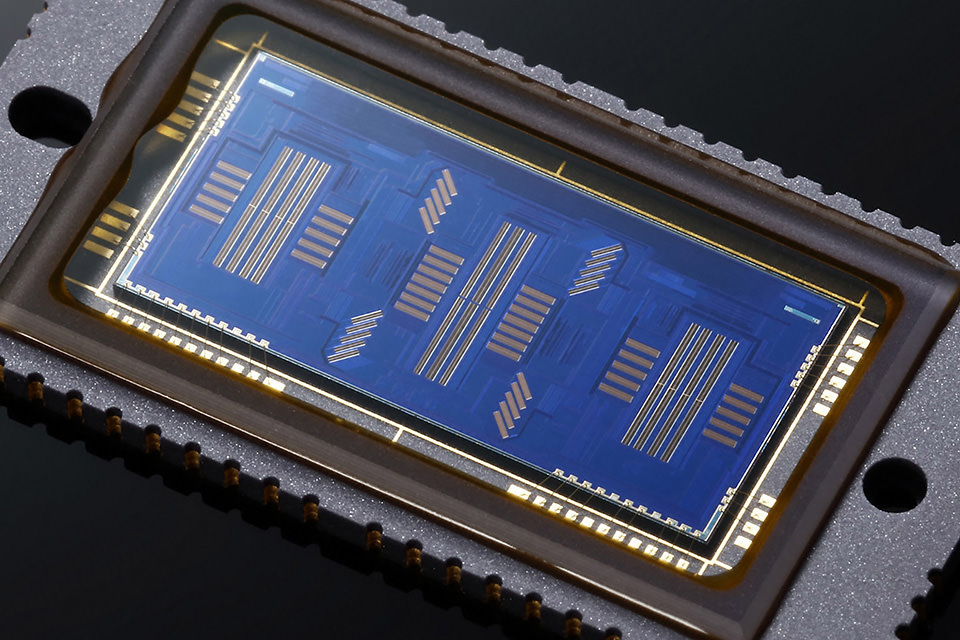
The AF sensor contains an array of different patterns in different directions that are used for scanning the focused area for contrast. They can be vertical, horizontal, and sometimes even diagonal in their direction. Here is a close-up of the AF module from an advanced Canon DSLR, which shows a complex layout of different sensors:
Since Contrast Detection AF requires light to actually hit the imaging sensor directly for the autofocus system to probe for contrast, DLSR cameras have to be in “Live View” mode for it to work. This means that while DSLRs can use both Phase and Contrast Detection AF, the former requires the use of the optical viewfinder, while the latter requires the use of the rear camera LCD.
In contrast, light always reaches the imaging sensor on mirrorless cameras. There is no secondary AF sensor, which means that focusing can only be performed on the imaging sensor itself. Nothing is reflected inside the camera chamber since the picture from the imaging sensor is simply duplicated to an electronic viewfinder (EVF), as shown below:
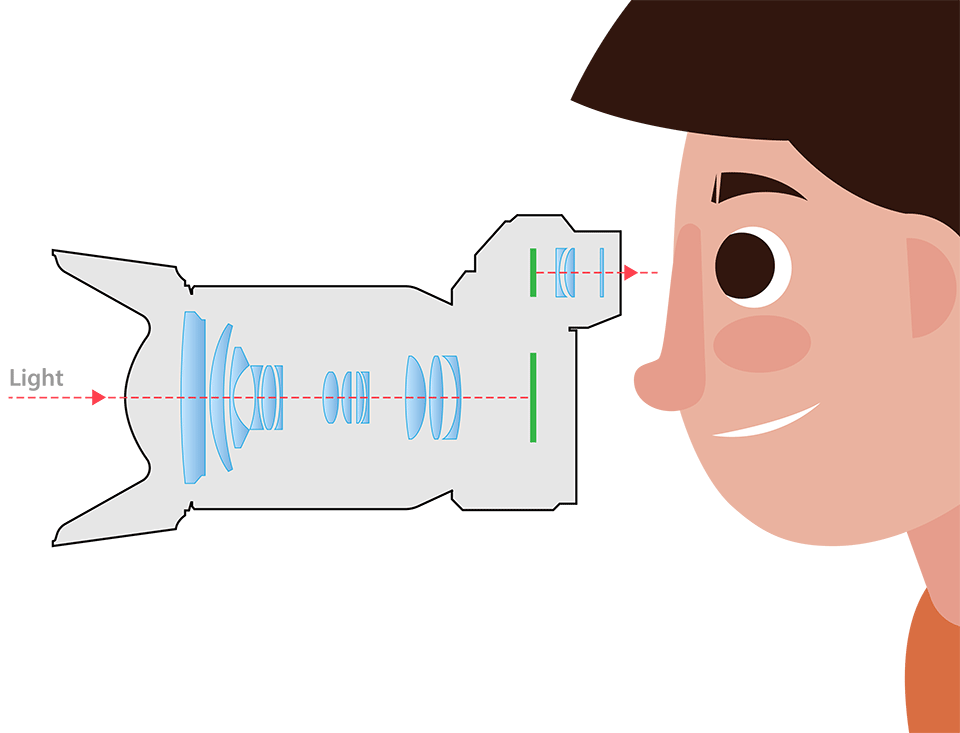
Since Phase Detection AF is much faster than Contrast-Detection AF, camera manufacturers figured out ways to integrate separate Phase Detection AF sensors directly on imaging sensors. This way, most mirrorless cameras today are able to perform both types of focusing.
Don’t worry about all this if it sounds too confusing – the technical information above is just provided to help you understand how autofocus functions. Just remember that the default autofocus behavior on your camera relies on the light that passes through the lens and the type of focus mode you pick, as explained further down below.
Focus Points
Focus points are the little empty squares or dots that you see when you look through your viewfinder (shown as a red square in the earlier illustrations). Manufacturers often differentiate entry-level cameras from professional ones by implementing different types of autofocus systems. Entry-level cameras generally have simple AF systems with a few focus points for basic focusing needs, while pro-level cameras have complex, highly configurable AF systems with lots of focus points. These focus points are intentionally laid out in certain parts of the frame and the number of focus points, along with the layout vary not only by the manufacturer but also by camera models. Take a look at these two types of autofocus systems with a different number of focus points and different layouts (Left: Nikon D3500, Right: Nikon D810):
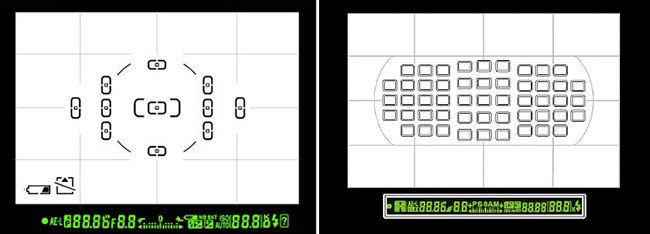
As you can see, the Nikon D3500 has a total of 11 AF points and the Nikon D810 is equipped with a total of 51 AF points – a big difference in total number. Is the number of AF points important? Of course it is – not only do you have more AF points to use while composing your shot and focusing on a particular area of an image, but also the camera AF system can use those different AF points for subject tracking (extremely useful for sports and wildlife photography). However, it is not just the sheer number of focus points that make a difference – there are also different types of focus points.
Types of AF Points
Let’s talk about different types of AF points now. As I have pointed out above, the number of focus points is not the only important factor in autofocus systems – the type of AF points is also very crucial for getting accurate results. Generally, there are three types of AF point sensors available: vertical, horizontal and cross-type. These only apply to Phase Detection AF, because they rely on hardware sensors.
Both vertical and horizontal sensors are one-dimensional, and they only detect contrast in one direction. Cross-type sensors are two-dimensional and they can detect contrast both on vertical and horizontal lines, which makes cross-type sensors much more accurate in comparison. What this means, is that the more cross-type sensors your camera has, the better and the more accurate Phase Detection AF is going to be.
That’s why when new cameras are announced, you will typically see something that says “x number of focus points and x number of cross-type sensors” – manufacturers proudly state the number of focus points and the number of cross-type sensors, especially when those numbers are high. For example, this is what Nikon lists under “Key Features” on the Nikon D7100: “Building on the acclaimed autofocus system from the D300s, the D7100 uses 51 focus points, including 15 cross-type sensors for detecting both vertical and horizontal contrast variations, to achieve fast, precise focus”. This means that the total number of focus points is 51, 15 of which are more accurate, cross-type sensors.

NIKON D3S @ 500mm, ISO 1600, 1/800, f/8.0
Whenever you shop for a new DSLR camera, pay close attention to the total number of Phase Detection AF points, along with the number of cross-type sensors, because those two are important, especially if you want to shoot sports and fast-moving wildlife. On mirrorless cameras, Phase Detection AF pixels on the imaging sensor are designed differently (mostly one-dimensional), so you don’t need to worry about the types of AF points. However, the total number of focus points and their spread in the viewfinder can still matter for things like subject tracking.
Other Factors that Impact AF Performance
As you can see, both the total number of focus points and their types can be very important. However, those are not the only two things that are needed to get accurate results. The quality of light is another important factor that can seriously affect autofocus performance. By now, you probably already know that your camera autofocus works great when you shoot in daylight conditions, and it starts to suffer when you move indoors to challenging light. Why is this the case? Because in low-light conditions, it is much tougher for your camera to detect contrast. Remember, Passive Autofocus completely relies on the light that passes through the lens. If the quality of that light is poor, so is its autofocus performance.
There are a few other factors that can affect autofocus performance, such as your camera’s focus detection range, lens maximum aperture and the speed of focus motors. The focus detection range is an important factor because it affects how sensitive your camera’s autofocus system is to low light. This can be especially important when using teleconverters with lenses, which can reduce the maximum aperture by up to 2 stops (with a 2x teleconverter) – a big difference. When using slower lenses, older cameras might fail to autofocus in less than ideal conditions. In comparison, newer cameras often feature a wider focus detection range, which allows them to focus reliably even in extremely dark conditions.
In terms of lens maximum aperture, there is a reason why pro-level f/2.8 lenses focus much faster than f/5.6 consumer zoom lenses: f/2.8 is a sweet spot for autofocus systems, as the lens aperture is neither too wide, nor too narrow. Fast f/1.4 prime lenses are usually slower than f/2.8 lenses because they require more rotations of lens elements to achieve precise focus. Precision is key at such wide apertures, as depth of field is extremely shallow. Ideally, the lens aperture should be between f/2.0 and f/2.8 for the best autofocus performance. Smaller maximum apertures like f/5.6 mean less light passing through the lens, making autofocus operation more difficult. Therefore, lenses with large maximum aperture are generally better for the autofocus system.
The speed of the focus motors is another important factor. Older lenses generally have slow screw-drive AF motors, while newer lenses feature much faster silent-wave or linear motors. Some high-end lenses even feature multiple linear motors, which is often needed when moving large and heavy lens groups.
Lastly, the overall quality and reliability of the AF system in a camera should not be ignored. Keep in mind that both DSLR and mirrorless camera manufacturers continuously work on tweaking their AF systems and algorithms. As a result, it is becoming more common to release fixes and improvements to autofocus systems via firmware updates. Always make sure that you are running the latest and greatest firmware version, so that you can take advantage of all the latest tweaks to the autofocus system.
AF Point Coverage
Another important factor is the AF point coverage. This has to do with how far focus points can reach to the edges of the frame before they can no longer be utilized for focus selection and tracking. While it might not directly affect autofocus performance, AF point coverage can be an extremely important factor when tracking fast-moving subjects. This is where mirrorless cameras offer big advantages over their DSLR counterparts, because Phase-Detection AF sensors can be integrated into areas that are impossible to reach for a DSLR. Take a look at the below image that shows the AF point coverage on the Sony A7 III:
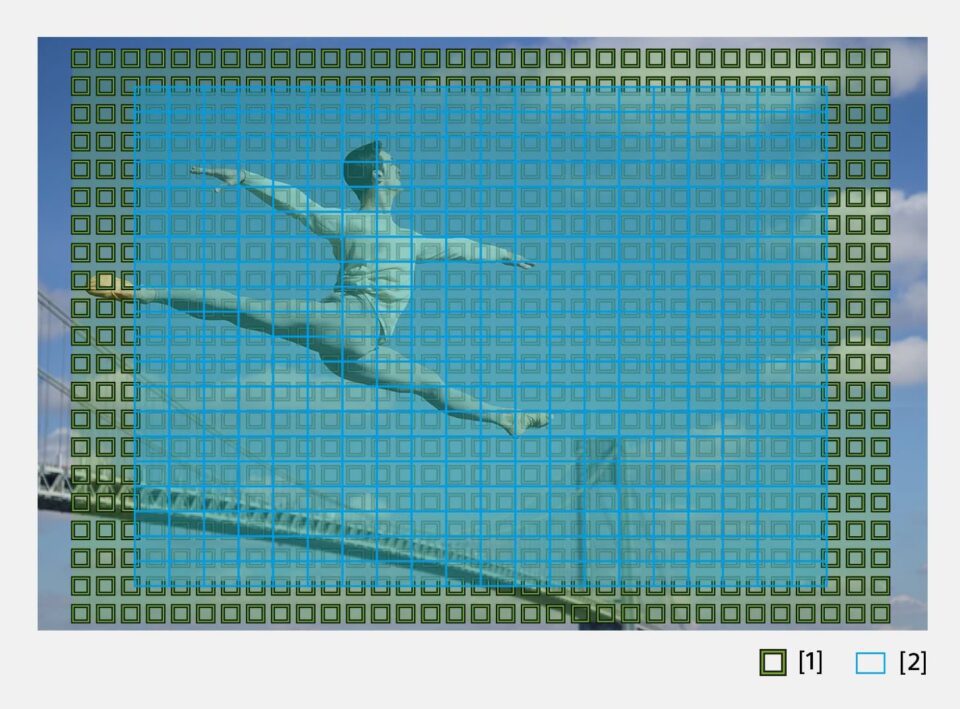
As you can see, it stretches practically to the edges of the frame, which allows the camera to continue tracking subjects no matter where they end up, as long as they are still somewhere in the frame.
DSLR cameras are limited by the size of the secondary mirror and the AF sensor, optical distortion, vignetting, and other issues, which results in only the center part of the frame being adequately covered.
Autofocus Modes
Nowadays, most digital cameras are equipped with several different focus modes for various situations. It is one thing to photograph a still subject’s portrait, and another to photograph a running person or a bird in flight. When photographing still subjects, you generally acquire focus once and take a picture. If the subject moves, you re-acquire focus again and take another picture. But if you have a subject that is continuously moving, you need your camera to readjust focus automatically as you take pictures. The good news is that your camera has built-in functionality to handle such situations. Let’s go over these focus modes in more detail.
Single AF (AF-S) Mode
The “Single AF” mode (AF-S), also known as “Single Area AF” on Nikon and “One-Shot AF” on Canon cameras, is a pretty straightforward way to acquire focus. You pick one focus point and your camera will look for contrast just in that single focus point. When you half-press the shutter or press a dedicated focusing button (if you have one), the camera will snap into focus once, and if your subject moves, it won’t reacquire focus even if you continue half-pressing the button. Hence, the focus remains “locked”.
The AF-S mode often requires the camera to lock into focus before allowing you to take a picture, so if the focus is not acquired properly, pressing the shutter will do nothing due to focus error. Some cameras allow you to change this behavior though. On Nikon DSLR and mirrorless cameras, for example, you can set “AF-S Priority Selection” under the “Autofocus” custom settings menu to “Release”, which lets you take pictures even when your subject is not in focus. A couple of things to note about the AF-S mode – if you mount an external speedlight that has an “AF-Assist” red beam, you will need to be in AF-S mode for it to work. The same is true for the “AF-Assist” lamp in front of your camera, it will only function in AF-S mode.

NIKON D700 @ 420mm, ISO 400, 1/1000, f/5.6
Continuous AF (AF-C) Mode
Another focus mode that is available on all modern DSLR and mirrorless cameras is called “Continuous AF” (AF-C), which is also known as “AI Servo” in the Canon world. This mode is used for tracking moving subjects, such as when photographing sports, wildlife, and fast-moving action. The AF-C mode is much more complex when compared to AF-S because the autofocus speed and tracking algorithms can heavily depend on the type of subject, how fast and how unpredictable it moves. Some AF-C implementations use all kinds of calculations that take advantage of artificial intelligence and machine learning for analyzing and predicting subject movement. This is one area camera manufacturers always put a lot of emphasis on, so you will see the most number of related focus options in the camera menu.
The nice thing about the AF-C mode, is that it will automatically re-adjust focus if you or your subject move. All you need to do is continue half-pressing the shutter button or holding the dedicated AF button (if you have one) on your camera, and the autofocus system will automatically track movement and adjust focus. Most modern autofocus systems allow using more than one focus point for dynamic subject tracking in AF-C mode, which I cover further down below in this article.

NIKON D3S @ 300mm, ISO 3200, 1/250, f/8.0
AF Auto (AF-A) / Hybrid Mode
Some cameras also have a mode called “AF Auto” (AF-A) or something like “AI Focus AF” (Canon), which is basically a hybrid mode that automatically switches between AF-S and AF-C modes. If the camera thinks that the subject is stationary, it switches to AF-S, and if the subject moves, it will automatically switch to AF-C mode. By default, most entry-level cameras are set to AF-A, which works quite well in most situations. Many of the higher-end / professional cameras do not have this mode, since it is designed for beginners in mind.
Full-Time Servo (AF-F) Focus Mode
The Full-time Servo AF mode, also known as “AF-F”, was introduced by Nikon specifically for recording videos on its DSLR and mirrorless cameras. This mode automatically tracks subject movement and acquires focus during video recording. Don’t worry about this mode if you do not shoot video.
Personally, I typically leave all of my Nikon cameras in AF-C mode and only switch to AF-S when the camera cannot focus in low-light situations.
Changing Focus Modes
If you do not know how to change the focus mode on your camera, I recommend checking out your camera manual, because different cameras handle this differently. For example, all entry-level Nikon DSLRs require going into the camera “Info” screen to change the focus mode, while higher-end DSLR and mirrorless cameras have a dedicated switch or a button to toggle between different focus modes. For example, here is how you change the focus mode on the Nikon D850:
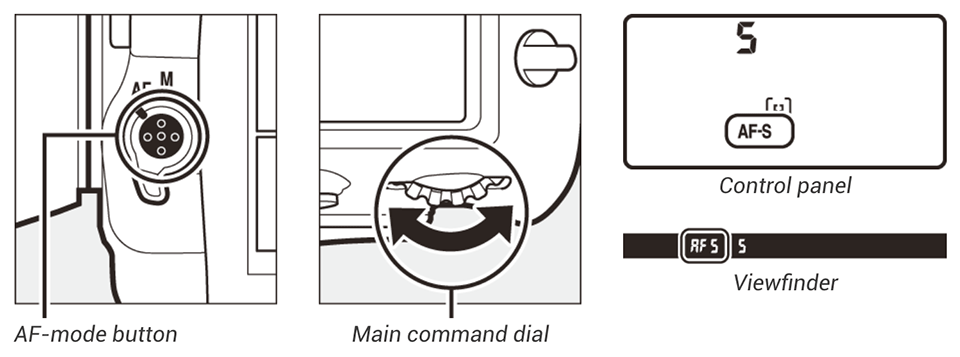
First, you press and hold the AF-mode button on the front of the camera, then you rotate the rear dial (Main command dial) to switch between AF-S, AF-C and M (manual focus) modes.
AF-Area Modes
To make things more confusing, many digital cameras also have something called “AF-Area Mode”, which allows photographers to choose several options to use while operating in AF-S, AF-C, AF-A, and AF-F modes. Many of the entry-level / semi-professional cameras allow you to pick a certain “AF-Area Mode” within the camera menu, while pro-level cameras typically have a dedicated button for it. So, what do these AF-Area Modes do? Let’s go through them one by one.
Pinpoint AF Mode
The pinpoint AF mode is a Nikon-specific mode that is designed to utilize Contrast Detection AF in order to precisely focus on a very small portion of the scene. The autofocus point becomes a small spot, which you can slowly move to any part of the screen, including the extreme edges. Use this mode when you need to acquire precise focus when photographing stationary subjects (landscapes, architecture, product, macro, etc). It is only available in AF-S mode.
Single-Point AF-Area Mode
When you choose the “Single Point” (Nikon) or “Manual AF Point” (Canon) AF-Area Mode, the camera only uses one focus point that you choose in your viewfinder to acquire focus. So if you move your focus point up/down/left/right, the camera will detect contrast only on that particular focus point. I use Single Point AF-Area Mode when photographing landscapes, architecture, and other stationary subjects.

Dynamic AF-Area Mode
In “Dynamic” (Nikon) or “AF Point Expansion” (Canon) AF-Area Mode, you still choose one focus point and the camera will initially acquire focus on that particular focus point. However, once the focus is acquired, if your subject moves, the camera will utilize the surrounding focus points to track subject movement and keep the focus on your subject. You are expected to track the subject by panning the camera along with the subject and making sure that the subject stays close to the initially selected focus point. If the camera selects a surrounding/different AF point, it might not be directly visible inside the viewfinder at the time of capture.
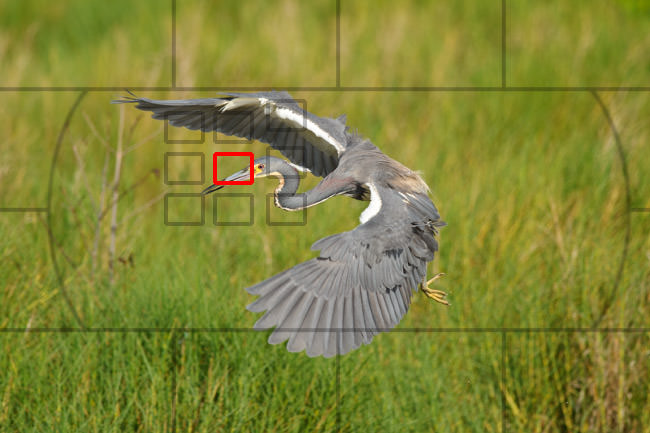
The Dynamic AF-Area Mode works great for fast-moving subjects like birds because it is not easy to keep the focus on birds in flight. Higher-end DSLR and mirrorless cameras have the ability to control the number of surrounding focus points to activate for this type of shooting. For example, the Nikon D810 allows choosing between 9, 11, 21 and 51 points in Dynamic AF-Area Mode. So if you only wanted to track a small portion of the scene, you would pick 9 points and if you wanted to track the entire frame, you could pick all 51 points to track your subject.
Lastly, many of the modern DSLRs from Nikon have a “3D-Tracking Mode”, where you initially pick the AF point and the camera will automatically activate as many focus points as needed to track subject movement. The cool thing about the 3D-Tracking mode is that it uses a special scene-recognition system that actually reads colors and will track your subject automatically, letting you compose your shot while the subject moves. For example, if you are photographing a white bird among many black birds, the 3D-Tracking system will automatically focus on and track the white bird, even if the bird moves or if you move the camera, letting you compose your shot.
If you compare 3D-Tracking to Dynamic AF-Area with a certain number of focus points selected, the 3D-Tracking method will use all available focus points on the camera to track your subject, while the Dynamic AF-Area mode divides the focus points to “zones”, activating only the surrounding focus points (as many as you selected). For example, if you choose 9 focus points, subject tracking will only work within a zone of 9 total focus points that are surrounding the focus point you picked. If your subject moves away from all 9 focus points, the camera will not be able to focus on the subject anymore. In 3D-Tracking mode, the camera will continue tracking the subject (newly selected focus points will be displayed in the viewfinder), even if it significantly moves away from your initial focus point. I use the Dynamic AF-Area mode a lot when photographing wildlife and typically shoot with a smaller number of focus points activated (between 9 and 21 focus points). But if the action is very chaotic and I have a bunch of random birds flying towards me, choosing the 3D-Tracking mode does a fairly good job at finding a subject to focus on and track it continuously.
Auto-Area AF Mode
The “Auto-Area AF” (Nikon) or “Automatic AF Point Selection” (Canon) Mode is the “point-and-shoot” method of acquiring focus. Depending on what you are photographing, it will automatically pick what to focus on. It is a pretty complex mode because it will actually recognize the skin tones of a person in the frame and will automatically focus on them. If there are multiple people in the frame, it will focus on those that are closest to the camera. If the camera does not detect any skin tones, it will typically focus on the closest and largest object in the frame. If you shoot in AF-S mode and select “Auto-Area AF”, the camera will actually display what focus points it will use for a second, allowing you to see and confirm the area the camera will focus on. The same thing can be done on Canon DSLRs, but it is called “Automatic AF point selection in One-Shot AF mode”. I never use this mode, because I want to control where to focus, instead of letting the camera do it for me.
Group-Area AF Mode
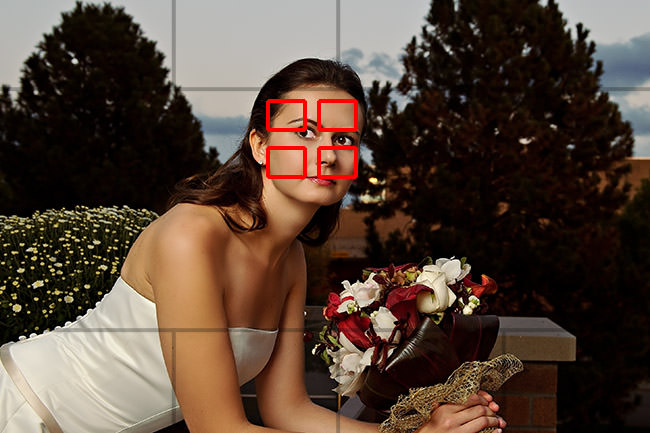
Another Nikon-specific mode is called “Group-Area Autofocus”. When compared to the regular Single-Point AF mode, Group-Area AF activates five focus points to track subjects. This focus mode is great for initial focus acquisition and tracking of subjects when compared to a Single-Point or Dynamic AF, especially when dealing with smaller birds that fly erratically and can be really hard to focus on and track. In such situations, the Group-Area AF mode might give better results than Dynamic AF, showing better shot-to-shot accuracy and consistency.
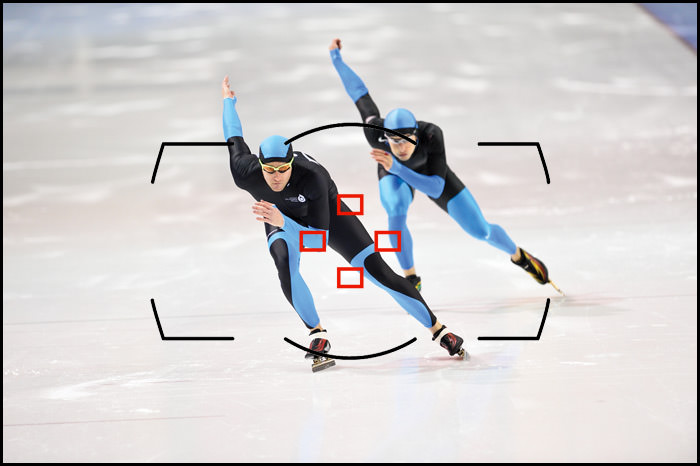
How does Group-Area AF work? Basically, within the viewfinder, you see four focus points, with the fifth one in the middle hidden. You can move all four focus points by pressing the multi-touch controller on the back of the camera (ideally, you want to stay in the middle, because the focus points in the center of the frame are cross-type and the most accurate). When pointed at a subject, all five focus points are activated simultaneously for the initial focus acquisition, with priority given to the closest subject. This differs from the Dynamic 9 (D9) AF mode quite a bit, because D9 activates 8 focus points around the center focus point, with priority given to the chosen center focus point. If the camera fails to focus using the center focus point (not enough contrast), it attempts to do it with the other 8 focus points. Basically, the camera will always prioritize the central focus point and only fail-over to the other 8 if autofocus is not possible. In contrast, Group-Area AF uses all 5 focus points simultaneously and will attempt to focus on the nearest subject, without giving preference to any of the 5 focus points.
Group-Area AF is especially useful when photographing birds, wildlife, and non-team sports. In the above sample image of speed skaters, if your goal is to focus on the front runner, Group-Area AF would do wonders, as it would automatically acquire focus on and track the runner that is closest to the camera.
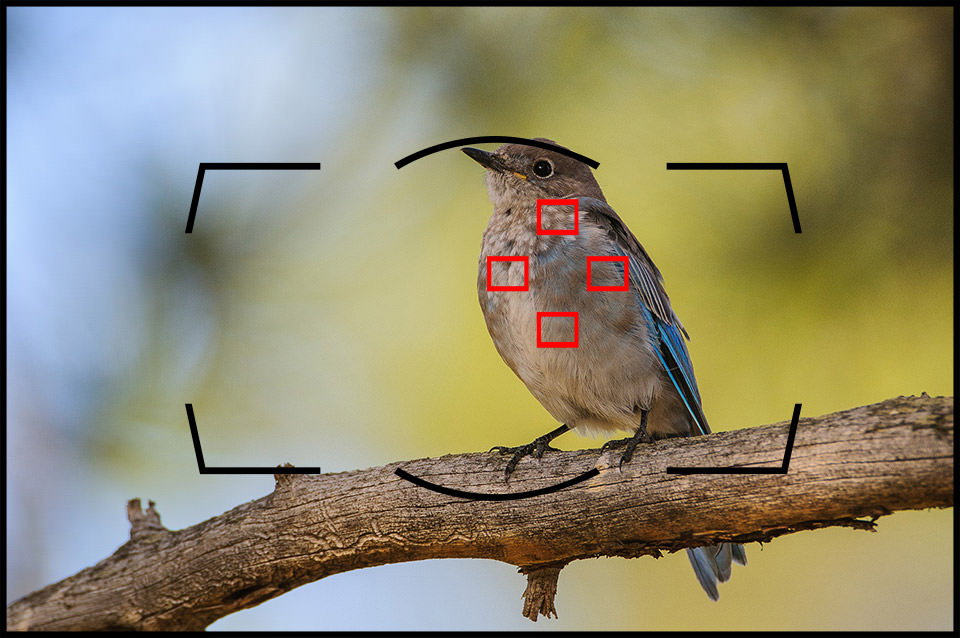
Another good example can be a perched bird sitting on a stick and you are looking at it a little from above, so the ground behind the bird is clearly visible. With Dynamic AF mode, whatever you are pointing at is where the camera will initially attempt to acquire focus. If you are right on the bird, the camera will focus on the bird. If you accidentally point to the ground behind the bird, the camera will focus on the background instead. This can get quite challenging when photographing small birds, especially when the branch or stick they are sitting on is constantly moving. Getting the initial focus point is important, and the quicker you do it, the better the chance of capturing and tracking action, especially if the bird decides to suddenly take off.
As I have mentioned above, with Group-Area AF, there is no preference given to any focus point, so all 5 focus points are active simultaneously. In this particular situation, since the bird is closer than the background, as long as one of the 5 focus points is near the bird, the camera will always focus on the bird and not the background. Once focus is acquired, Group-Area AF will also track the subject, but again, only if one of the 5 focus points is near the subject. If the subject moves fast and you cannot effectively pan your camera in the same direction, focus will be lost, similarly to what happens in Dynamic 9 AF mode. In terms of tracking, I personally find Group-Area AF to be pretty fast, but it is hard to say if it is as fast as Dynamic 9 AF – in some situations, Dynamic 9 AF seems to be a bit faster.
Another important fact I should mention, is that when you use Group-Area AF in AF-S mode, the camera will engage face recognition and attempt to focus on the eye of the nearest person, which is neat. For example, if you are photographing someone between tree branches and leaves, the camera will always attempt to focus on the person’s face instead of the nearest leaf. Unfortunately, face recognition is activated only in AF-S mode on Nikon DSLRs, so if you photograph fast-moving group sports and you need the camera to lock and track on a subject’s face (and not on the nearest object), your best bet will be to use Dynamic AF instead.
Here is an illustrated comparison of each Nikon AF mode (image courtesy of Nikon USA):
Clockwise from the top left: Single-Point AF mode, Dynamic-Area AF mode (9 points), Dynamic-Area AF mode (21 points), Dynamic-Area AF mode (51 points), 3D-Tracking mode, Auto-Area AF mode, and Group-Area AF mode.
Other Area Modes
Some of the newer Nikon cameras have additional AF-Area Modes like “Face-Priority AF”, “Wide-Area AF”, “Normal-Area AF” and “Subject-Tracking AF” for use in video recording. I’m not going to discuss each one of these in detail, because they are specific to certain camera models and will probably change in the future. Canon also has some AF-Area Modes like “Spot AF”, where you could fine-tune your focus inside a focus point.
When to Use Different AF-Area Modes
Why do you need to know how and when to use different AF-Area Modes? Because each one of them can be combined with Focus Modes! To make things easier to understand, I compiled a chart with examples for you (for Nikon cameras):
| AF-Area Mode | Nikon Focus Modes | ||
|---|---|---|---|
| AF-S Mode | AF-C Mode | AF-A Mode | |
Pinpoint AF-Area Mode (Live View Only) | Camera acquires focus only once and on the selected single focus point only. | Disabled, only works in AF-S. | Disabled, only works in AF-S. |
Single-Point AF-Area Mode | Camera acquires focus only once and on the selected single focus point only. | Camera focuses on the selected single focus point only and will reacquire focus if the subject moves. | Camera detects if subject is stationary or moving and will automatically select whether to use AF-S or AF-C. Only one focus point is used in either case. |
Dynamic AF-Area Mode | Disabled, works just like Single-Point AF. | You choose an initial focus point and once the camera acquires focus on the subject, it will engage the surrounding focus points to track subject movement. The number of surrounding focus points to use can be selected in camera menu. | Camera detects if subject is stationary or moving and will automatically select whether to use AF-S or AF-C. |
Dynamic AF-Area with 3D-Tracking | Disabled, works just like Single-Point AF. | Instead of using a particular number of surrounding focus points, the 3D-Tracking activates all available focus points and uses color recognition to track subjects. You pick the initial focus point and the camera will track the subject across the frame automatically, letting you recompose the shot without losing focus on the subject. | Camera detects if subject is stationary or moving and will automatically select whether to use AF-S or AF-C. |
Group-Area AF Mode | Camera activates five focus points and focuses on the nearest subject. If faces are detected, the camera will give priority to portrait subjects. | Camera automatically focuses on the nearest subject and will track the subject in the frame, as long as the subject remains close to the five selected points. Face detection is disabled. | Not available. |
Auto-Area AF Mode | Camera automatically picks a focus point, depending on what’s in the frame. | Camera automatically picks a focus point on a moving subject and will track the subject in the frame. | Camera detects if subject is stationary or moving and will automatically select whether to use AF-S or AF-C. |
| Note: Not all of the above focus modes may be available on your Nikon camera. The new AF-F and other AF-Area video modes are not included in the above chart. | |||
Changing AF-Area Modes
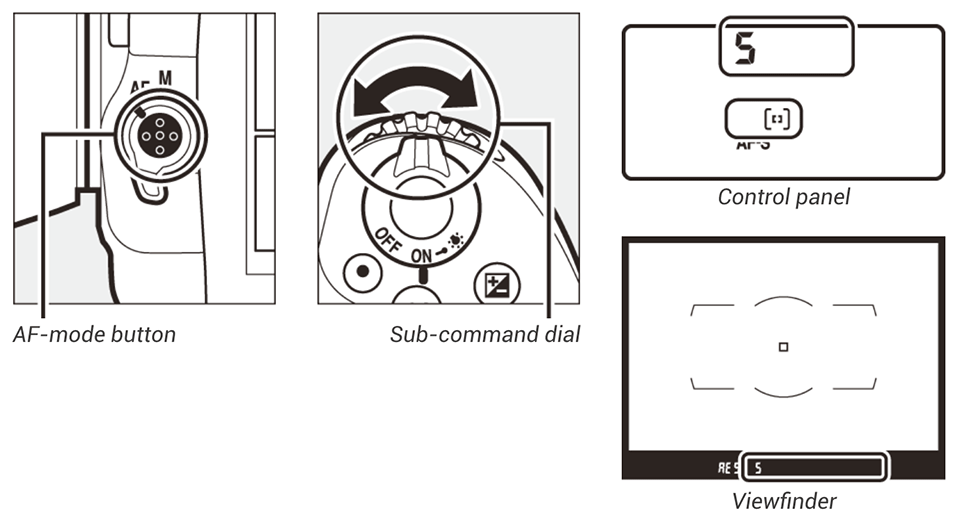
To find out how to change the AF-Area Mode on your camera, once again, I recommend checking out your camera manual. If you have an entry-level camera, you will most likely have to go through the camera menu to change your AF-Area mode. If you have a higher-end DSLR or mirrorless camera, you might be able to quickly toggle through different AF-Area modes by pressing a combination of different buttons. For example, on the Nikon D850 DSLR, you have to press the same AF-mode button on the front of the camera, then rotate the front dial (Sub-command dial) to change the AF-Area mode, as shown below:
Autofocus Scenarios and Examples
So far you have read a lot of technical information on each focus mode and AF-Area modes. Let’s now go through different scenarios and examples for you to fully understand and grasp the information above. The camera settings I show below only apply to Nikon DSLR cameras, but the concepts remain the same for any other camera system out there.
Scenario #1 – Photographing Outdoor Sports
Which autofocus mode and AF-Area mode would you choose when photographing outdoor sports like football? Let’s start with choosing the right Autofocus Mode. Obviously, using the Single AF / AF-S mode is not going to work, since you need the camera to re-adjust focus continuously as you half-press the shutter / AF buttons on your camera. Therefore, we must use either AF-C or AF-A modes. In such situations, we know that the subjects move continuously all the time, so I would just pick the AF-C mode. What about AF-Area mode? Should you use the Single-Point AF-Area Mode, Dynamic AF-Area Mode, Group-Area AF Mode or the 3D-Tracking Mode? I would personally choose the 3D-Tracking mode and let my camera deal with tracking the subjects while I compose my shots. If you find that 3D-Tracking is not working out well and it fails to track your subjects correctly (or you have one particular subject to track), then switch to Dynamic AF-Area mode with a relatively high number of focus points, especially if you are close to the action. Group-Area AF would work great if you only want to track the subject that is closest to the camera. Here is a summary of the settings I would use:
- Autofocus Mode: AF-C
- AF-Area Mode: 3D-Tracking, Dynamic AF-Area or Group-Area AF
- Custom Settings->Dynamic AF Area: 21-points or 51-points
- Custom Settings->AF-C Priority Selection: Release+Focus
Scenario #2 – Photographing People Outdoors
When taking portraits of people that pose for you outdoors in daylight, any of the autofocus modes should work perfectly fine. If you shoot in AF-S mode, the camera will only focus once when you half-press the shutter, so just make sure that you or your subjects don’t move once you acquire focus right before taking a picture. By default, your camera should not let you fire, if the focus is not properly acquired in AF-S mode. If you are shooting in AF-C mode, just make sure to acquire good focus before taking a picture. AF-A mode works great for portraits as well. When it comes to AF-Area modes, I would stick with the Single-Point AF-Area Mode, since your subjects are stationary.
- Autofocus Mode: AF-S, AF-C or AF-A
- AF-Area Mode: Single-Point AF-Area
- Custom Settings->AF-S Priority Selection: Focus
- Custom Settings->AF-C Priority Selection: Release+Focus
It goes without saying that you should always focus on the closest eye of your subject, especially when standing close.
Now, if you use a modern DSLR or a mirrorless camera that has Face or Eye-Detection Autofocus modes available, make sure to use them! On a Nikon Z mirrorless camera, the settings would be the following:
- Autofocus Mode: AF-C
- AF-Area Mode: Auto-Area AF
- Custom Settings->Auto-Area AF Face/Eye Detection: Face and Eye Detection On
- Custom Settings->AF-C Priority Selection: Release
Scenario #3 – Photographing People Indoors
Photographing people indoors can be quite challenging, especially in low-light. If the light levels indoors are poor, I would shoot in AF-S mode to make sure that my AF-Assist beam helps me when needed. If you are using a speedlight, AF-S will make your speedlight use the AF-Assist red beam to acquire focus. You cannot do that in AF-C mode. The AF-A mode should also work well for these types of situations, but I would still opt to use the AF-S mode instead. In terms of AF-Area modes, I would pick the Single-point AF-Area Mode and choose the center autofocus point for better accuracy when shooting in low-light situations.
- Autofocus Mode: AF-S
- AF-Area Mode: Single-Point AF-Area
- Custom Settings->AF-S Priority Selection: Focus
- Custom Settings->Low-light AF: On
Scenario #4 – Photographing Birds in Flight
Birds are extremely tough to photograph since it is hard to predict their behavior and they are often very fast. As I have pointed out above, I would shoot in Continuous AF / AF-C mode and pick either Group-Area AF Mode or Dynamic AF-Area Mode with focus points between 9 and 21 (I prefer to leave focus points at 21, but 9 is generally faster). I have tried using 51 focus points and also tried shooting in 3D-Tracking mode, but found those to be slower and less reliable than using fewer focus points. I use the center focus point 99% of the time when photographing birds and only change focus points when birds are perched on something. Again, the center focus point is normally going to give you the best results. If you are dealing with small birds and have a hard time with initial focus acquisition, give Group-Area AF a try (if available).
- Autofocus Mode: AF-C
- AF-Area Mode: Dynamic AF-Area or Group-Area AF
- Custom Settings->Dynamic AF Area: 9-points or 21-points
- Custom Settings->AF-C Priority Selection: Release+Focus
Scenario #5 – Photographing Landscapes and Architecture
For landscapes and architecture, all focus modes work fine, but I prefer to switch to AF-S or pinpoint modes since there is nothing to track. In low-light situations, you will not be able to utilize the AF-Assist function on your camera anyway (because of distance issues). Use Live View when possible for accurate focusing (zoom in to 100% first) and use Contrast Detect AF to focus on a bright object in your scene. Otherwise, the only other option is to turn off autofocus and manually focus your lens. When taking pictures of landscapes and architecture, you have to be extremely careful about where to focus and need to understand such things as hyperfocal distance well. You can find more information about these in my detailed Landscape Photography Guide. In terms of AF-Area mode, you want to use either Pinpoint AF or Single-Point AF-Area Mode in order to focus precisely on a certain part of the frame.
- Autofocus Mode: AF-S
- AF-Area Mode: Pinpoint AF or Single-point AF-Area
- Custom Settings->AF-S Priority Selection: Focus
Scenario #6 – Photographing Large Animals / Wildlife
When photographing large animals, I would shoot in Continuous AF / AF-C mode and use Dynamic AF-Area or 3D-Tracking modes, both of which work great. Animals are normally not as fast as birds (although they can be even faster at times), so unless you are shooting fast action, I would just pick Dynamic AF-Area with the highest number of focus points or use 3D-Tracking.
- Autofocus Mode: AF-C
- AF-Area Mode: Dynamic AF-Area / 3D-Tracking
- Custom Settings->Dynamic AF Area: Highest number of AF points or 3D
- Custom Settings->AF-C Priority Selection: Release+Focus
Scenario #7 – Photographing Small Groups
I frequently get asked about how to focus when photographing a small group of people. Before I talk about focus modes, let me point out a few important things here. If you are using a telephoto lens, you have to be careful about the camera-to-subject distance when using large apertures. If you stand too close to the group and use large apertures like f/1.4-f/2.8, only one or two people might be in focus while everyone else is blurred, unless everyone is positioned on the same focus plane. The solution is to either change your aperture to something smaller like f/5.6 or f/8 or to stand back / move away from the group, so that your depth of field is increased, or do both. If you want to blur the background and shoot at large apertures, your only choice is to put everyone on the same focus plane, parallel to your camera. Imagine how the group would be standing if they were all touching a flat wall with their heads – that’s how they need to stand. In terms of autofocus modes, if you are shooting in broad daylight, any of the AF modes work fine and I would pick Single-Point AF-Area Mode for focusing.
- Autofocus Mode: AF-S, AF-C or AF-A
- AF-Area Mode: Single-Point AF-Area
- Custom Settings->AF-S Priority Selection: Focus
- Custom Settings->AF-C Priority Selection: Release+Focus
Note: As you may have noticed, I always leave my “AF-S Priority Selection” and “AF-C Priority Selection” to be “Focus” and “Release+Focus”, respectively. Here is why. By keeping “AF-S Priority Selection” at “Focus”, I force my camera to not let me take a picture when I do not have good focus. I do not use the AF-S mode very often, but when I do, I want to make sure that my focus stays good. As for the “AF-C Priority Selection”, the “Release+Focus” mode works great for most situations – the camera will do its best to acquire good focus, but won’t hold up or delay the shutter too much, letting me shoot when I want. I don’t see the point of using either “Release” or “Focus” in AF-C mode. “Release” won’t care if your focus is good or not (what’s the point of autofocus then?) and “Focus” won’t let you take a picture until focus is locked. If I want my focus to be that accurate, I will switch to AF-S mode instead. Just leave these two settings as shown above and forget about them.
Hopefully, the above scenarios will be useful for you to understand when to use different autofocus and AF-Area modes. Now might be a good time to go back and review the chart above and see how well you can understand it.
Tips to Improve Autofocus Performance in Low Light
As I have pointed out earlier, focusing in bright, sunny environments is often quite easy and our cameras handle that pretty well. But people start having all kinds of problems when shooting in low-light conditions, especially indoors. Here are some tips for you if you have challenges shooting in low light:
- Use the Center Focus Point. Whether your camera is equipped with 9 or 51 focus points, you do not want to use the focus points in the corners of the frame when shooting in low-light conditions, simply because they are not going to be as sensitive and accurate. The center focus point is often your best bet because it is a cross-type sensor that works better than any other focus point in your camera. But what about framing and composition if you have to focus in the center? For those situations, the solution is to move the autofocus function from your shutter release to a dedicated button on the back of the camera, then focus on your subject and recompose. This technique is called “focus and recompose” using back-button focusing. Most digital cameras, including entry-level ones can do this. Professional-level cameras have a dedicated button for focusing called “AF-ON”, which is specifically designed for back-button focusing and you can easily activate it through the camera menu (“Custom Settings” -> “AF-Activation” -> “AF-ON Only” on Nikon). But you have to be careful when recomposing your shots after focusing, especially when dealing with shallow depth of field. If you focus and then recompose, your focus plane will change, potentially resulting in an out-of-focus subject, so keep this in mind.
- Use the “AF-Assist” Feature. It is there for a reason – use it every time you have problems focusing in low-light. To activate it, make sure that “AF-Assist” is turned on in your camera menu and the AF-S mode is selected. If you have a Nikon Z mirrorless camera, make sure that the “Low-light AF” option is turned on as well. And don’t forget about using a speedlight in extremely low-light environments.
- Look for Contrast and Edges. Instead of trying to focus on plain, one-colored subjects, look for “contrasty” subjects that stand out from the background.
- Add More Light. Sounds pretty basic, but if you are having problems focusing, what is simpler than adding a few more lights or turning more lights in the room? Lola and I were once photographing a corporate event and the ballroom was so dim, that we had a hard time getting good shots. We both switched to AF-S and were using our flashes for focusing, but high ceilings and lack of ambient light were making our images look very flat and dull. Lola then approached an event coordinator and simply asked her to turn up the lights and our problems all went away and we came back with beautiful pictures!
- Watch Your Shutter Speed. It might look like bad focus, but it might actually be camera shake that causes your images to look soft. Using a camera with in-body image stabilization or a lens with optical image stabilization technology certainly helps, but still, make sure to keep your shutter speed relatively high. Check out my article on the reciprocal rule. If you have to work with slow shutter speeds, work on your hand-holding technique.
- Use Live View Contrast Detection AF. Try focusing in Live View mode using Contrast Detection AF. It is much slower than Phase Detection AF, but certainly more reliable in low-light situations. Whenever I use a tripod, I always try to use Contrast Detection AF, because it gives me better and more accurate results. Even manually focusing is much easier in Live View mode, since you see a lot more on the larger LCD than inside the optical viewfinder. Not something you have to worry about on most mirrorless cameras though, since they automatically switch to Contrast Detection AF in low-light situations.
- Use a Bright Flashlight. If your camera does not have a built-in AF-Assist lamp, use a bright flashlight and ask someone to point it at your subject while you try to focus. Switch to manual focus mode once focus is acquired, then ask your helper to turn off the flashlight and take a picture without you or your subject moving.
- Use Manual Focus. Kind of goes against the title of this section, but you should still learn how to manually focus your lenses and not be afraid to do it from time to time. Sometimes manually focusing your lens is quicker than trying to use any of the autofocus methods or tricks.
Autofocus – Photography Basics
If you would rather watch a video on the basics of autofocus and how it works, please watch the video below on YouTube:


