


In this article, I will explain how to calibrate Apple’s iMac and MacBook monitors using a hardware colorimeter and DisplayCAL software. Proper calibration is crucial for the best display quality.
As photographers, it is important for us to establish a consistent and accurate editing environment, which means that ideally, we should be looking at an accurate representation of colors in photographs in order to properly post-process them. Because of this, our output devices such as monitors and printers should always be properly calibrated to reproduce accurate colors consistently.
With Apple being a key player in the photography industry with its iMac, MacBook, and Mac Pro hardware, specifically tailoring products for enthusiast and professional needs, there seems to be a great deal of misunderstanding and confusion about these products, their factory calibration / out-of-the-box accuracy and the proper process of calibrating them. Unfortunately, many photographers seem to think that they don’t need to worry about calibration at all with Apple products, which is certainly not the case.
In this article, I am not going to go into details about color management and calibration, as these topics have been explained in detail by someone who is far more knowledgeable than me. I would recommend getting started with the Basics of Monitor Calibration, where you will find plenty of valuable information on monitor calibration. Instead, I will provide step-by-step instructions on how you can quickly and accurately calibrate your Apple Mac display for photography needs.
Apple Display – Out-of-the-box Color Accuracy
First, let’s take a look at a brand new, uncalibrated iMac screen and see how color accurate it is straight out of the factory. This is important to see for those who think that they can safely edit their images without ever doing any kind of display calibration. I went ahead and used the i1Display Pro colorimeter, along with DisplayCAL / ArgyllCMS software to verify its accuracy (more on that further down below). Let’s take a look at the below measurement report:
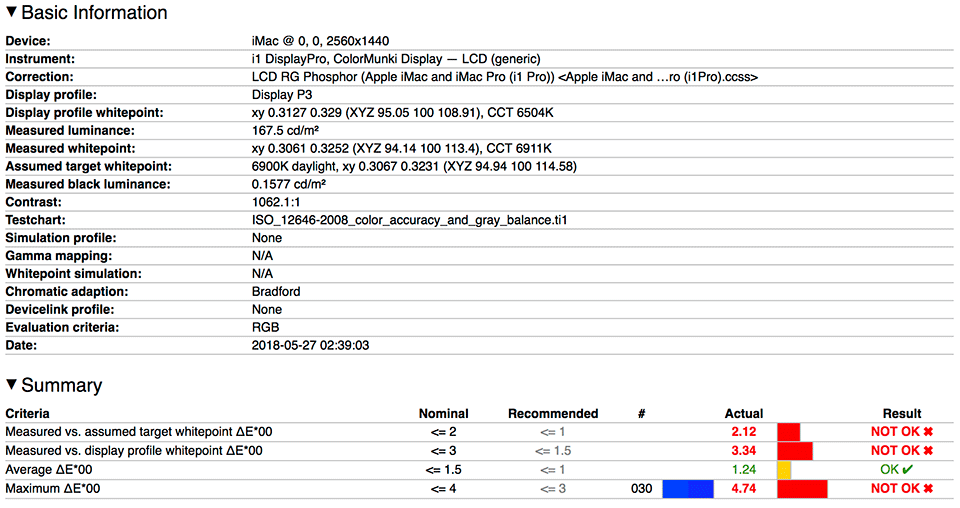
As you can see, this simple test reveals that the iMac screen is far from being color-accurate out of the box. With brightness levels being too high for proper editing and automatic brightness adjustment turned on, I knew that the default settings just wouldn’t work. My blues were out of whack and the reds were also oversaturated, so this monitor definitely needed calibration. In fact, I can run the same test for most similar monitors out there and they will all reveal similar results, which shows that proper screen calibration with a good colorimeter and understanding of color calibration software is very important.
Hardware Colorimeters vs Software Calibration
Now let’s get one thing straight – as a photographer, you do not want to even try to self-calibrate a monitor without proper hardware and software. Your eyes and your brain’s perception of colors is pretty horrible, so trying to use software tools to calibrate a monitor will potentially make your monitor even worse than what you started with. So despite those built-in OS calibration tools and other third-party software that seemingly help make your colors more accurate, you should avoid using those at all costs!
In addition, while it might be tempting to try out different built-in display profiles within your operating system, those don’t help in achieving proper calibration either, and they can also make things look much worse than the defaults. Lastly, don’t attempt to use a monitor profile from someone who calibrated their screen, even if both screens are identical. This doesn’t work due to things like differences in brightness levels, tolerances, age of display, etc. This is why each display has to be calibrated individually! So when it comes to being able to properly calibrate a screen, a proper hardware colorimeter is a must-have tool and unfortunately, there are no shortcuts here.
It is also important to note that there is a distinction between what is commonly referred to as “hardware calibration”, where a wide-gamut monitor that has a built-in LUT (Look-Up Table) can be hardware-calibrated, and software calibration, where the video card changes color output to match the calibration profile. Since none of the current Apple monitors come with LUT and cannot be hardware-calibrated, only the software calibration method will work. And even for the latter, you will need to use a good quality colorimeter with the right kind of software to achieve the desired results.
Colorimeter Choice: X-Rite vs Datacolor
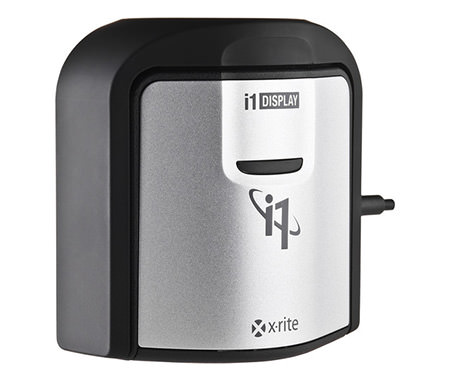
Speaking of colorimeters, while there are a few manufactures that make hardware colorimeters on the market, the two biggest players that make consumer-grade colorimeters are without a doubt, X-Rite and Datacolor. X-Rite has a number of different colorimeters, with the i1Display Pro being the most popular, while Datacolor’s top choice is the “Spyder” colorimeter that comes with different software options. For example, the SpyderX can be bought in “Pro” and “Elite” packages, which have the same underlying hardware.
Personally, I have used colorimeters from both companies. My prior experience with Datacolor colorimeters wasn’t particularly great, especially when calibrating multiple screens and assessing darker tones. I could never achieve consistent calibration on a dual monitor setup, which was a big problem for me. It turned out that Datacolor used to make colorimeters with gelatin filters that fade and deteriorate over time. When I found out that X-Rite uses high-quality dichroic glass filters, I switched to i1Display Pro and never looked back. To be fair, the newer SpyderX model by Datacolor supposedly uses much better glass filters, but I have not had a chance to test it out yet, so I cannot speak for its quality.
With my X-Rite i1Display Pro, I was finally able to make a dual monitor setup work where things looked identical, and both calibration and verification yielded very consistent results.
I know everyone’s experience is different, but if you ask the right people who are well-versed in calibration, they will all point to i1Display Pro being the industry standard. It makes sense – after-all, most high-end monitors from NEC and EIZO are calibrated with i1Display Pro hardware, and for good reasons, accuracy and consistency being the most important ones.
As you will see further down in this review, I used X-Rite’s i1Display Pro colorimeter to calibrate my Mac screens. I will not be providing instructions for calibrating monitors using Datacolor Spyder hardware and software, but if that’s what you currently own, you should be able to calibrate your monitor using the same steps below.
X-Rite Software vs DisplayCAL / ArgyllCMS
X-Rite products are shipped with i1Profiler software, which can be used for calibrating your Apple Mac screen. While you can achieve pretty good results with this software and it is very easy to use, I personally prefer the combination of ArgyllCMS and DisplayCAL instead, which can be used to software-calibrate any monitor with a lot of different options.
With ArgyllCMS + DisplayCAL you can do much lengthier calibration of the screen involving many more color patterns than what is found on X-Rite’s i1Profiler, so that you can end up with more accurate results. In addition, ArgyllCMS + DisplayCAL can be used to assess the quality of the Apple Mac screen and measure things like uniformity, where you are able to assess the brightness levels of different areas of the screen. In fact, if you have just purchased a Mac, I would highly recommend using these tools to see if your sample is worth keeping. Apple’s quality control is generally very good, but it doesn’t mean that you should just skip testing the screen. If the display panel is defective, you will end up with a lot of problems over time.
DisplayCAL Calibration
Now that we have all that behind us, let’s start the process of calibrating your Mac monitor. The first step will be to download and install DisplayCAL. The process of installing the software is pretty simple. Once you download the package and open it, simply drag the DisplayCAL icon into your Applications folder and you are good to go.
Upon launching the tool, you will be asked to download ArgyllCMS, which you will also need to install afterward. From there, fire up DisplayCAL and you will be presented with a screen that looks like this:
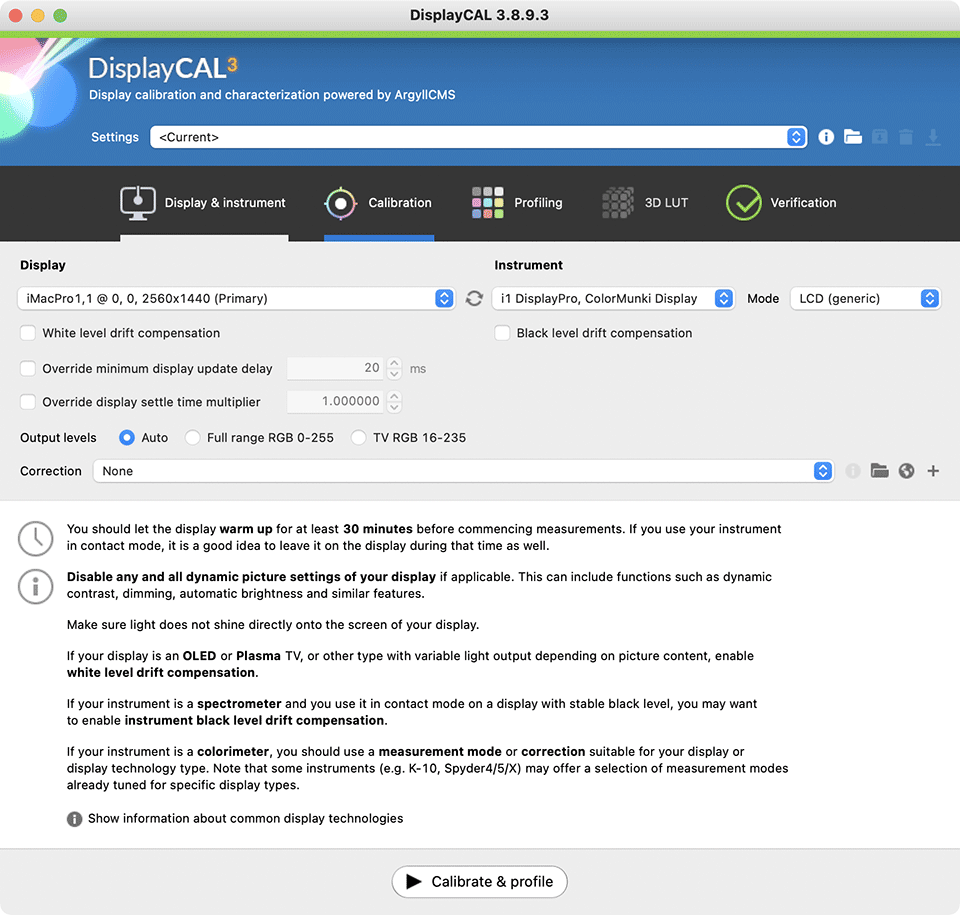
Go ahead and connect your colorimeter (in this case the X-Rite i1Display Pro) to one of the USB ports on the back of the Mac – you do not want to use any external tools or USB hubs, since they might not provide sufficient power or have other issues that might impact the performance of the colorimeter. Once connected, you should be able to see it under the “Instrument” dropdown of the software, as shown above.
DisplayCAL has a ton of different options and I am not going to go over them all – I will only reveal the essentials. As you can see from the above screenshot, the software has 5 different tabs available. The first three tabs are used for calibration and those are the ones we will focus on the most.
Let’s start with the first tab called “Display & instrument”. This is perhaps the most important tab of them all because it relates to your monitor’s technology – if you choose the wrong monitor type, you might end up with pretty screwed up results. This is found in the “Corrections” drop-down. When you click the drop-down, you will see a number of different options from “Auto” to “WOLED” screens.
Apple’s iMac and MacBook screens are best calibrated with the “LCD PFS Phosphor WLED IPS” correction, and there is now one provided with the DisplayCAL software that you can use to calibrate any iMac, iMac Pro, MacBook Air or MacBook Pro screens with P3 color gamut. Technically, it is named “LCD PFS Phosphor WLED IPS, 99% P3 (MacBook Pro Retina 2016)”, but it works on other Apple P3 displays as well (I successfully tested it on the iMac Pro, MacBook Pro 2016, and MacBook Air M1).
Once you select that profile, the Display & instrument page should look like this:

Next, click the “Calibration” tab and set the options as shown below:

Here, we are setting the White Point to 6500K (D65), White level to 120 cd/m2 and Gamma to 2.2 – recommended settings for editing photographs. If you want better accuracy, set the Calibration speed to High or preferably Medium, as shown above.
The last tab we need to visit is “Profiling”. Go ahead and set the options to the ones below:
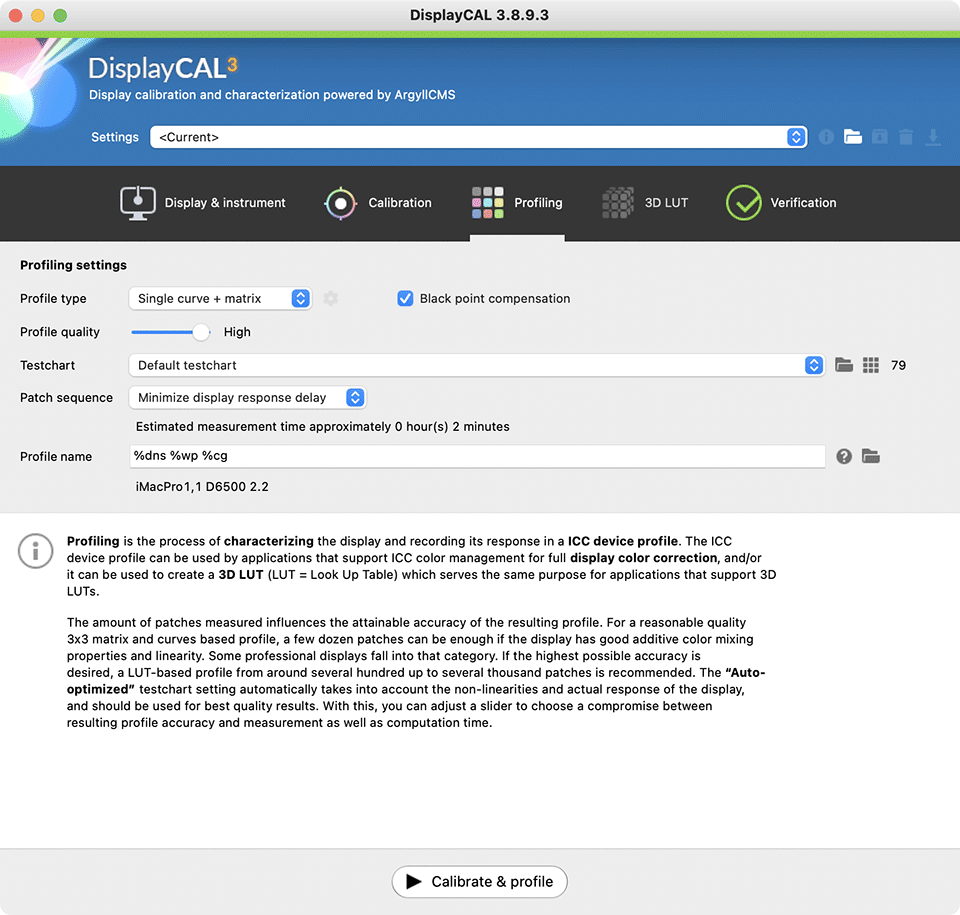
The key setting here is to choose “Single curve + matrix” as the Profile type. We will pick “Default testchart” as the test chart, which should be sufficient, as it will run 79 different colors for calibration. I like to keep my profile names simple, but if you have other preferences, you can set them under “Profile name”.
It is now time to calibrate – go ahead and click the “Calibrate & profile” button on the bottom of the screen to get started.
The software will show a “Measurement area” screen in the middle of the screen, with a blue “Start measurement” button. Go ahead and open up the colorimeter, then place it flush on the screen, right in the dead center. Click the “Start measurement” button to kick off the initial process. It will flash a few colors, then you will be presented with another screen called “Interactive display adjustment”. The software needs to measure the brightness of your screen and set it to 120 cd/m2 as we previously picked, so this is where you will be doing it from.
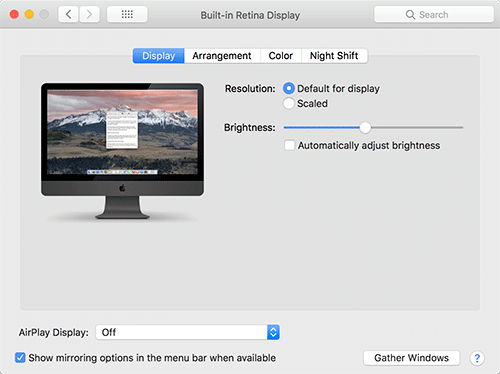
Since the Apple Mac screens generally do not have Automatic Display Correction, you will need to adjust the brightness of your screen manually using the “Displays” icon within your MacOS “System Preferences”. Go ahead and click the “Start measurement” button, then wait until the software starts actively measuring the brightness. While it is doing so, go ahead and open up System Preferences -> Displays, then after you uncheck “Automatically adjust brightness” option, start moving the “Brightness” slider:
Move it very slightly with your mouse until you see a green checkmark in DisplayCAL, as shown below:
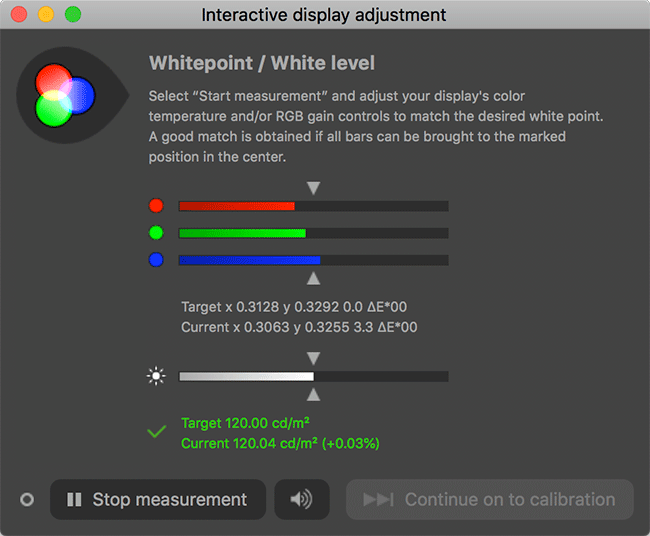
This means that the desired brightness level has been achieved. Click the “Stop measurement” button – we are finally ready to calibrate the screen! Go ahead and click the “Continue on to calibration” button to get the process started. With the “Medium” calibration option we selected earlier, it should take about 10-15 minutes to run through the calibration process. Once it is complete, you will be asked to install a profile, as shown below:
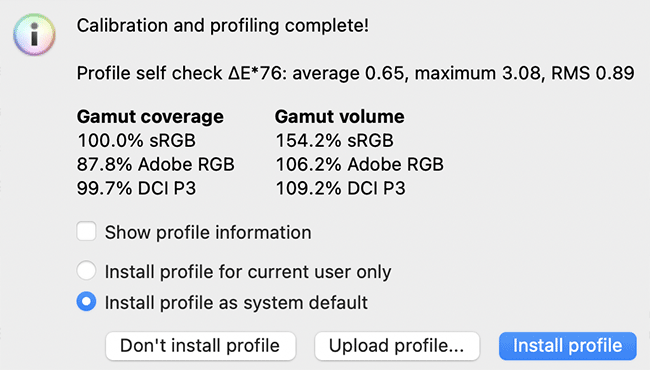
It looks like I was able to get to 100% of sRGB and very close to 100% of DCI P3 coverage, while hitting 87.8% of Adobe RGB, which is pretty good for an Mac screen. Go ahead and select “Install profile” to install the newly-created profile on your macOS.
Validating Calibration Results
Now that the monitor is calibrated, I would recommend running calibration verification to make sure that the results are good. This is what the last “Verification” tab within DisplayCAL is for! Go ahead and click the tab, pick “ISO 12646:2008 color accuracy and gray balance” from the drop-down, then click the “Measurement report” button on the bottom of the screen. It will ask you to save the report, so just pick a location where you want to save the report, then click “Save”.
From there, the software will go through similar steps as above, except this time it will flash through a bunch of colors while measuring them with the colorimeter. After the process is complete (which should only take a couple of minutes), your browser will open up the report, which looks very similar to the one I showed you at the beginning of this article:
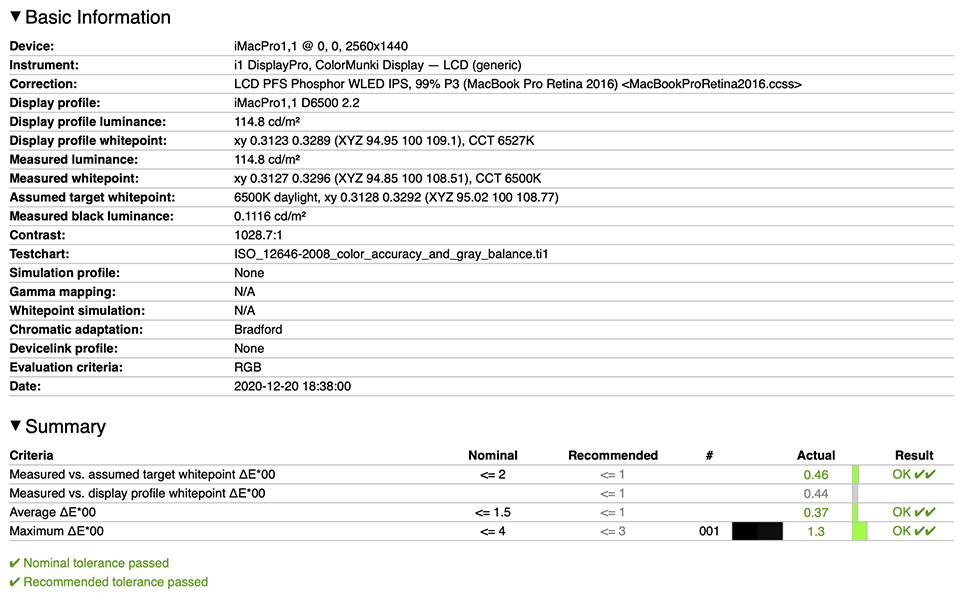
As you can see, the results are much better in comparison to the first test, with whitepoint deltas very low and maximum delta staying around 1, which is pretty good! As you scroll down the report, you will be able to see deltas broken down by color, along with a few nice graphs on the bottom. Just scroll through these and make sure that nothing stands out – you want all the bars to look green, which is an indication of good color calibration.
Uniformity Test
The last test I would recommend to run to make sure that your iMac screen is lit evenly, is the Uniformity test. It is not in the main area of the DisplayCAL software, so you will need to go to the menu, then go to Tools -> Report -> Measure display device uniformity… Go with the standard grid of 5×5 and click OK to bring up the uniformity test screen:
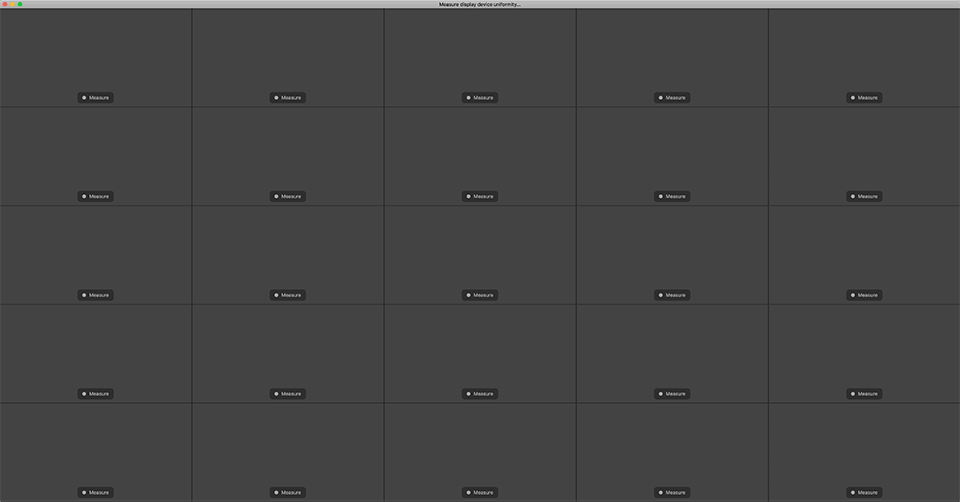
As you can see, there is a small “Measure” button in each grid, which means that you will need to place the colorimeter within each rectangle, then click this button. What this will do, is flash white colors in each rectangle, then measure the brightness. At the end of the process, you will be presented with a similar HTML report, which will show how bright each area is. Look for any areas that show up in red, which could mean that those areas are darker than they should be. This should be a pretty good test to see if your screen has any uniformity problems.
That’s all there is to it. Once again, big thanks to my friend who goes by the nickname “Color Consultant” for guiding me with the settings. I couldn’t do it without him. If you have any questions about any of the above, please let me know in the comments section below. And as always, check out the comments section of this article for some helpful feedback from Color Consultant, as well as some of our readers!

