


One of the three most important settings in photography is Shutter Speed, the other two being Aperture and ISO. Shutter speed is responsible for two particular things: changing the brightness of your photo and creating dramatic effects by either freezing action or blurring motion. In the following article, we will explain everything you need to know about it in very simple language.
Shutter speed exists because of the camera shutter – which is a curtain in front of the camera sensor that stays closed until the camera fires. When the camera fires, the shutter opens and fully exposes the camera sensor to the light that has passed through your lens. After the sensor is done collecting the light, the shutter closes immediately, stopping the light from hitting the sensor. The button that fires the camera is also called “shutter” or “shutter button,” because it triggers the shutter to open and close.
What is Shutter Speed?
Shutter speed is the length of time the camera shutter is open, exposing light onto the camera sensor. Essentially, it’s how long your camera spends taking a photo. This has a few important effects on how your images will appear.
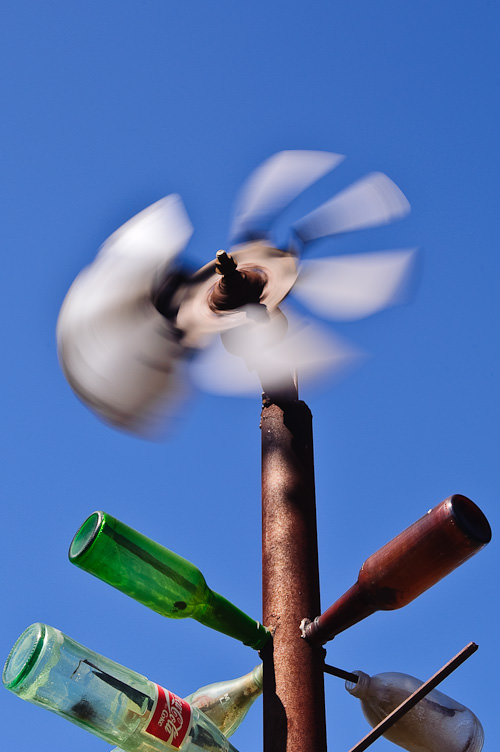
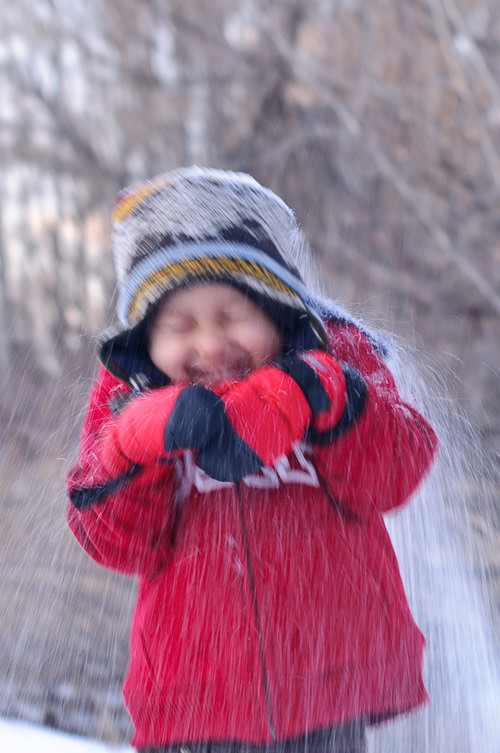
When you use a long shutter speed (also known as a “slow” shutter speed), you end up exposing your sensor for a significant period of time. The first big effect of it is motion blur. If your shutter speed is long, moving subjects in your photo will appear blurred along the direction of motion. This effect is used quite often in advertisements of cars and motorbikes, where a sense of speed and motion is communicated to the viewer by intentionally blurring the moving wheels.
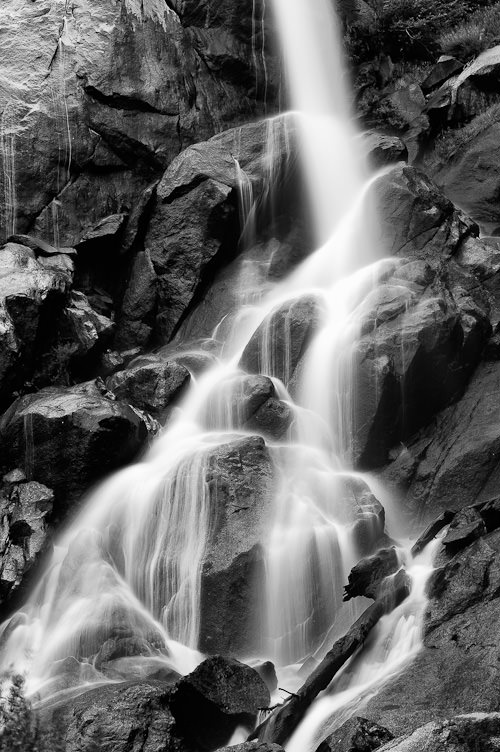
Slow shutter speeds are also used to photograph the Milky Way or other objects at night, or in dim environments with a tripod. Landscape photographers may intentionally use long shutter speeds to create a sense of motion on rivers and waterfalls while keeping everything else completely sharp.
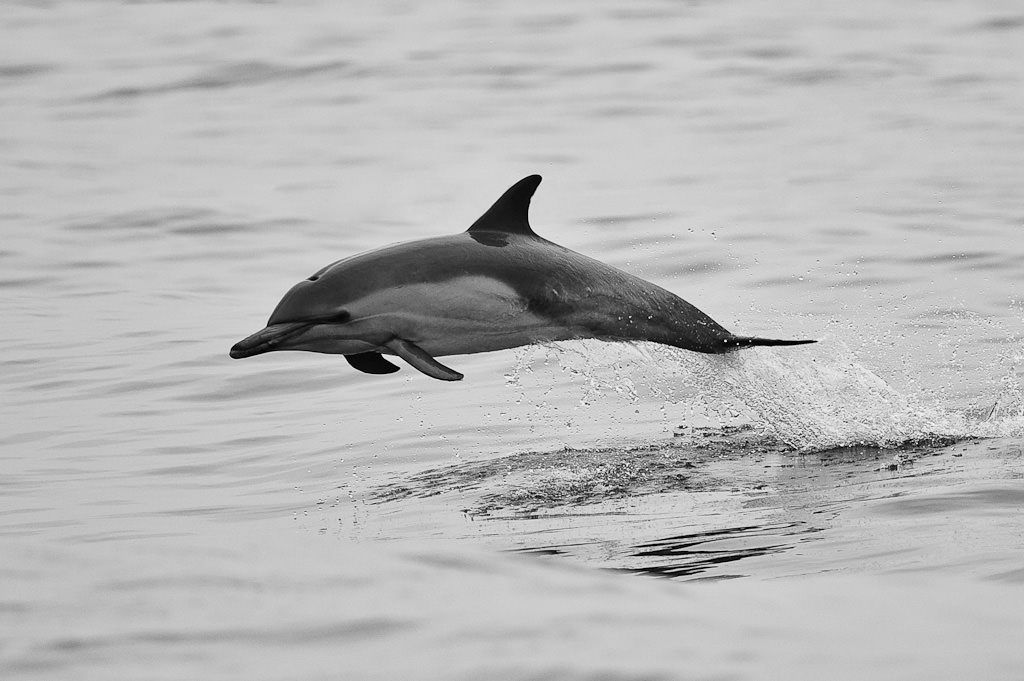
On the other hand, shutter speed can also be used to do just the opposite – freeze motion. If you use an especially fast shutter speed, you can eliminate motion even from fast-moving objects, like birds in flight, or cars driving past. If you use a fast shutter speed while taking pictures of water, each droplet will hang in the air completely sharp, which might not even be visible to our own eyes.
All of the above is achieved by simply controlling the shutter speed. In summary, quick shutter speeds freeze action, while long ones create an effect of motion when you photograph moving objects.
How Shutter Speed is Measured
Shutter speeds are typically measured in fractions of a second when they are under a second. For example, 1/4 means a quarter of a second, while 1/250 means one-two-hundred-and-fiftieth of a second (or four milliseconds).
Most modern DSLRs and mirrorless cameras can handle shutter speeds of 1/4000th of a second at the fastest, while some can handle even quicker speeds of 1/8000th of a second and faster. On the other hand, the longest available shutter speed on most DSLRs or mirrorless cameras is typically 30 seconds. You can use a longer shutter speed by using external remote triggers, if necessary.
Shutter Speed and Exposure
The other important effect of shutter speed is on exposure, which relates to the brightness of an image. If you use a long shutter speed, your camera sensor gathers a lot of light, and the resulting photo will be quite bright. By using a quick shutter speed, your camera sensor is only exposed to a small fraction of light, resulting in a darker photo.
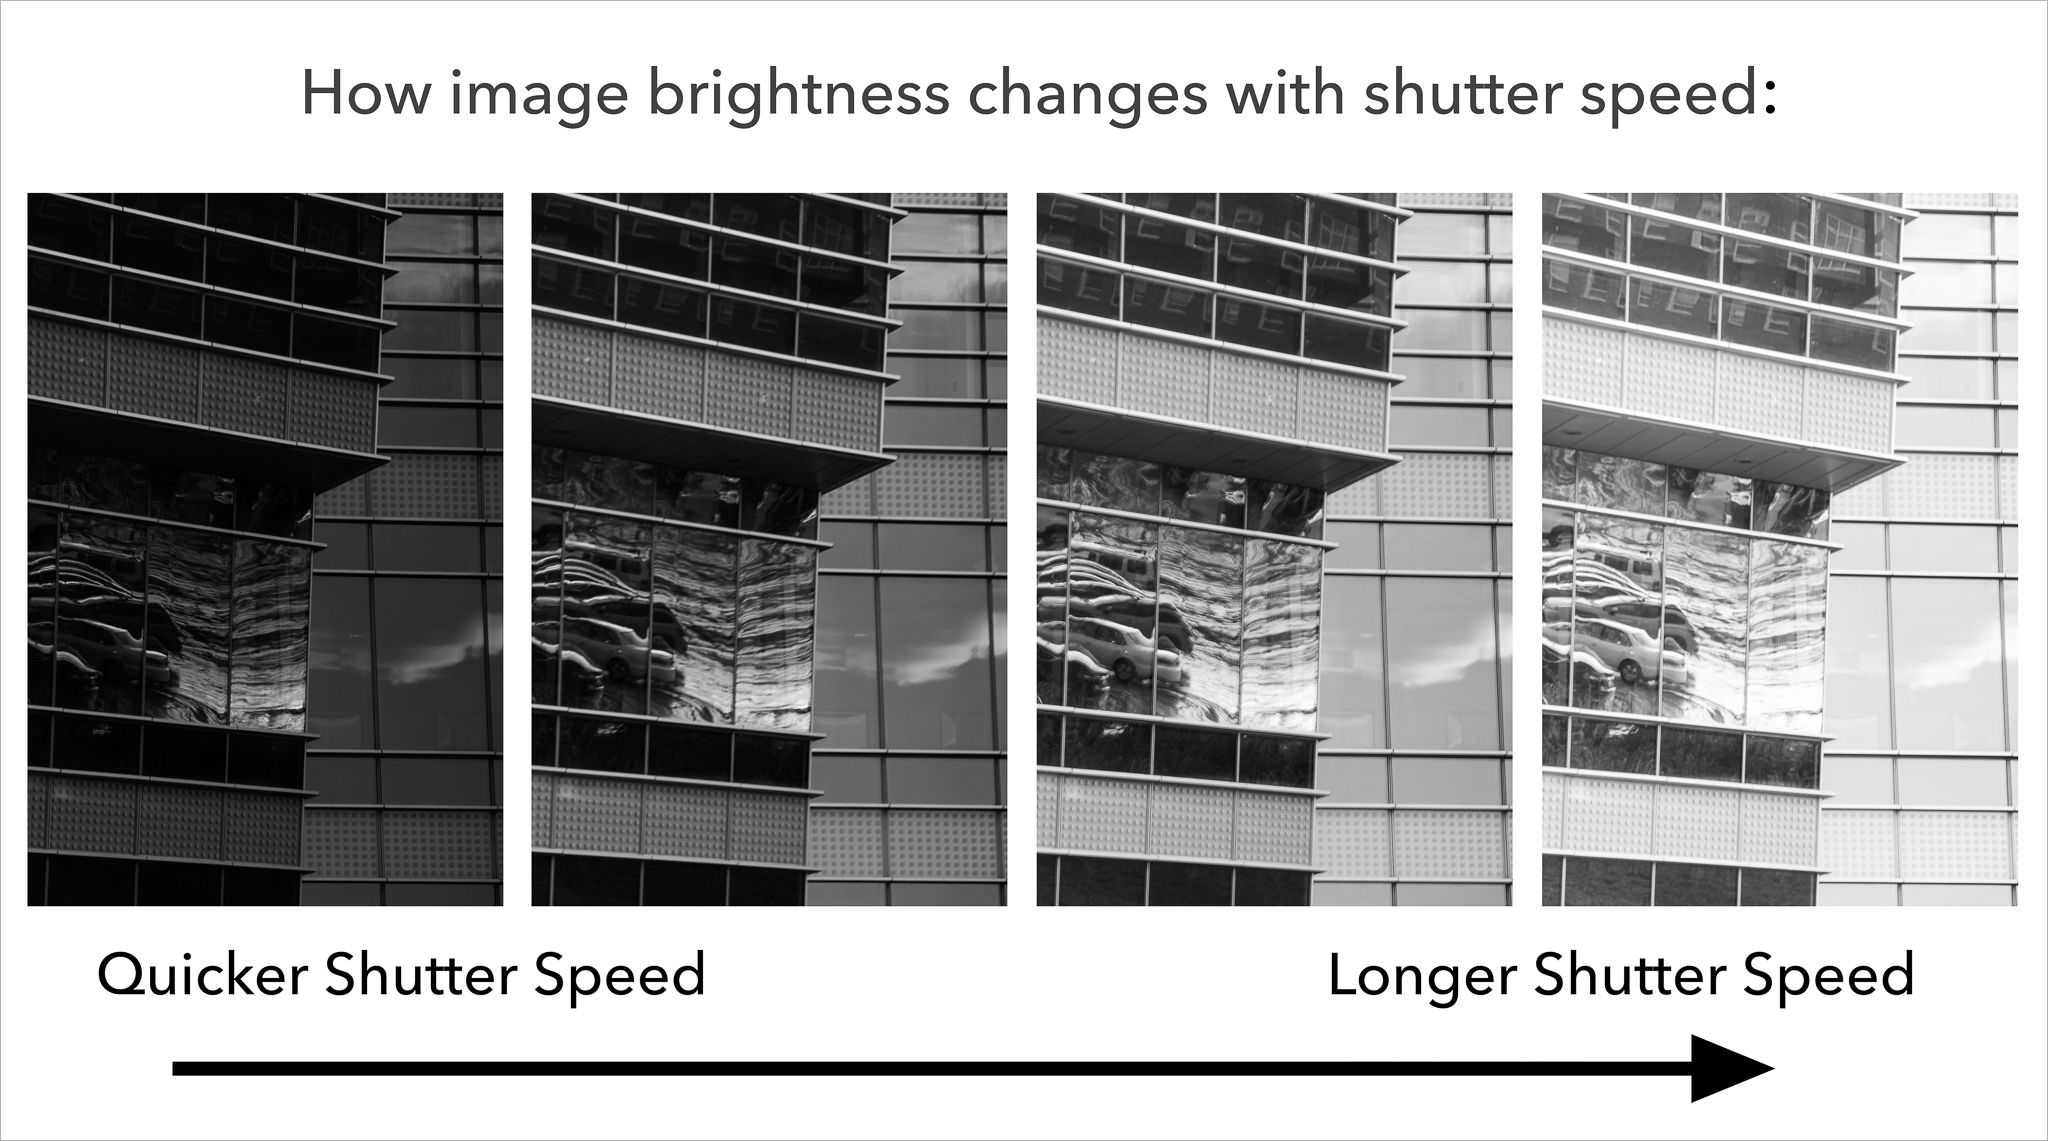
However, shutter speed is not the only variable that affects the brightness of an image. There are also aperture and ISO, along with the actual brightness of the scene in front of you. So, you have some flexibility when you’re deciding on a shutter speed, but you need to pick your other settings carefully.
Shutter speed can be a vital tool to capture a photo of the proper brightness. On a sunny day, you may need to use a fast shutter speed so that your photo isn’t overexposed. Or, if it is dark out, a long shutter speed may be necessary to avoid a photo that is too dark (which, in turn, could require a tripod, due to motion blur from handholding the camera). For many people, this is the main reason to adjust shutter speed: to make sure your photos are the proper brightness. Still, motion blur concerns are also very important, and should not be overlooked.
Fast, Slow and Long Shutter Speeds
A fast shutter speed is typically whatever it takes to freeze action. If you are photographing birds, that may be 1/1000th second or faster. However, for general photography of slower-moving subjects, you might be able to take pictures at 1/200th second, 1/100th second, or even longer without introducing motion blur.
Long shutter speeds are typically above 1 second – at which point, you will need to use a tripod to get sharp images. You would use long shutter speeds for certain types of low-light / night photography, or to capture movement intentionally. If anything in your scene is moving when you use long shutter speeds, it will appear very blurry.
In between, shutter speeds from 1/100th second to 1 second are still considered relatively slow. You may not be able to handle them without introducing camera shake from your hands, especially close to the one-second mark.
Also, this strongly depends upon your lens. Some lenses, such as the Nikon 70-200mm f/2.8, have specific image stabilization (also known as “vibration reduction”) technologies within the lens that can help photographers take pictures at very slow shutter speeds when hand-holding cameras, without introducing camera shake. Other lenses do not have vibration reduction, which means you need to use the reciprocal rule instead to determine how long your shutter speed should be without introducing blur from camera shake. It is also important that you know how to hold a camera.
How to Set Shutter Speed
Most cameras handle shutter speeds automatically by default. When the camera is set to “Auto” mode, the shutter speed is selected by the camera without your input (and so are aperture and ISO). However, you can still set the shutter speed manually if necessary:
- By setting the camera to “Shutter Priority” mode, you choose the shutter speed, and the camera automatically selects the aperture.
- By setting the camera to “Manual” mode, you choose both shutter speed and aperture manually.
Within both of these modes, you can choose to set ISO manually or automatically.
In most cases, we recommend letting the camera select the correct shutter speed for you. Still, watch to be certain that you aren’t introducing too much motion blur in a photo (or freezing motion that you want to be blurred). I cover more of this in an article on camera modes, but I tend to shoot in “Aperture Priority” mode 95% of the time, letting the camera calculate the shutter speed automatically.
How to Find Shutter Speed
Do you know how to find what your camera shutter speed is set to? It is typically very easy to find it. On cameras that have a top panel, the shutter speed is typically located on the top left corner, as circled:
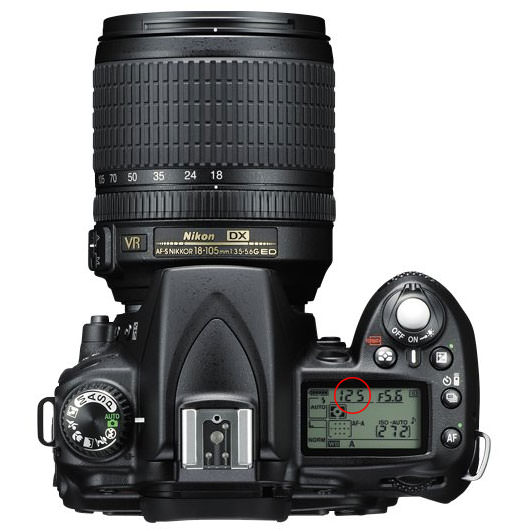
If your camera does not have a top LCD, like some entry-level DSLRs, you can look through the viewfinder, where you will see the shutter speed on the bottom-left side. And if your camera has neither a top LCD nor a viewfinder, like many mirrorless cameras, you can see your shutter speed simply by looking on the back screen.
On most cameras, the shutter speed will not show up directly as a fraction of a second – it will typically be a regular number. When the shutter speed is longer than or equal to one second, you will see something like 1” or 5” (with the quotation sign to indicate a full second).
If you still cannot find the shutter speed, set your camera to “Aperture Priority” mode, and make sure that you have turned “AUTO ISO” off. Then, start pointing around your camera from dark to bright areas. The number that changes will be your shutter speed.
We also made a video explaining shutter speed if that’s how you prefer to learn things:
Shutter Speed FAQ
Below are some of the frequently asked questions related to shutter speed:
And if you want to continue learning from our Photography Basics Guide, below is our Table of Contents. The next chapter in the guide covers everything you need to know about aperture.
Photography Basics Organization
Chapter 1: Photography Basics Introduction
Chapter 2: What Is Photography?
Chapter 3: Shutter Speed
Chapter 4: Aperture
Chapter 5: ISO
Chapter 6: Composition
Chapter 7: Metering
Chapter 8: Camera Modes
Chapter 9: Focusing
Chapter 10: Flash
Chapter 11: Camera Settings
Chapter 12: How to Take Sharp Pictures
Chapter 13: Photography Tips for Beginners
Chapter 14: Photography Ideas

