


Color spaces are essential in photography; they apply in some way to every photo you take. The most well-known color spaces are sRGB, Adobe RGB, and ProPhoto RGB. But what makes them so important? Beware: There’s a lot of misinformation about this topic online. Outdated and inaccurate recommendations abound – but so does a lot of valuable information, if you’re willing to learn it. This article introduces sRGB, Adobe RGB, and ProPhoto RGB, and when to use each one.
I’ll preface this article, like most technical articles I write, by saying that this is a complex subject! You might want to dig down and read it a couple times to fully internalize how everything works. I did my best to write it all in plain English, as well as define complex terms in context, so hopefully it’s still easy to understand. You’re also free to ask questions in the comments section at the end, and I’m happy to help clarify anything you’re still wondering about.
1. What Are sRGB, Adobe RGB, and ProPhoto RGB?
sRGB, Adobe RGB, and ProPhoto RGB are three of the most commonly used color spaces in photography.
“Color spaces” is not some fancy term meant to confuse or bewilder. It just means a set of colors – a container, almost. If you have two paints (say, red and blue) plus a white canvas, your entire color space is just the colors you can make by mixing the two paints. And yes, that includes painting more lightly to let some of the white canvas shine through.
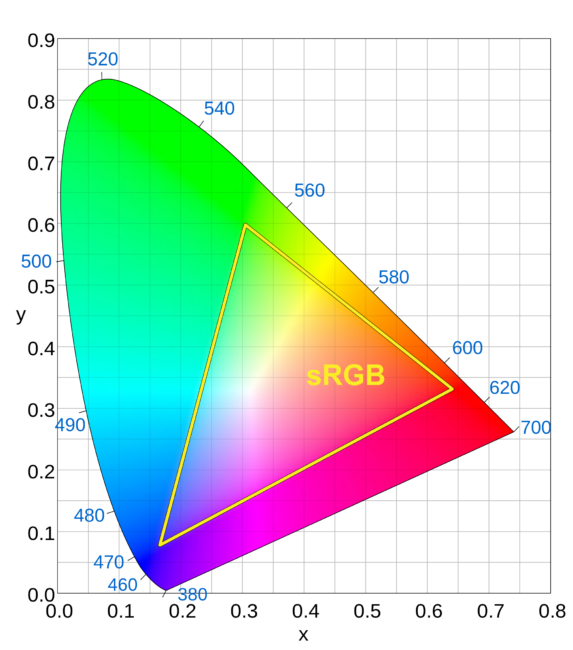
A good way to envision color spaces is to look at a set of all the colors people can see. (If no one can see it, it’s not a “color” anyway – colors are subjective like that.) You may have seen an illustration like this before:

The diagram above represents every color we can see, although note that it’s a two dimensional figure (x and y axis only), so it doesn’t account for darker colors, i.e., luminance.
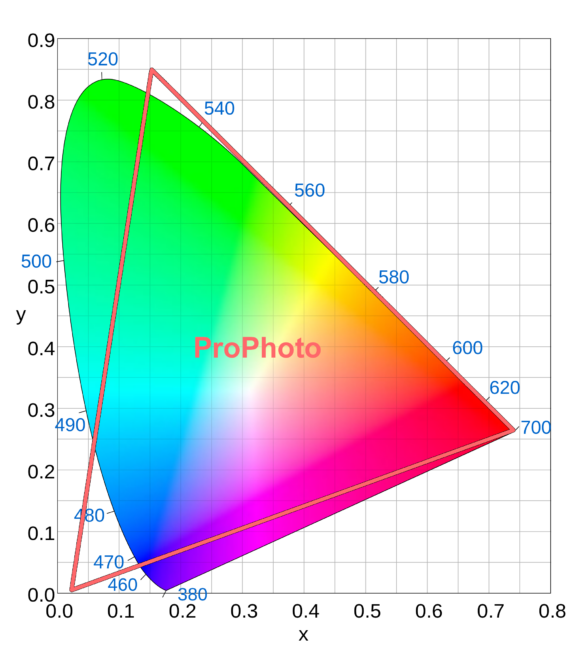
So, how do sRGB, Adobe RGB, and ProPhoto RGB fit into this? Quite simply, they intersect with the diagram above (and, in the case of ProPhoto, actually stretch beyond it in places). Here are the different shapes of the sRGB, Adobe RGB, and ProPhoto color spaces. If you’re first learning about these three color spaces, the simple diagrams below might answer some of your questions already:

And here’s how they all look overlaid together:
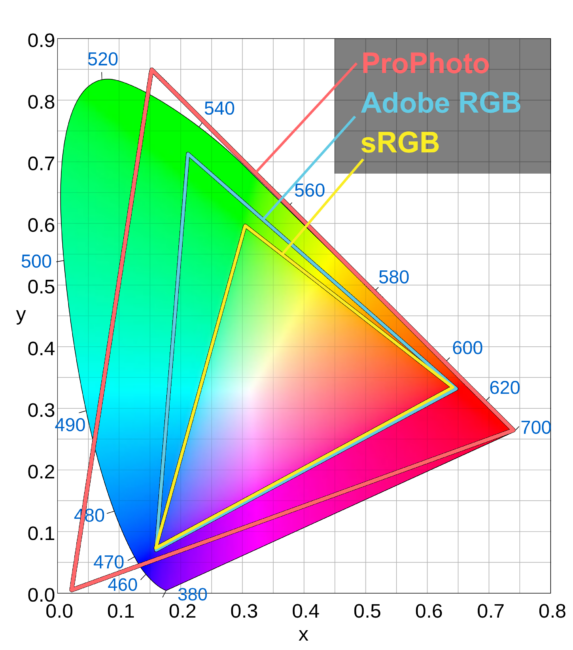
As you can see, sRGB is the smallest color space, with a gamut (another word for range) only covering a small portion of what our own eyes can see. The Adobe RGB gamut is larger, particularly in the green and cyan colors. It allows for more saturation (“chroma”) in those areas.
ProPhoto RGB is the largest of the three – and possibly the most interesting, since it includes “colors” outside what we can see. We call these imaginary colors just to induce fear in other photographers. You physically cannot see them; that’s what makes them imaginary. They aren’t especially important to this discussion, though. ProPhoto RGB only includes those values because it allows the gamut of real colors to be larger than that of other color spaces, including sRGB and Adobe RGB.
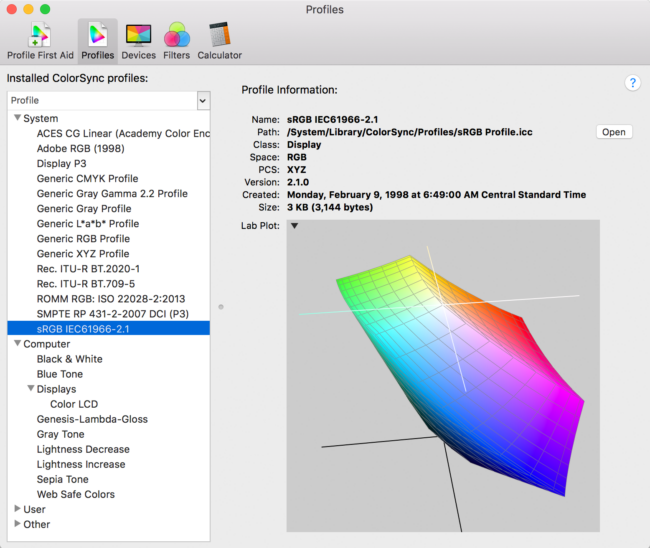
Remember, too, that these are just 2D representations. Here’s a 3D image of the sRGB color space (viewed from slightly overhead), so you can visualize the role that luminance plays:
2. Understanding RGB Values
Let’s say that you want to specify a particular color, maybe a slight shade of beige-white. Color spaces are defined mathematically. Every color you could possibly think of has, essentially, its own “coordinates” within the color space so you can find it exactly. But keep in mind that these coordinates are specific to each color space. The same values won’t result in the same color in both sRGB and Adobe RGB, for example.
“RGB” stands for red, green, blue. This is what specifies the color you’re looking for – three values, one each for red, green, and blue. In sRGB color space, the beige-white color in question is specified as RGB 255, 248, 231 – meaning that the red channel value is 255, green is 248, and blue is 231.
But “255, 248, 231” points to a different color in Adobe RGB space, as well as in ProPhoto RGB space. That is very important to know; it’s why your photos need to include information about their color space. Otherwise, how can a computer application know what color you mean by “255, 248, 231”? It simply can’t tell.
Spoiler alert: Despite how important it is, some applications don’t read the color space of a photo. They just assume you’re using a default color space (more on that later). This is a problem for hopefully obvious reasons. You don’t want your browser or application to see the RGB coordinates “120, 140, 160” in both sRGB and ProPhoto color spaces and think they’re the same color.
3. Understanding Bit Depth
Another important topic to this discussion is bit depth, also known as color depth – simply how many bits of data are used to create each pixel.
The baseline in photography is usually 8 bits per pixel, meaning that each individual pixel can represent 2^8 or 256 colors. But your camera has red, green, and blue pixels. So that’s 256 shades of red, 256 shades of green, and 256 shades of blue. The total is 256 x 256 x 256, or a whopping 16,777,216 RGB values.
But why stop there? It’s common to work with photos up to 16 bit per channel, leading to an incredible 281 trillion RGB values at your disposal. Although this may seem absurd and unnecessary – it’s far more than the human visual system can perceive – there are benefits to using 16-bit color while you’re editing a photo. Specifically, it makes gradients in an image as smooth as possible, with minimal banding.
(Note that calling all of these 281 trillion RGB points “colors” is a bit misleading, since color is defined based on human perception. Sure, there are trillions of “color codes,” but many of them are too similar for us to notice a difference. And recall that some of ProPhoto’s color codes refer to imaginary colors anyway – ones we cannot see.)
3.1. Do Photos in Large Color Spaces Have More Colors than Others?
One major confusion I often see is the idea that photos in large color spaces like ProPhoto have “more colors” than others.
No! The color space of a photo says nothing about total number of colors in an image. ProPhoto RGB may be “bigger” in terms of range, but an image in ProPhoto RGB color space doesn’t have more colors than a photo in sRGB. An 8-bit per channel photo is limited to about 16.8 million RGB values, no matter what color space it’s in. Those values are simply spread out farther in color spaces like ProPhoto – potentially leading to a problem known as banding.
3.2. Bit Depth and Banding
The larger your color space, the more important it is that you work with higher bit depth photos. In sRGB, using 8-bit per channel color will often result in smooth gradients that are just fine, with no perceptible banding. But those same 16.8 million colors in ProPhoto will be by definition farther apart from one another, since they’re spreading out to fill a bigger “container.” This makes it more likely that you’ll see banding in gradients in your photos.

You can work around this easily by avoiding 8-bit color with ProPhoto images.
4. Working Space vs Output Space
There are two stages along the photo pipeline where you need to choose a color space: post-processing and outputting your image.
Okay, if you shoot JPEG (don’t), you also have to make this decision in camera, at least with some cameras (which have sRGB and Adobe RGB options). RAW shooters can ignore this menu option if they want. It will change the preview on the rear of your camera screen, so I recommend picking Adobe RGB, but it doesn’t alter the RAW data you capture.
Below, I’ll narrow down the importance of picking the right color space for both post-processing and output.
4.1. Working Space
When you post-process a photo, you have to choose which working space you’re in. This is the color space your post-processing software restricts you to use; no edit you make can lead to a color found outside your chosen working space. In general, it is ideal that your working space is ProPhoto RGB when you edit a RAW photo. That’s because RAW photos often contain colors outside of both sRGB and Adobe RGB color spaces, especially in high-saturation shadow regions. If your photo’s working space is sRGB, you’ll automatically clip any colors that fall outside the sRGB range for every photo you edit. (Some software, like Lightroom, doesn’t even let you specify sRGB as your working space for this reason.)
Photoshop’s ideal settings are a bit tricky, and there are a few different philosophies on the best practices. But if you’re unsure, just set Edit > Color Settings > RGB > Preserve Embedded Profiles. That way, any ProPhoto images you open from Lightroom, Adobe Camera RAW, etc., remain in ProPhoto. And be sure to enable the checkboxes below so you know about any mismatches when they appear. (Another possibility is to select RGB working space to ProPhoto and “Convert to working RGB” so all your Photoshop documents are ProPhoto, for the same result in most cases.)
This is critical! A lot of photographers use software like Adobe Camera RAW or Lightroom for many of their important edits, then open the image in Photoshop. But their Lightroom export settings may create images in sRGB or Adobe RGB working space, not realizing that this clips colors beyond it. Instead, click on the blue link at the bottom of Camera RAW and change the images to ProPhoto, 16-bit. In Lightroom, go to Lightroom > External Editing > File Format TIFF, Color Space ProPhoto, Bit Depth 16.
Equally critical! If you just realized that you’ve been using sRGB or AdobeRGB for Camera RAW’s or Lightroom’s external editing settings, and you’re rushing to change it to ProPhoto, hang on for just a minute. You’re about to do something useful – you’re avoiding clipping colors outside the sRGB space for no reason – but it comes with some responsibility. You now have an extra step when exporting images from Photoshop to the web: converting them to sRGB. That’s easy to do with Edit > Convert to Profile > sRGB. Converting to sRGB for web images is essential; don’t let a ProPhoto image loose on the world.
4.2 Output Space
Output space is merely the color space chosen for your final photo. The ideal color space depends on your output medium, but each one – sRGB, Adobe RGB, and ProPhoto – has its uses.
For the web, sRGB is generally ideal (more on that in the next section). To send files for other photographers to edit, perhaps ProPhoto is preferable. And for printing, converting directly from a large working space (ProPhoto) to the printer’s specific color space is ideal.
Some specific third parties may request photos in sRGB,Adobe RGB, or occasionally ProPhoto. For example, some (low-end) print labs won’t accept photos in any color space other than sRGB or perhaps Adobe RGB. In that case, send what they request, or ideally switch to a different lab.
5. When Should You sRGB, Adobe RGB, and ProPhoto RGB?
This is the bottom line – the best times to use each color space. Each of sRGB, Adobe RGB, and ProPhoto RGB has its uses, but you need to know when each one is ideal:
5.1. sRGB
sRGB is often touted as the “default” color space – the easiest to understand, the lowest common denominator. Beginning photographers are told, often by some loud voices in the photography world, to do everything in sRGB. That’s reasonable advice for exporting to the web or to clients, but potentially a very bad idea when talking about working space.
First, it’s true that you generally should export photos to the web or clients in sRGB. That’s because of two things: computer monitors and non-color-managed applications.
Remember when I said that non-color-managed applications don’t read the profile assigned to an image? They just pick a default color profile. If you guessed that this “default” was usually sRGB, you’d be wrong – but not far off. Instead, most non-color-managed applications use your monitor’s color space to map the RGB coordinates of a photo. Crazy, right? Not that there’s anything too weird about your monitor having a color space; it’s just the colors your monitor can display.
But here’s the important point: Most non-photographers use monitors with color spaces similar to sRGB color space. That means sRGB files will look the “least bad” when they’re interpreted with a non-color-managed application. By comparison, if you look at a ProPhoto image on a non-color-managed application (like an old web browser) with one of these monitors, it will look very dull and low in contrast. So, for web and client photos, export in sRGB.

Lastly, don’t use sRGB as your working space for editing photos, or you’ll clip colors for no good reason. But at the same time, be certain to convert photos to sRGB for exporting to the web! You’ll need to add that step to your workflow if you haven’t already. Again, don’t let an Adobe RGB or ProPhoto RGB image escape into the wild.
5.2. ProPhoto RGB
I skipped Adobe RGB for the moment to talk about ProPhoto RGB, the ideal working space to use in most cases.
Note that I said working space – not output space. There’s a reason why Lightroom uses a cousin of ProPhoto RGB for editing images. When you edit an image in ProPhoto, you minimize the risk of clipping colors unnecessarily. And you can still export the photo in a smaller color space, so why worry?
At the same time, be very careful not to publish or send off a ProPhoto image. It’s easy to accidentally save an image from Photoshop in ProPhoto RGB if that’s your working space. If anyone views the resulting file in a non-color-managed application, the colors will look strange and likely quite dull.
This is why, if you have clients, one of the worst mistakes you can make is to give them a set of ProPhoto RGB images. Why? Because sooner or later, they’ll open the images on some old photo viewing program without color management, and they’ll think you totally ruined their wedding/event/portrait session. The same is true of Adobe RGB, too, although the colors won’t look quite as bad in that case on most monitors. This is why you export in sRGB!
5.3. Adobe RGB
Adobe RGB is a bit of the odd one out.
This color space doesn’t resemble that of most consumer screens, like sRGB does, making it a poor choice for export to the web. It also isn’t as large as ProPhoto, minimizing its utility as a working space. I’m tempted to say that you should avoid it entirely – and, indeed, sRGB and ProPhoto RGB are more useful overall – but there are still some cases when Adobe RGB is ideal.
First, if you buy a wide-gamut monitor, it will mimic Adobe RGB more closely than sRGB. In that case, for personal use on any non-color-managed applications, Adobe RGB will look noticeably better than sRGB (which will be oversaturated by comparison).
Second, if you print your photos and have a wide-gamut monitor, Adobe RGB can be useful in certain cases. It’s the best way to get your print to match the image on your screen – not always as ideal as it sounds, but nonetheless the goal of some photographers. I’ll touch on that in the next section.
Lastly, some clients and companies specifically request Adobe RGB images. In certain cases, they may have a good reason, while in other cases, they may just be confused. If you’re doing work for a company that already has a system in place, and they request Adobe RGB, just go with it. The same is true for certain print houses that request solely sRGB or Adobe RGB files. It might not be a high-end printing house, but you should follow their request or risk getting a bad print.
6. Printing Photos
It would take several articles to cover the nuances of color when printing photos, so this article will only touch on some brief recommendations:
6.1. The Two Printing Methods
If you’re not well-practiced at printing, the best thing to do is simple: Send your images off to a lab of your choice, without any extra photo edits or corrections, and pick their “color correction” option if they have one. Do so with sRGB files. This is the easiest way to get painless prints that look good and match your screen as much as possible.
For advanced printing needs, you’ll have to decide between printing at home or sending off to a higher-end lab (one that lets you do the corrections yourself). If you’re sending off to a lab, download their ICC profile for the ink/paper you’re using. Soft proof the photo in something like Adobe Lightroom, and make edits to exactly how the print will look. Export the image in ProPhoto (usually), then convert to the printer’s ICC profile. Send it off to the lab and specify no color corrections. For self-printing, do the same thing, just using the print module in Photoshop or similar. It’s worth mentioning that unless you have some practice here, the result has a good chance of looking worse than the prior method.
There certainly are printing methods in between, like sending photos to a high-end lab in ProPhoto space for them to color correct. But these are the two extreme ends of the spectrum.
6.2. Should Your Print Match Your Screen?
There’s a big reason why I said you should “usually” convert directly from ProPhoto to the printer’s ICC profile – and it gets down to the whole essence of this topic in the first place. No matter how good your display is, there are colors in ProPhoto that your monitor will not show. This means that when you’re editing in ProPhoto working space, you are editing colors that you can’t actually see on screen.
Don’t panic; this sounds scarier than it is. In real-world photography, it usually just means that saturated shadows have more detail and nuance than your monitor – or any monitor – physically can display. If you want that detail and nuance to show up in a print, follow the steps above.
But if you’re a stickler for the print matching the screen, this obviously won’t work. Instead, convert the photo from your working space of ProPhoto to the color space that resembles your monitor – Adobe RGB if you’re using a wide gamut monitor, and sRGB if you’re using a typical monitor. Make minor adjustments if needed, then print. You’ll get a print that more closely matches the screen – but at the expense of clipping away detail that your printer potentially can print.
No printer can encapsulate all of ProPhoto RGB’s real colors, nor those of Adobe RGB or even sRGB. But almost every photo printer on the market can print some colors outside the sRGB gamut, and even outside the Adobe RGB gamut. (Don’t believe me? Compare the gamuts of your printer’s ICC profile versus sRGB color space, making sure to look at 3D illustrations rather than 2D.)
The colors outside sRGB and Adobe RGB, but within your printer’s gamut, are the ones you’re after. They’re likely to look the best and most nuanced when you convert directly from ProPhoto working space to your printer’s ICC profile, then print.

7. What About Monitor Calibration and Profiling?
I almost forgot the one color topic that photographers know the most about: the importance of calibrating and profiling your computer’s display.
Although profiling your monitor is a bit removed from the theme of this article, it’s worth mentioning because it really is an important part of post-processing. Of course, if you’ve read about monitor calibration before, you’ll already know that every viewer with an uncalibrated monitor will see your photos differently anyway. But calibration and profiling are still important in order to get your print to match your screen as much as possible – and to get (relatively) consistent images among other photographers looking at your work.
Calibration and color profiles also apply to printers. However, not nearly as many photographers create custom profiles for those as for their monitors. In part, that’s because most common ink/paper combinations come with an ICC profile already (easy to find online if you don’t already have it), so creating a custom profile is more a case of fine-tuning. Still, if you’re willing, it can be better to see exactly how your own printer performs with a given combination of ink and paper rather than accepting the manufacturer’s profile. But that’s a topic for another day.
8. Conclusion
You made it, and that’s impressive – this is one of the lesser-understood topics in photography, despite its importance. Many photographers have no idea when to use sRGB, Adobe RGB, or ProPhoto RGB. Now you do! That should help you avoid two of the cardinal sins of color spaces: clipping colors unnecessarily, and publishing photos with the wrong color space.
If you have any questions or comments, feel free to add them below. I’ll do my best to help out if anyone is confused on this topic. Also check out the tutorials on Andrew Rodney’s website for more in-depth information about digital color in general.

