


When photographing with a digital camera, it might sometimes be impossible to focus on the edges of the frame due to the limitations of the camera. To be able to get around the problem, photographers can use a technique called “focus and recompose”. In this article, I will go over the focus and recompose technique, which can be quite useful when photographing in various environments – whether shooting in low-light situations or composing your shots with the subject in the corner of the frame.

NIKON D700 + 50mm f/1.4 @ 50mm, ISO 200, 1/320, f/1.8
I personally use this technique quite a bit when doing event and wildlife photography. It saved me a number of times when the light conditions were extremely poor and my camera could not properly focus. It also works really well in situations where my camera’s focus points are only concentrated in the middle of the frame.
What Recomposing Means
Before I talk about this technique, let me first explain what the word “recompose” stands for in photography. When you take a picture, you carefully frame your shot and place your subject somewhere in the frame before you take a picture. In other words, you compose the shot. Recomposing simply means framing your shot first (for example to acquire focus), then moving your camera to reposition your subject somewhere else in the frame.
For example, let’s say you started off by placing the subject in the center of the frame and focusing on the subject’s eyes. Instead of having a boring shot with your subject in the dead center, you could place the subject a little to the side and end up with a much better composition. In other words, you are recomposing your shot.

Why the Need to Recompose?
Normally, most people do not bother with recomposing their shots when using modern digital cameras. Many cameras, even the most basic entry-level models come with a bunch of focus points, which are scattered across the viewfinder, as seen in the below image:

When composing a shot, the easiest thing to do is typically to move the focus point to the desired area of the viewfinder (where the subject is placed), acquire focus and then take a picture. But therein lies a typical problem – the focus point is often too small to cover the area of interest or it might not be where you want it. Take another look at the above viewfinder – you are forced to place your subject where the pre-defined 11 focus points are.
But what if you wanted more flexibility and if you wanted to move your subject freely anywhere in the frame? Sure, higher-end cameras have a lot more focus points to work with in situations like this, but they rarely cover the entire frame, and even when they do, moving them might slow you down as well when recomposing your shots.
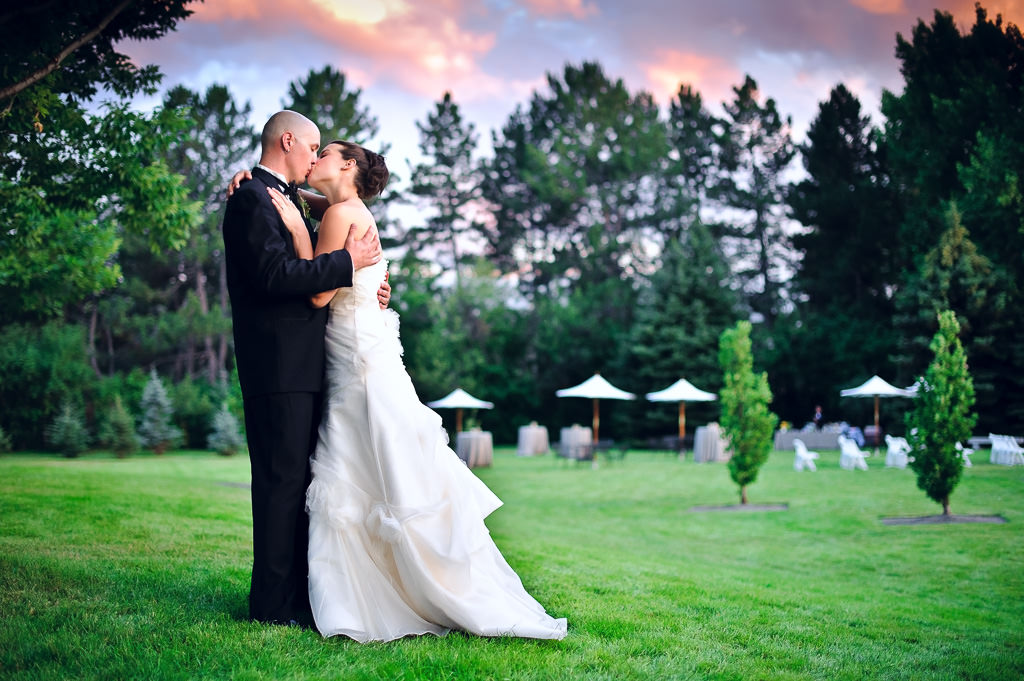
In addition to this, if you’re shooting a DSLR, then the center focus point is always the most accurate, as I pointed out in my article on taking sharp photos. This means that when light conditions are poor, your only choice to get acceptably sharp images might be to use the center focus point. If you have done some low-light photography, you will relate to this, as I am sure you can remember how the lens goes back and forth “hunting” for focus when using corner focus points. Here is an image, which was shot in an extremely dark environment:

The subject is tack sharp. I had to manually pre-focus on my subject with the center focus point with the help of the camera’s AF assist beam (no other focus point could get accurate focus), then I fired a flash behind the subject with a blue gel to get the above effect.
So for these kinds of situations, being able to first focus and then recompose your shots can make a huge difference. If the technique is done right, you do not have to worry about too much post-processing and cropping just to get a better composition – you can do it right using your camera and this technique.
Focusing and Recomposing Methods
There are several ways to focus and recompose your shots. Let’s go over each method and look at its advantages and disadvantages. Please keep in mind that I am assuming that your camera and lens are set to autofocus. The below instructions will not work in manual focus mode.
Single Servo Focus Method
The first, and the easiest way, is to set your camera to Single Servo or “AF-S” autofocus mode. When your camera is set to Single Servo mode, it will only acquire focus once when you half-press the shutter button. While leaving the focus point in the center, point your camera at your subject, lock focus by half-pressing the shutter release button, and wait for the camera to confirm it (either with a beep or with an in-focus indicator), then recompose and take a picture. If your camera refuses to take a picture, it means that it is set to “Focus” release mode. Just go to the camera menu and set it to “Release” in AF-S / Single Servo mode and it should be able to fire no matter where you point it.
This method works great on most cameras, but it requires to have your camera set to the Single Servo / AF-S mode. If you shoot with an entry-level Nikon DSLR, then the default AF-A mode should also work great, as long as your subject is not moving. If you want to be able to lock focus in any autofocus mode, see the next method.

Autofocus Lock Method
Almost every modern interchangeable lens digital camera, including entry-level models, comes with a button on the back of the camera that is dedicated to locking the camera exposure and autofocus. On Nikon cameras, this button is called “AE-L / AF-L” and you will find it on practically every camera model. By default, the button is programmed to lock both exposure and focus, which would work great for the focus and recompose technique.
Without worrying about which autofocus mode your camera is in, you simply focus on your subject by half-pressing the shutter button, then after focus is confirmed, you press and hold the AE-L / AF-L button on the back of the camera while continuing to half-press the shutter. Then you recompose your shot and take a picture (continue to hold both buttons). Doing this will achieve two things – your exposure will get locked and will not change (which can be very useful when photographing people in challenging light) and your focus will stay on the subject.
The only thing you have to make sure is that this button is actually programmed to lock exposure and focus. On some camera models, it might not be able to do both. On all Nikon DSLRs, the AE-L / AF-L is set to do this by default. However, if the above method does not work for you, you might have to look at the menu settings.
AF-ON / Back Button Method
The last method, which I personally prefer over the first two, is to program a button on the back of the camera to acquire focus – a technique known as “Back-Button Focus“. By moving the focusing function of the camera to this button, you eliminate the need to half-press the shutter button when acquiring focus – the shutter button is only used to actually take pictures.
This works great for me because I do not have to constantly think about pressing the Autofocus lock button or being in Single Servo mode. On top of that, I do not have to keep half-pressing the shutter button, which I might accidentally trigger. And it works great for focusing and recomposing your shots.

Again, all modern DSLRs and mirrorless cameras can do this. If you have a high-end digital camera, you might have an “AF-ON” button on its rear where your thumb can reach it. The “AF-ON” button can be configured in the camera menu to move the focus function to it.
First, make sure that you are in a single AF mode – you should be able to move the focus points in your viewfinder. Next, go to the “Custom Setting Menu” -> “Autofocus”, then find the menu item “AF Activation”. Change it to “AF-ON only”. Once set, try half-pressing the shutter button – it will do nothing. But as soon as you press the AF-ON button with your thumb, the camera will start acquiring focus.
If you have an entry-level Nikon camera, it might not have a dedicated AF-ON button. However, don’t be disappointed, because the same “AE-L / AF-L” button I talked about before can be configured to do the same thing:

The setting is located in a different menu location. Go to the “Custom Setting Menu” -> “Controls” -> “Assign AE-L/AF-L button” or to “Setup Menu” -> “Buttons” and you will see an option that says “AF-ON”. Just choose that option and press OK. Once done, test by half-pressing the shutter button first – it should not attempt to acquire focus. Next, press the AE-L/AF-L button and the camera should start autofocusing.
We go through many other camera brands in our back-button focusing article, so make sure to check it out.
Once you move the focus function to this back button, here is how to use it:
- Use the focus point selector and place the desired focus point on your subject
- Press the AF-ON / Back button with your thumb to acquire focus
- Release the AF-ON / Back button to keep and lock focus where it is
- Recompose your shot and take a picture
Potential Focus Issues
One thing you always have to keep in mind when using this technique is that you mind end up with badly focused images when recomposing aggressively, shooting at very large apertures and close distances. Remember, your focus plane shifts when you recompose, so if you have a very shallow depth of field and you are standing too close to your subject, recomposing too much could result in a soft-looking / defocused subject.
If you cannot get a sharp image, try to keep the focus point as close to the subject as possible and then recompose a little. Less shift means less change in the focus plane. If you shoot with long-lenses over long distances, you do not have to worry about this as much. Here is an example of the technique, where I used the center focus point to focus on my subjects on the right (using the AF-ON button), after which I recomposed the image to include the two models on the left:

Does Focusing and Recomposing Make Sense with Mirrorless Cameras?
Focusing and recomposing works well and I still use the technique myself when shooting with DSLRs. However, modern mirrorless cameras make this technique less important.
For example, if you’re shooting people, then you’ve probably heard that most mirrorless cameras have excellent eye and face detection modes. This makes it rarely necessary to focus and recompose if you’re shooting portraits or even group shots. In fact, many of the higher-end mirrorless cameras have detection modes for animal eyes and objects, which is much faster than focusing and recomposing.
Mirrorless cameras also have more focus points distributed across the entire viewfinder, and some of them have very intuitive methods for selecting these focus points. Thus, it’s safe to say that using the focus and recompose technique is not as prominent in the mirrorless realm as it was with DSLRs.
Still, there may be times where focus and recompose still makes sense. For example, you may wish to lock onto a specific point in your shot, such as in a landscape, without having to move your focus point. In these cases, sometimes it’s still nice to do a quick focus and recompose, which still works quite well.
Conclusion
In many situations, the focus and recompose technique works very well as an alternative to moving focus points. However, with more modern mirrorless cameras, focusing and recomposing is often less necessary. I hope this article was useful to you. Please let me know if you have any questions!

