


Photographers have a dilemma. If you want a photo to have the largest possible depth of field – from the foreground to infinity in a single photo – a small aperture is absolutely necessary. At the same time, though, a small aperture causes your photograph to lose sharpness from diffraction. So, where’s the sweet spot? In this article, I will cover how to choose the sharpest possible aperture for such a photograph, including mathematically accurate charts (free for printing) that are easy to use in the field.
Before that, though, please note that this article only applies if you want everything from the foreground to the horizon (infinity) to be sharp in your photographs. If you are simply interested in the sharpest aperture on your particular lens, this is the wrong article; check out our lens reviews instead, each of which includes sharpness tests. In an ideal world, you would always be able to use the sharpest aperture on your lens. In practice, though, you will find yourself stopping down to smaller, diffraction-prone aperture values if you need more depth of field.
A large portion of this article is simply the background research and calculations that went into the finalized charts. If you prefer to skip the sections two and three, you won’t miss anything particularly important; however, I want to include some background information for readers who are curious.
This is a long article, but it isn’t too complicated – especially if you skip directly to the “Charts” and “Putting It into Practice” sections. So long as you understand aperture, diffraction and hyperfocal distance, nothing in this article will be particularly confusing.

What Makes a Photo Blurry?
For the purposes of this article, which only relates to your aperture, there are three elements that cause a photograph to blur.
Lens aberrations: These are what cause your photos to grow less sharp at wide apertures like f/2 or f/1.4. If a lens is considered “less sharp” than another, lens aberrations are to blame. This is something that manufacturers are improving over time, although there is always a balance between the lens’s size, weight, price, and quality.
Diffraction: This is the loss in sharpness that occurs when you stop down to extremely small apertures like f/16 or f/22. Technically, diffraction exists at all apertures, but it only begins to rob noticeable sharpness once you stop down far enough. For more information, read our in-depth article on diffraction.
Defocused Foregrounds and Backgrounds: It is impossible to focus at more than one plane in a single image. So, if you focus partway into a scene, the foreground and infinity will both be blurrier than they would be if perfectly-focused. You can minimize this blur by focusing at the hyperfocal distance, which is twice the distance to the closest object in your photograph. For instance, a scene from five feet until infinity will be as sharp as possible if you focus at ten feet. For more information, read our in-depth article on the hyperfocal distance.

Airy Disks and Circles of Confusion
Diffraction and defocus effects can be measured by the size of their blur on a camera’s sensor. If the size is large, the photo is blurry. (For now, I will skip over the effects of lens aberrations. They are important in determining your sharpest aperture, but they vary from lens to lens. As such, I’ll cover them in a separate section near the end of this article.)
To quantify the amount of blur in your photograph, you need to combine two different values:
Airy disk: The blur from diffraction that is projected onto your camera sensor. The Airy disk increases in size at small apertures.
Circle of Confusion: The blur from out-of-focus regions that is projected onto your sensor. The more out of focus that a point becomes, the larger its circle of confusion will be. So, the circle of confusion is largest at the foreground and infinity of your photograph (assuming that you have focused at the hyperfocal distance point).
These two variables combine all the time. No matter where you focus, the total blur at a given point in your photograph is the combination of its Airy disk (how much diffraction is present) and the circle of confusion (how out-of-focus it is). Now, the question is simple: in what way do these two variables combine?

The answer is not just addition or multiplication, as you may expect. There is no easy way to combine these two fundamentally different effects, but the formula below is most common:
Ignoring lens aberrations (and motion blur), the resulting value is the total blur at a given point in your photograph. Of course, we want this value to be as small as possible. The rest of the article discusses how this is accomplished.
Formula
The formula to find the sharpest possible aperture – the one which minimizes the total blur value above – is quite simple:

This formula is not my own work. I gathered the information from three sources, as found in the links below. I encourage you to read these sites if you are interested in the derivation of the formula above, since there is not enough room in this already long article to cover all the background information:

The only change that I made to the formula is to allow “Distance to far object” to equal infinity, which is the case at the hyperfocal distance. When this is done, the formula simplifies to the version shown below:
By plugging in half the hyperfocal distance (“Distance to near object”), along with various focal lengths, I turned this information into the charts you see in the next section.
The Charts
Before presenting the charts, there are some points to note:
- These charts are huge. In the next section (“Putting It into Practice”), I will show how to take such a large chart and shrink it down to match your equipment. For my 20mm lens, for example, the final chart is only ten rows tall and two columns wide.
- Believe it or not, these charts are accurate no matter your camera’s sensor size. The Olympus 7-14mm f/2.8 is why the chart includes such wide angle lenses (there is more information about this in the next section).
- This chart stops at any aperture smaller than f/22. If you want more depth of field than that, I strongly recommend focus stacking. I also excluded any apertures larger than f/2.0. I could have stopped before that, but I wanted to cover my bases in case Zeiss introduces a 24mm Otus that is sharpest around f/2.8 (more info for why lens sharpness matters is under “Simplifying the Charts” below).
- Although very few people would use a chart like this for telephoto lenses, I included all the major focal lengths up to 200mm. If yours isn’t included, I discuss how to create your own chart in the next section.
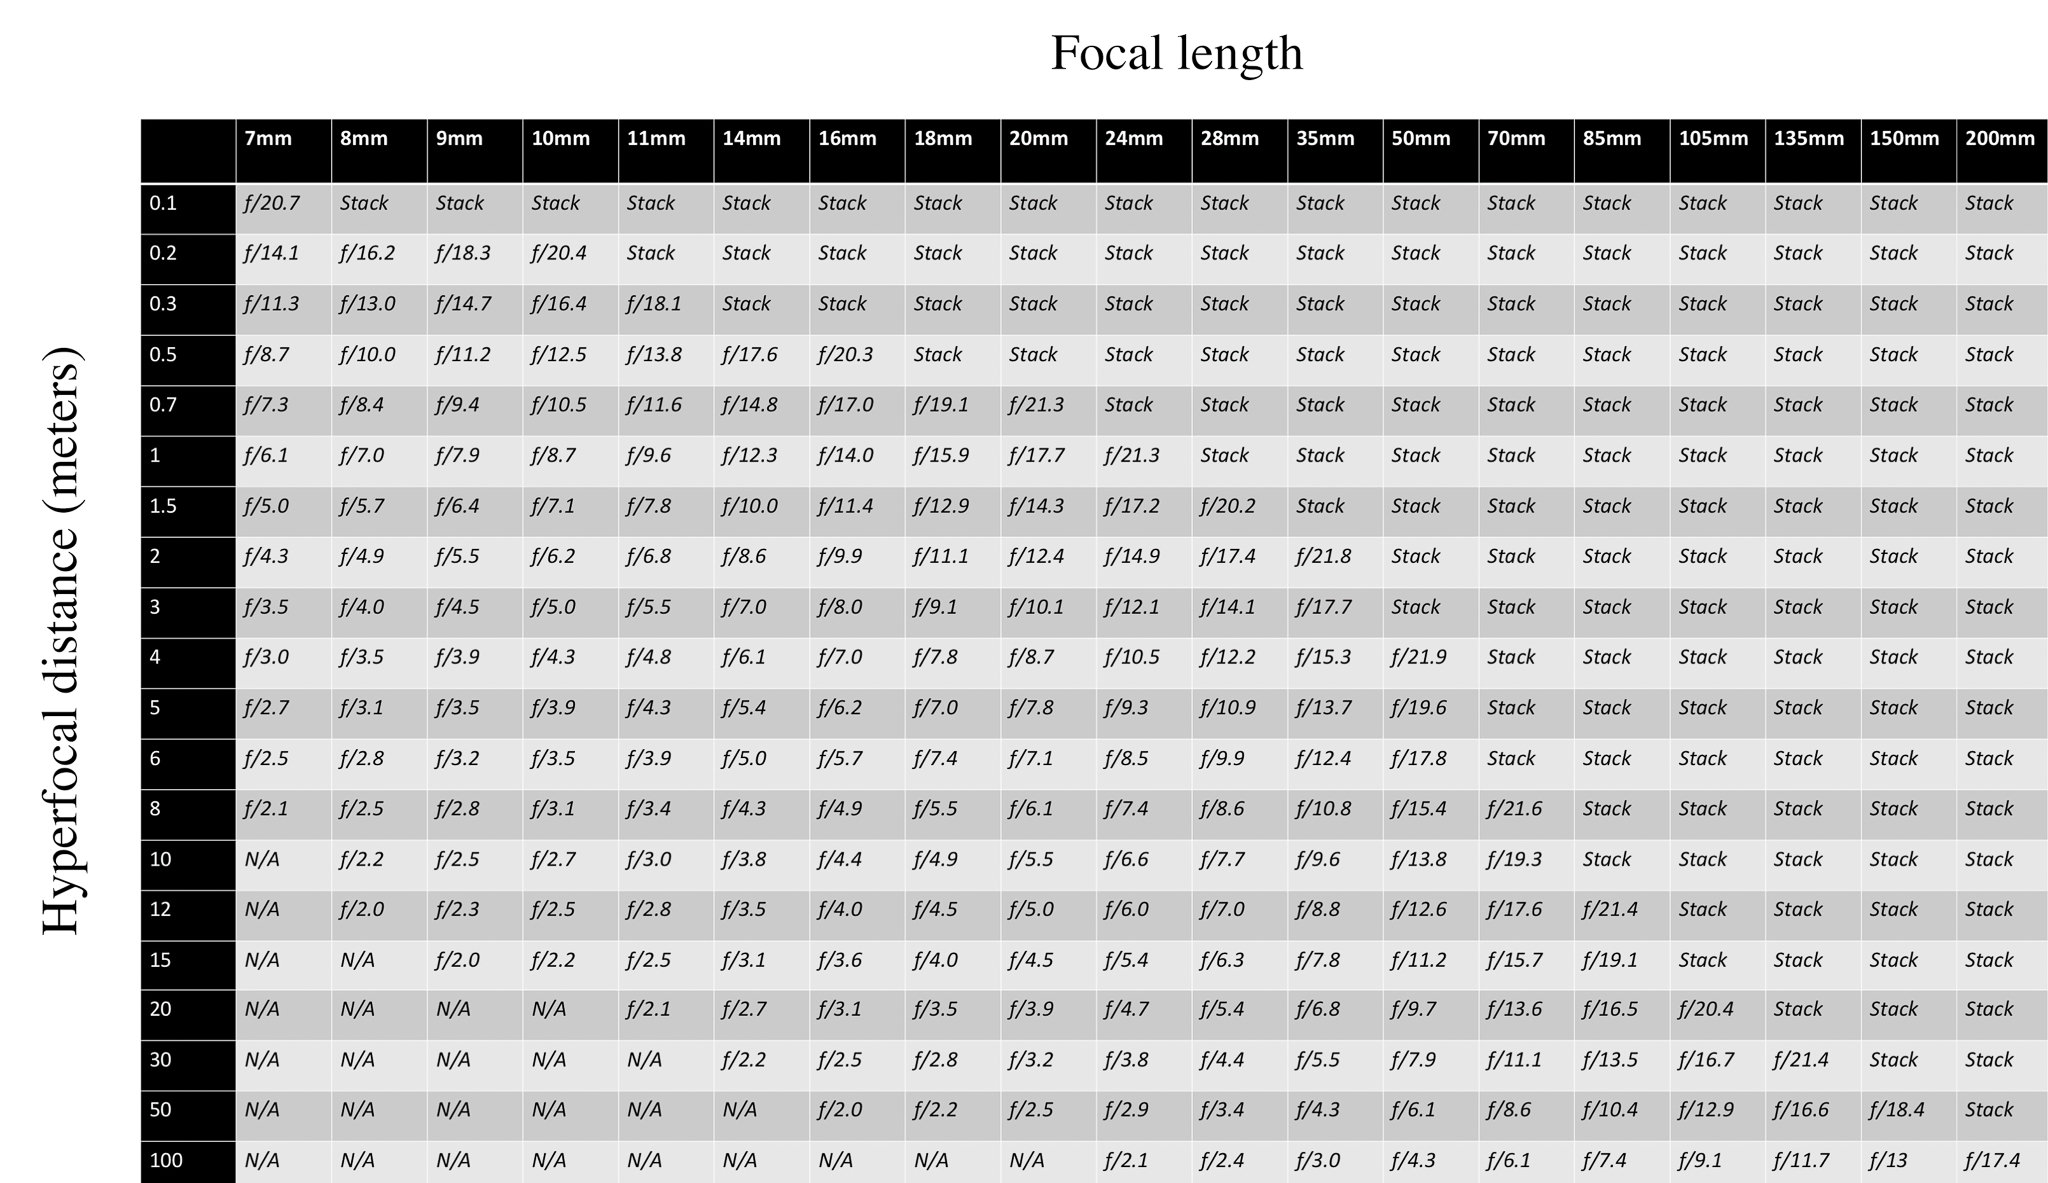
Now that those are out of the way, let’s see the charts. Here’s Metric:
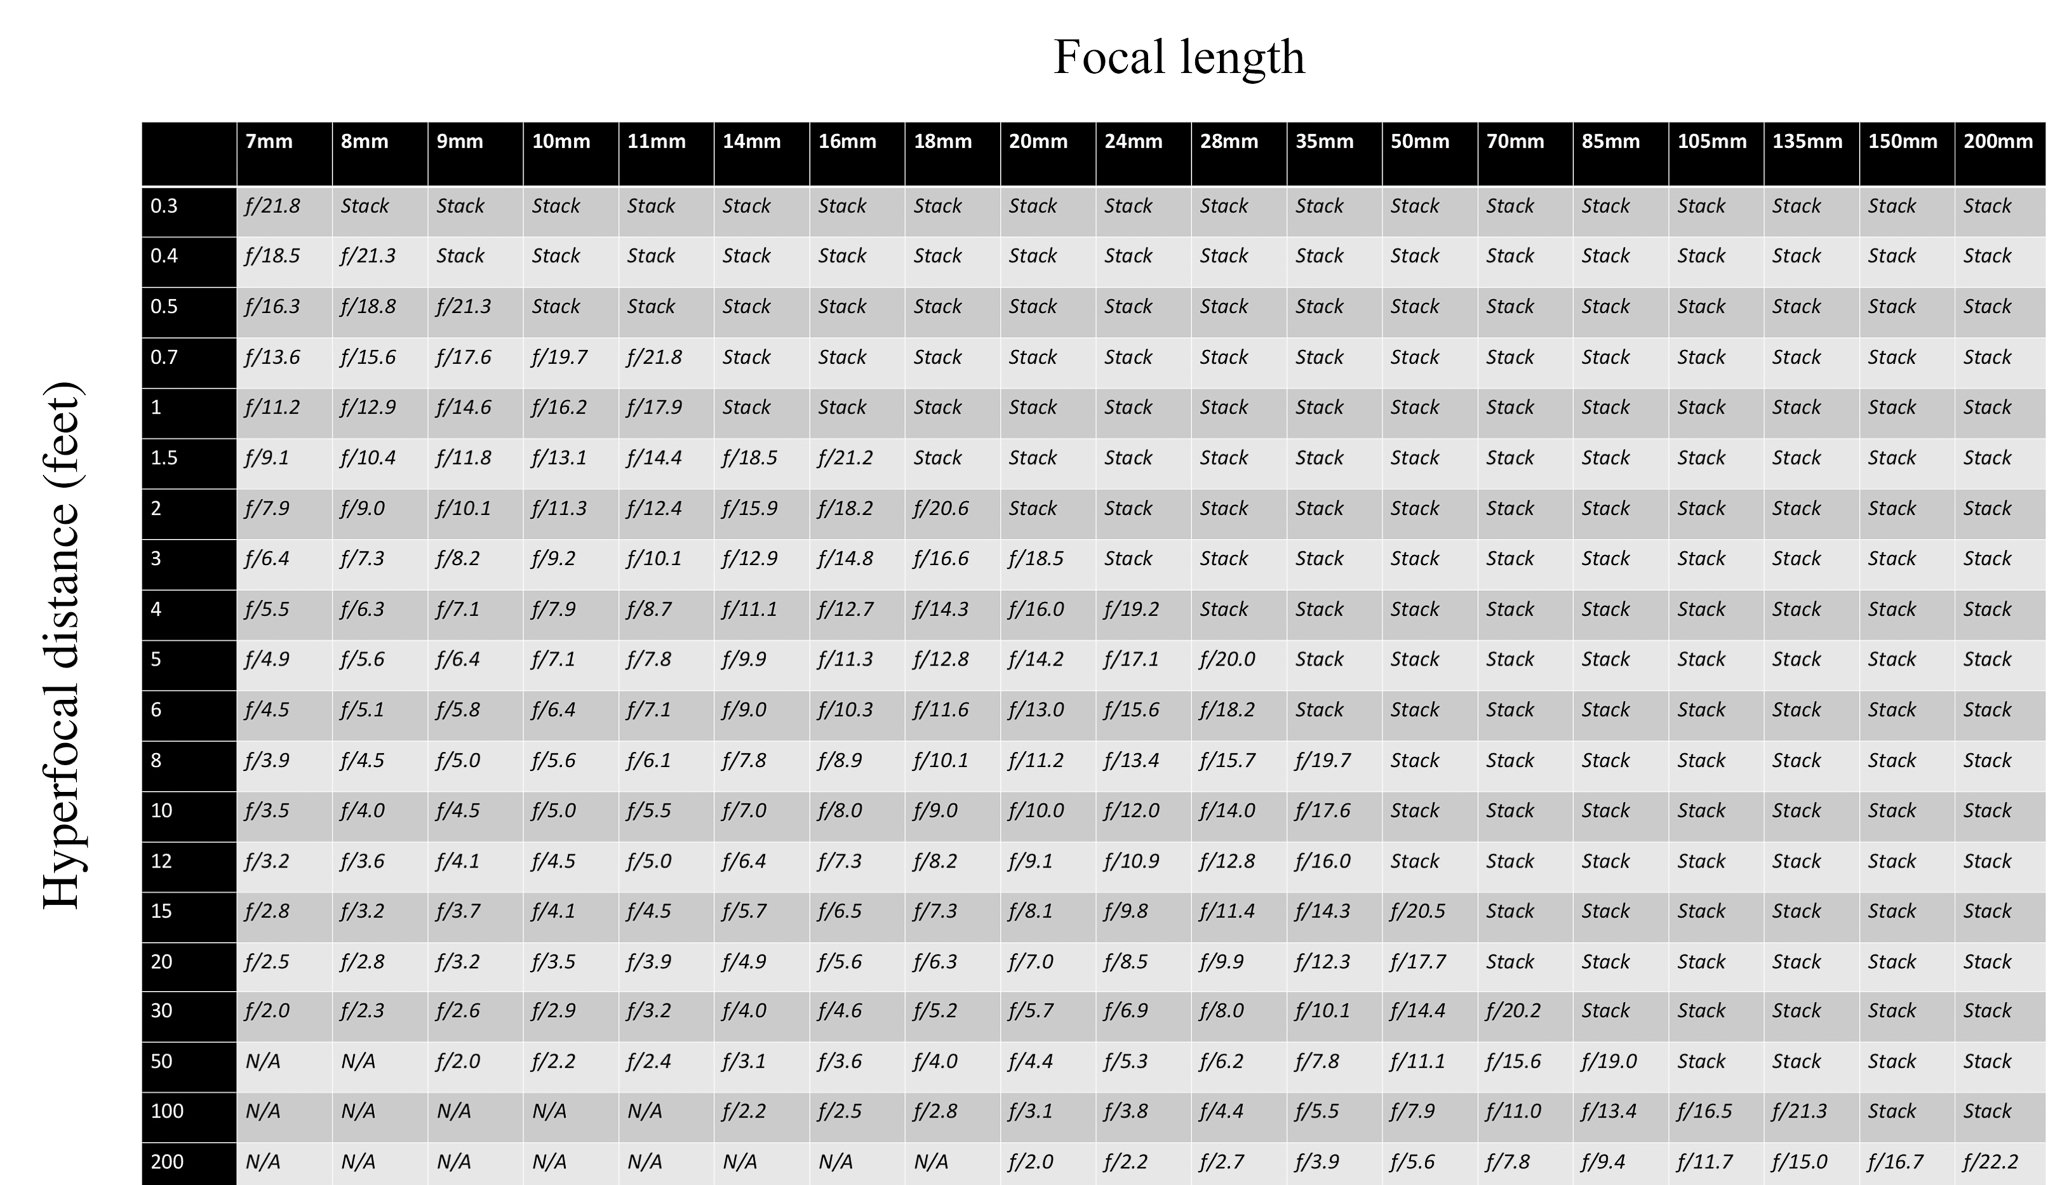
And Imperial:
If you click on these charts, the values will be significantly clearer.
Putting It into Practice
These charts are not particularly difficult to use. All you need to do is pick a focal length, then find your hyperfocal distance. The intersection on the chart is your ideal f-number. However, there are a few more essential pieces of information before you can use either of these charts. This section is very important; if you use the charts incorrectly, your results will not be as sharp as possible.
Hyperfocal Distance?
Yes, unlike a normal hyperfocal distance chart (which gives you the hyperfocal distance), this one requires that you find it yourself. However, this isn’t hard. As I mentioned in my hyperfocal distance article, all you need to do is find the distance to the closest object in your photograph. Then, double the distance.
Say, for example, that you are using a 20mm lens. If you want everything in focus from five feet until infinity, your hyperfocal distance is equal to ten feet. So, on the Imperial chart, find the f-number that corresponds to ten feet at 20mm. In this case, it is f/10.0. Then, simply focus at ten feet, set the lens to f/10.0, and take the picture. Everything from five feet until infinity will be as sharp as is possible for a single frame.
In some of my recent articles, a few readers mentioned that the most accurate way to measure these distances is to use a laser rangefinder measurer. (I tend to estimate the distances instead, although that isn’t as accurate as possible.) Although I don’t own a laser measurer, an example product can be found at Amazon. This particular measurer works up to 130 feet, or about 40 meters. If you purchase a measurer, make sure that it also records distances in the one-foot or one-meter range – hunting rangefinders typically do not. Although I tend to think that a laser measurer is overkill, some photographers undoubtedly will want the extra precision.

Using Different Cameras
As I said above, the two charts are accurate regardless of the camera that you use. A Sony RX100 IV and the Nikon D750 will both use the same chart, even though their sensors are vastly different in size. However, there are two points to keep in mind:
First, and most importantly, don’t use your lens’s equivalent focal length. Instead, always use the actual focal length of your lens. This is absolutely crucial! Say, for example, that you are using the Nikon 24mm f/1.4 lens on a DX camera. Even though the equivalent focal length is roughly 35mm, it is essential that you look at the entry for 24mm instead!
The same goes for any camera. The Sony RX100 IV, for example, has an equivalent focal length of 24-70mm, but its actual focal length is 8.8-25.7mm. On this chart, do not use 24-70; use 8.8 (rounded to 9mm) and 25.7 (rounded to 24mm or 28mm) instead.
The second point is also important, though less dramatic. As you can see on the chart, I didn’t include any aperture values smaller than f/22. However, if you use a crop-sensor camera, f/22 will show significantly more diffraction than it would on a full-frame camera, given the same print size. (For more details, see the article on diffraction.) Essentially, if you use a crop-sensor camera, you may need to focus stack even at some of the apertures that don’t say “Stack” in the charts.
Simplifying the Charts
As I have said above, those two charts are huge. Although you are welcome to print them out at full size, it is very easy to make a version – specific to your equipment– that is much smaller. To start, you can simply remove any columns that don’t correspond to your focal lengths. For my 20mm f/1.8 lens, that leaves a chart like this:

In theory, for an optically-perfect lens, this chart is completely accurate. However, it is plain to see that there are some unusual values once the hyperfocal distance becomes too large. For example, the chart above suggests that the sharpest aperture for a 200-foot hyperfocal distance point is f/2.0. This definitely is not correct! At such a wide aperture, lens aberrations will lower the quality of your image. In this case, a smaller aperture would be much sharper.
To fix this problem, you simply find your lens’s sharpest aperture – based on tests from a review of your lens – and replace any wider apertures on your chart with that value. For example, for my 20mm f/1.8, a sharpness chart is below:
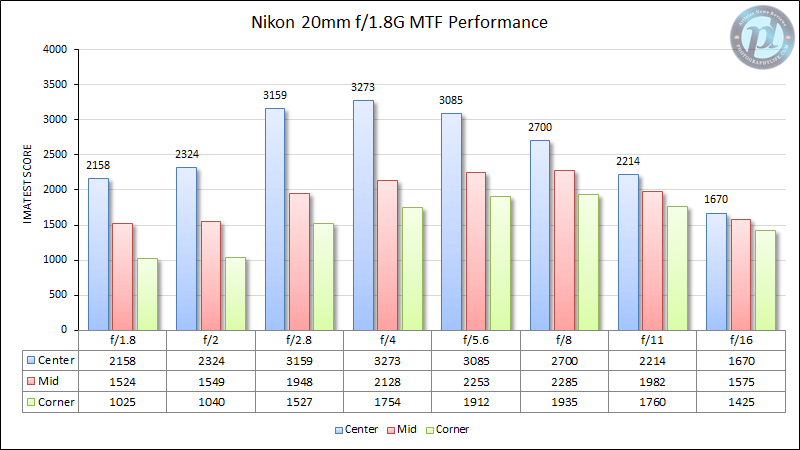
If you care about detail in your corners – as most landscape photographers do – I recommend finding the aperture with the highest “corner” value. In the chart above, that would be f/8, although f/5.6 is close (Remember that the “corner” value only applies if you use a full-frame camera. If you are using a full-frame lens on a crop-sensor camera, pay attention to the “mid” value instead).

Now, after replacing all the wide aperture values with f/8, the chart is a bit simpler:
By grouping all the identical values together, I can cut it down some more. Also, my 20mm lens does not stop down past f/16, so I am grouping those into the “stack” category. That gives the final version:
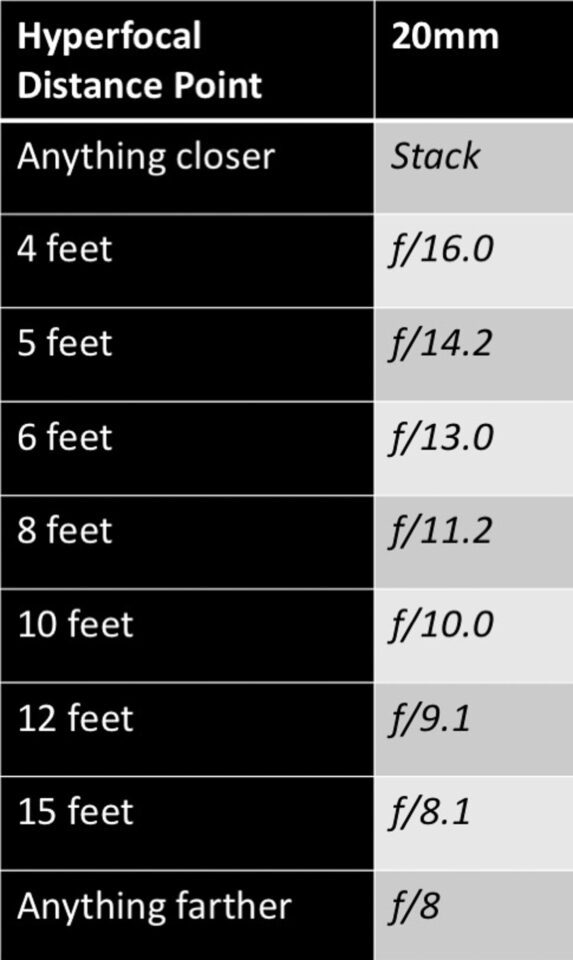
There we have it! This small chart now shows the mathematically sharpest aperture for my 20mm lens at seven common hyperfocal distances. If you have a zoom lens, just create a table like this for every important focal length in the zoom range.
Rounding
Don’t be afraid to round the values in this chart. If you are very close to the “perfect” aperture, your photos will be all but indistinguishable. This is true both for your focal length and your aperture values. For instance, a 17mm lens at f/11 is not particularly different from an 18mm lens at f/11. There is no reason to stress about small differences. Personally, if I need to round, I tend to lean towards a smaller aperture. Although this does result in additional diffraction blur, it also offers some leeway in case my focus was slightly incorrect. For example, if the chart tells me to shoot at f/8.5 (which my camera does not allow me to set), I am more likely to shoot at f/9 than at f/8. Again, though, this only makes a small amount of difference.

Making Your Own Charts
Perhaps the focal length or distance that you use most is not on either of these charts. If that’s the case, and you would prefer not to round, feel free to make your own chart. For Metric charts, the math is exactly what I showed earlier:

Note that, for “half the hyperfocal distance,” your figure needs to be in millimeters! Otherwise, your result will be vastly incorrect. So, if the hyperfocal distance is five meters, that value should equal 2500mm.
Imperial calculations are a bit different:

In this case, make sure that “half the hyperfocal distance” is in feet. So, if your hyperfocal distance is equal to twelve feet, that value should equal six.
If your lens isn’t included in the huge charts above, these formulae should help you create your own.
Smartphone Apps
As you might expect, this information also works well as a smartphone app. Although most hyperfocal distance apps do not take diffraction into account – and, therefore, do not show you the sharpest possible aperture – there is a trio of apps that does. These applications are developed by George Duovos, whose derivations helped create the formula I used in this article. I have been experimenting with these three apps for a few weeks, and I can thoroughly recommend them. Unfortunately, they only exist for iOS, and there are no similar apps for Android phones. Here are the links (affiliate):
- OptimumCS-Pro, $9.99. This app is most similar to the information in this article. Given the closest and farthest reaches of your scene, it tells you the sharpest possible aperture. (Note that OptimumCS-Pro does not include lens aberrations, so it may suggest wider apertures than ideal if your hyperfocal distance is far away. Again, to correct this, follow the same procedure outlined in the “Simplifying the Charts” section above.)
- TrueDoF-Pro, $8.99. This app tells you – for a specific circle of confusion size – the range of distances that are acceptably in focus at a given aperture. Essentially, this app gives you the same information as a typical hyperfocal distance chart, except that you can change the circle of confusion size. I prefer the first app, OptimumCS-Pro, for my photography. (Unlike the other two apps, though, there is a limited free version for this one, so you may want to test it before committing to the regular version.)
- FocusStacker, $7.99. This app tells you the number of photos – at which aperture and focusing distances – are necessary to create a focus stack for a given level of sharpness. Although FocusStacker is a bit separate from this article, I included it here because I find it particularly valuable. I haven’t seen this type of information available in any other form; if you ever focus stack, this is the best option available (my one critique is that it doesn’t let you set the aperture; it suggests an aperture value for you, making its calculations from that).
There also are non-Pro versions of the first two apps, which are slightly less expensive. These are the ones I use, since I have no need for the additional features of the Pro apps (tilt-shift lens compatibility, view camera compatibility, different wavelengths of light, extra focusing scales, and some additional presets). The standard versions are below:
Aside from the charts (or equations) in this article, OptimumCS is the only way to find the mathematically sharpest aperture for a scene.
Is All This Necessary?
All of the information above is fine and interesting, but is it truly necessary? Should all landscape photographers be using these calculations? To answer the question, I would like to quote my hyperfocal distance article:
“Honestly, though, the main drawback of hyperfocal distance charts is their impracticality. Do you really want to bring a chart into the field while you are taking pictures? It can take quite a while to find the values and focus in the right spot.”
This statement is just as true here, even though the charts and apps in this article are more accurate than standard hyperfocal distance tables. Very few people people want to fiddle with their phone or a sheet of paper while taking pictures. Perfect sharpness is far from essential; there are quicker methods that give more than enough detail for many photographers.
At the same time, for some photographers, this level of precision is welcome. I personally use the charts in this article for many of my landscape photographs, assuming that I have a few extra seconds to spend on a shot. If you pixel peep or create large prints, there truly is a benefit from this high level of accuracy.

Other Methods
The method above is far from the only way to choose the sharpest aperture for a scene. Although it is mathematically accurate, it takes some time for every photo; there are simpler techniques as well.
Focus Stacking: For one example, you could focus stack a difficult landscape. This isn’t particularly quick, but it results in photos that are incredibly sharp. Simply set your lens to its sharpest aperture, then take a series of photos focused at different distances. (Again, I recommend the FocusStacker app.) You can combine the resulting images in a program like Photoshop or Zerene Stacker, which outputs a single photograph with the sharpest portion of every individual shot. This method gives you more detail than any single photograph, no matter which technique you use. Unfortunately, it tends to work well only if your subject is completely still.
Estimation: If you can’t focus stack, another method is to focus at the hyperfocal distance and estimate the best aperture based upon your prior experience. For example, if you are photographing a scene with tremendous depth, you may choose to shoot at f/16 simply from experience. This technique is incredibly quick, but – even for expert photographers– it won’t always be the sharpest aperture possible.
Reviewing the LCD: If a photo’s sharpness is particularly important, you may simply decide to review the image on your camera’s LCD screen. You can make changes from there, setting the widest aperture that still gives the depth of field that you need. However, as useful as this method can be, a three-inch LCD is far from the best way to check the critical sharpness of a large photograph.
Each of these methods can be valuable, and a “mathematically perfect” aperture is overkill for many photographers. This is especially true if you create smaller prints, or if you primarily display your images online. It all depends upon your specific situation.
Conclusions
This entire article boils down to a single question: When you are taking pictures with a large depth of field, how do you choose your aperture setting? If you prefer to leave the camera at, say, f/11 – no matter what the subject is – there is nothing wrong with that at all. Your resulting photos may not be as sharp as possible, but they typically will be good enough. However, if you want to spend time making sure that your aperture has the best possible ratio of depth of field to diffraction, the charts (and apps) covered in this article are the most accurate methods available.
Photographers like to chase technical perfection – and, honestly, I believe that is a good thing. It is wonderful to drive ourselves to create the best possible photographs; if nothing else, it shows that we care about our work. However, mathematical perfection is not always necessary, and sometimes it is not even desired. If we lose sight of a photograph’s innate, aesthetic qualities, none of these technical settings will make it a success.
So, if you choose to use the aperture charts in this article, do so for a reason. “Perfect” sharpness is not itself an end; it is a tool to help convey your photographic message. If you are making large prints of a dramatic landscape, these techniques absolutely may be worthwhile. However, if you are simply taking pictures for fun, there is no reason to abandon the methods that you already enjoy.


