


Back-button focus is a technique used in photography to separate the focusing and shutter release functions to two separate buttons. This technique is particularly useful in preventing the camera’s autofocus system from continuously engaging when the shutter is released. In this article, we will delve deeper into the concept of back-button focusing, and explore how you can take advantage of it to enhance your photography.
One of the key areas many photographers often struggle with, especially when starting out, is focusing. Being able to properly acquire focus on a subject or a scene is critical in making sure that the photograph is sharp where it needs to be. This is where back-button focusing comes into play.
Introduction
Critical focus is one of the most crucial elements we attribute to a good photograph. This is especially true in my field of nature and wildlife photography where focus accuracy usually makes or breaks an otherwise good photograph. A basic understanding of a camera’s focusing system is fundamental at the outset of our photographic journey, but I often find that a more in-depth mastery of the camera’s focusing system takes a backseat while we improve other photographic aspects.

Copyright Dvir Barkay, Canon EOS-1D X @ 560mm, ISO 640, 1/1600, f/6.3
Part of the reason for this is that it is effortless these days to pick up a camera and take sharp images with the default focus settings – issues only begin to arise when our subjects become more complicated. Whether it is a model’s eye in portraiture, or the beak of a bird-in-flight, proper focusing forms an essential part of the storytelling mechanism of photography. The key to sharp images starts with a fundamental understanding of your camera’s focusing system and settings, which is why it is important to understand what back-button focus is and how you can take advantage of it in your photography.
What is Back-Button Focus?
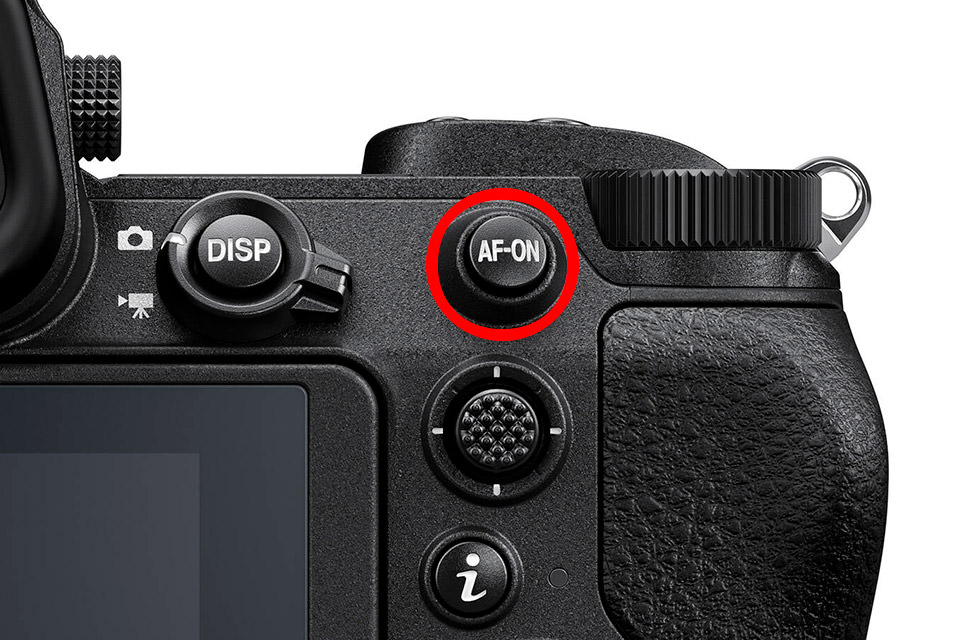
Simply put, back-button focus is a technique that takes the autofocus function away from the shutter release button, and re-assigns it to another button on the back of the camera. Although the name only suggests a button on the back of the camera, it can be any physical button (provided it can be set up for engaging autofocus). Most advanced digital cameras on the market today have a dedicated AF-ON button that is specifically designed for back-button focusing, as shown in the illustration below:
When you pick up a camera and half-depress the shutter release button, the focus system engages and tries to attain focus on your subject, which is the way most cameras are set up by default. With a bit more pressure applied to the shutter release button, the shutter trips and an image is captured. This process occurs regardless of the autofocus mode set up on the camera.
This essentially means that the single shutter release button is used for two different purposes – one to focus and one to take a picture. While doing this, if you apply a bit more pressure to the shutter release button than usual, you will ultimately end up taking unwanted images. What if your subject is stationary and all you want is to focus and recompose for a better composition? Sure, you could switch to One-Shot / Single Servo (AF-S) mode, lock on your subject then focus and recompose, but each time you switch from a stationary to a moving subject, you will need to remember to switch from One-Shot / Single Servo (AF-S) to AI Servo / Continuous Servo (AF-C) mode to be able to continuously track the subject.
In addition, if your subject is stationary and the camera-to-subject distance is the same, you will need to either turn off autofocus or remember to hold the autofocus lock button (if there is one) in order to prevent the camera from re-acquiring the focus again. Some cameras will allow you to keep half-depressing the shutter release to lock on focus and hold it, but if you accidentally let your finger off the shutter release button, you will be forced to re-acquire focus again. All this unnecessarily complicates your focusing technique, since there are too many actions and settings to keep in mind.
By moving the focusing function to a dedicated button on the camera and using the shutter release button only to take pictures, you can greatly simplify this process. Any time you need to focus, refocus or continuously track the subject, you engage the focusing button. If you need to take a picture, you engage the shutter release button. There is no need to remember which focusing mode you are using, because you can always keep your camera in AF-C mode. Dead simple.
Advantages of Back-Button Focus
Let’s go through all the benefits of back-button focusing.
Shoot in AF-C with the Benefits of AF-S
The biggest benefit of back-button focusing is the ability to shoot in AI-Servo / Continuous Servo (AF-C) mode with all the benefits of One-Shot / Single Servo (AF-S). Since the dedicated focusing button is only engaged when you need to focus, you can keep your finger off of it when you need to lock focus and simply keep on taking pictures.

With back-button focus, it was easy to focus and recompose on the model’s face
For the above image, it was impossible to focus on the model’s face with the Nikon D750 DSLR, because the focus points are only spread in the middle of the frame. This meant that the focus and recompose technique had to be utilized for this particular composition to work. Here, combining the AF-C mode and back-button focusing provided the same benefits as when using the focus and recompose technique in AF-S mode.
The back-button focusing technique can also be advantageous in situations where you need to quickly transition from shooting a stationary subject to one that is moving.

Copyright Dvir Barkay, Canon EOS-1D X @ 350mm, ISO 2500, 1/5000, f/9.0
In the above case, you can find a Shoebill patiently waiting in the midst of a Papyrus Swamp in Uganda. I pointed my center focus point (since it is most accurate) at the bird, then focused using the AF-ON button and recomposed. Right after I took my image, the bird decided to fly off.

Copyright Dvir Barkay, Canon EOS-1D X @ 280mm, ISO 2500, 1/5000, f/9.0
I just held down the AF-ON button to start focus tracking and squeezed the shutter button simultaneously to take continuous images of the Shoebill in flight. The whole process is seamless and done with just one autofocus mode (AF-C) while at no point limiting my ability to focus and recompose.
Instant Manual Focus
Since the camera’s autofocus is only engaged when you press the dedicated focus button, you can take complete control of the manual focus on most lenses without your camera overriding the focus when the shutter is released. This can prove incredibly useful for situations where your subject is heavily obstructed by objects that prevent the focusing system from being able to acquire focus.

Copyright Dvir Barkay, Canon EOS-1D X @ 600mm, ISO 1000, 1/1250, f/8.0
This photograph of a Grizzly Bear represents a situation where my focusing system struggled to acquire proper focus due to the high grass situated before my subject. I was missing critical moments due to the focus system continually jumping back and forth between the bear and the blades of grass. After some moments of struggling with the focus system, I decided to go ahead and take photos of the bear using manual focus. Because I was using Back-Button Focus at the time, the moment I stopped pressing the AF-ON button, I took complete control of the manual focus without my Canon DSLR overriding my focus when I pressed the shutter button.
Back-button focusing can also be very useful for night photography. If you have tried photographing the Milky Way, you probably know how important it is to properly acquire focus and frame your shot. Instead of constantly dealing with switching between autofocus and manual focus, you can simply use the back-button focusing technique to acquire focus, then use the shutter release to take as many pictures as you need.

Copyright Spencer Cox, NIKON D800E @ 20mm, ISO 3200, 20 seconds, f/2.2
Ignore Obstructions
Moving subjects will often confuse the autofocus of the camera. Since AF-C is used to track movement, if something gets in the way of the subject, the focus system may attempt to lock onto the obstruction. With Back-Button Focus, you can momentarily remove your thumb from the AF-ON button while still taking photos of the subject using the shutter button.

Copyright Dvir Barkay, Canon EOS-1D X @ 300mm, ISO 6400, 1/1250, f/3.2
Disadvantages of Back Button Focus
One of the main drawbacks of Back-Button Focus is that it requires excellent coordination to operate fluidly. Initially, it might take some time and practice to fully master having to press two buttons to do the job that you had previously done with one.
If there is one real difficulty to Back-Button Focus, is when you use it under challenging shootings conditions where it can become difficult to maintain the high coordination needed for it (such as when shooting with a heavy lens or when you are tired). This is especially true when you use it during very cold weather conditions.
I experienced this first hand while shooting in Yellowstone during a snowstorm. After spending long hours outside in the sub-zero temperatures, my fingers became numb, and I lost the ability to accurately judge if I was pressing the buttons on my camera with the proper force to activate their functions. In such a case, it is much easier to only have one button which both enables focus and trips the camera’s shutter.

Copyright Dvir Barkay, Canon EOS-1D X @ 454mm, ISO 8000, 1/1000, f/5.6
Because I was using Back-Button Focus at the time, I missed some photos due to not pressing the AF-ON button firmly enough. I recommend that in cold weather or in situations where you can’t be 100% positive that you are correctly pushing all the cameras buttons, you revert to the default method of using the shutter release button for both focusing and capturing the image.
Another downside is that if your subject is always on the move and it is very erratic (such as a bird in flight), it simply tires your thumb to the point that it might be worth switching back to a single button. If you always shoot such fast action and you always default to the center focus point, you might want to evaluate if it is worth using back-button focus.
How to Set Up Back-Button Focus in Your Camera
Canon DSLR and Mirrorless Cameras
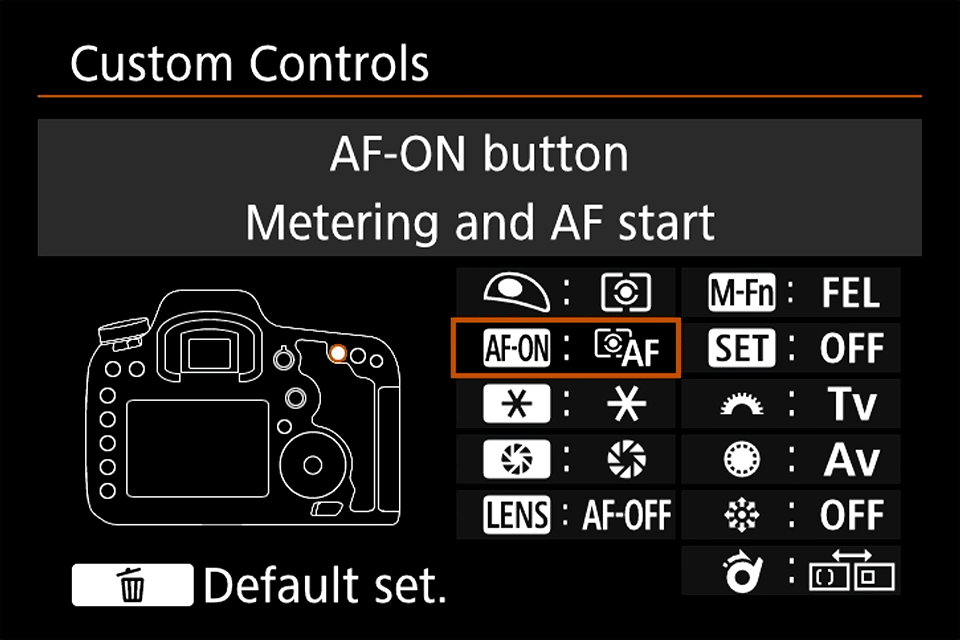
If you use a Canon DSLR or mirrorless camera, the process of setting it up for Back-Button Focus starts with the Custom Function Menu. Depending on which Canon model you are using, the Custom Menu will be laid out a bit differently, but in all recent models the following functions can be found in the Custom Function Menu:
- Open Custom Functions in the Menu
- Scroll to the Custom Controls screen
- In the Custom Controls screen, set the shutter button to “metering start” (which stops the shutter button from engaging focus)
- Set the AF-ON button to “Metering and AF start”
Nikon DSLR and Mirrorless Cameras
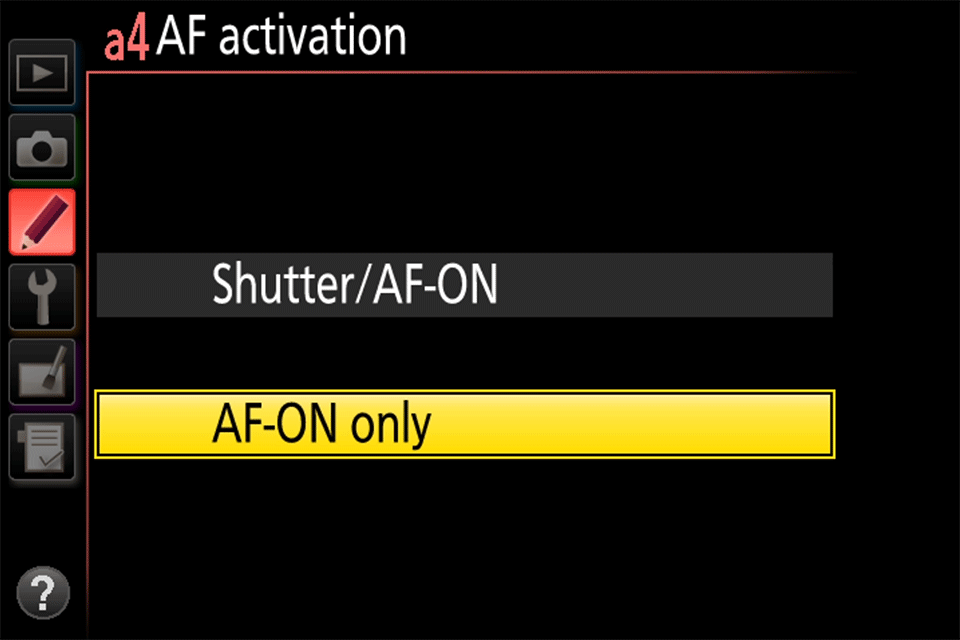
If you use a Nikon DSLR or mirrorless camera, the process of setting it up for Back-Button focus starts with the Custom Settings Menu. Depending on which Nikon model you use, the Custom settings Menu will be laid out a bit differently, but in all the recent models, the following settings can be found in the Custom Settings Menu:
- Open the Custom Settings Menu
- Select the “Autofocus” tab
- Select “AF activation”
- Select “AF-ON only”
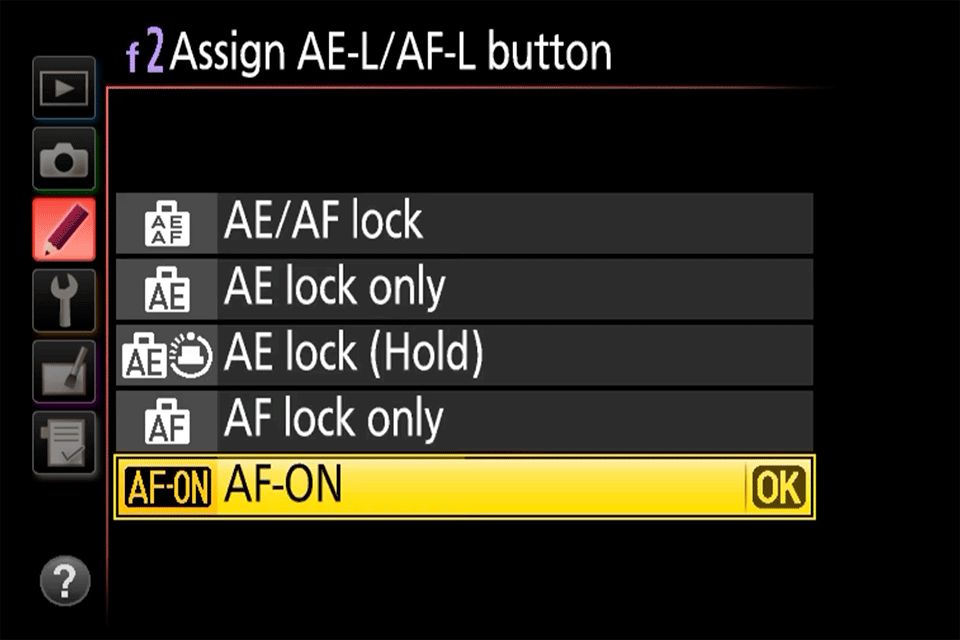
For Nikon models that don’t have an AF-ON button, you will need to set up the AE-L / AF-L button in the Custom Settings Menu to use it as if it was an AF-ON button:
- Open the Custom Settings Menu
- Select “Controls” tab
- Select “Assign AE-L/AF-L button”
- Scroll through the different options in the menu until you find “AF-ON”
- When on the “AF-ON” option, select “OK”
Sony Mirrorless Cameras
If you use a Sony mirrorless camera, you can also move the focusing button to one of the buttons. The latest mirrorless models have a dedicated “AF-ON” button that you can use for back-button focus.
First, you need to de-couple autofocus from the shutter release. This can be done by visiting the menu and finding the “AF w/ shutter” option. Make sure to turn it off.
- Press the Menu button
- Find “AF w/ shutter” menu and set it to “Off”

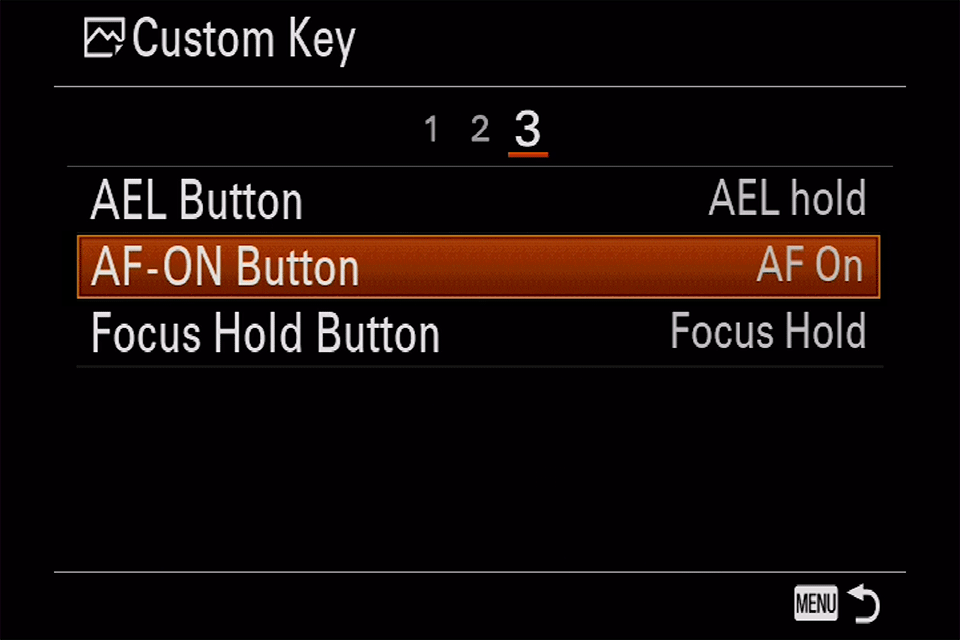
Pressing the AF-ON button should now work for focusing. Make sure that it has not been previously set for something else though. Visit the “Custom Key” menu of your Sony camera and find the “AF-ON Button” assignment. Make sure that it is set to “AF On”, as shown below:
Fujifilm GFX and X Mirrorless Cameras
Back-button focus on Fuji cameras is performed a little differently from model to model. Below is how you do it on some of the latest mirrorless models:
- Open “Set Up” in the menu
- Select “Button/Dial Setting”, pick Fn/AE-L/AF-L Button Setting, and assign AE-L or AF-L button to “AF-ON”.
- In “Button/Dial Setting”, set “Shutter AF” to “Off”
If you have a Fuji camera that has a dedicated AF-ON button (such as the GFX 50S or the X-H1), then you need to perform the following:
- Open “Set Up” in the menu
- Select “Function (Fn) Setting” and make sure that “AF-ON” is set to “AF-ON”
- Select “Button/Dial Setting”
- Set “Shutter AF” to “Off” for both “AF-S” and “AF-C”
Fuji cameras have another method to perform back-button focus by allowing a button to perform focusing even when switched to manual focus. Here is how you set it up:
- Switch the focus selection dial to Manual (M).
- Open “AF/MF” in the menu
- Select “Instant AF Setting”
- Set “AF-C”
Panasonic Lumix Cameras
If you have a Panasonic Lumix camera, setting up back-button focusing is quite easy:
- Set the “AF/AE LOCK” dial to: AFC.
- Go to the Custom Setup menu
- Set “AF/AE Lock” to “AF-ON”
- Set “Shutter AF” to “OFF”
- Set “Focus/Release Priority AFS/AFF” to “FOCUS”

