


Recently, you learned on PhotoEskape what the best camera settings are when photographing birds. Today’s article takes a more detailed look at bird behavior, biology, and environment. The goal is to teach you how anticipate what birds will do, and ultimately reach the holy grail: to take very sharp, high-quality photos of birds in flight.

Birds have always stimulated the human imagination. In some historic cultures, birds have been so privileged that they have even entered the exclusive company of human gods and goddesses. Whether it was the Greek Harpies, the Egyptian Hor, or the Phoenix, birds have always been part of peoples’ mythologies across the world.
What is is that fascinates humans about these feathered creatures, which inhabit our planet in approximately eleven thousand species? The answer must be sought in the ability of birds, which we humans can only clumsily imitate: the ability to fly.

Whatever you do as a photographer, it is always useful to learn as much as you can about the subject you are photographing. This is all the more important when we are dealing with the most agile creatures on our planet, which can easily outmaneuver an unprepared photographer. I highly recommend learning as much as possible about birds if you are interested in photographing them, especially in birds in flight…
Get Familiar with Bird Biology
To be able to predict a bird’s flight path with at least some probability of success, you should first learn a few principles that will help you plan your images better.

The first is the principle of the nest. Birds usually take care of their offspring in a nest, and the parents frequently leave and return from it to feed their chicks. As such, you can expect increased activity and many more opportunities for photography if you are in the vicinity of a bird’s nest.
When waiting for the bird to arrive to its nest, it’s useful to observe the bird from a distance and over the course of a few days to understand its daily rhythm and schedule. Are there still eggs in the nest, or are the parents already reading their nestlings? What time of day, and for how long, do the parents tend to leave the nest in search of food? This period of observation is crucial, and it also lets you be a better judge of how to approach the nest to a photographable distance without disturbing its inhabitants, and how long of a lens you may need.
For cavity nesters – woodpeckers, toucans, bee-eaters, parrots and many owl species, for example – we can often predict from the position of the entrance hole where the parent will be coming from. But with birds that build their own nests on top of trees or something similar, it can be harder to predict what direction they’ll fly from. Thus finding the right angle for a photo can depend somewhat on trial and error.

Sometimes, the presence of a human can trigger a strong reaction in a bird and cause them to fly away from us in distress. After all, we are the apex predators of the planet and a potential threat to their nests. This is especially true if there are a lot of people and dogs around.
Other birds react to humans in a different way. No doubt you’ve seen seagulls and pigeons flock to people with bread in their hand. But some bird species will actively attack humans! If you’ve ever been near a nesting pair of Great Skuas, for example, you know what I mean. They have an invisible border of tolerance in the grassy terrain where they live. If you cross it, a nesting pair will rise into the air and launch violent raids on you like a pair of jet fighters. You’ll face blows from their beaks and sharp talons. An opportunity for photography? Only if you’re crazy.

Beware, some bird species are particularly sensitive to disturbance. Especially during nest building or egg incubation, there is a high risk that they will abandon their nest. Please never get too carried away with the desire to take a photograph. If you have any doubts, pack up your goods and leave. After all, trying to take this photo once may scare the bird away for good, which is bad both for the bird and for your photography in the long run.
Some species of birds have regular roosts that they claim and rarely leave from that spot. Cattle egrets, cormorants, and some species of parrots and ravens come to my mind. In these spots, you don’t need to rush your photography and can wait with some consideration. In the case of nocturnal species, you can even continue after sunset, and the bird will often remain in the same spot.

Another principle of photographing birds is food. Birds can be spotted wherever they find suitable food in the right habitat.
For waterbirds, watch where they feed or where they lurk for their prey. In woodland, try to find trees and shrubs that attract hungry birds from far and wide. Steppe species of insectivorous and predatory birds seek elevated perches from which they hunt their prey.

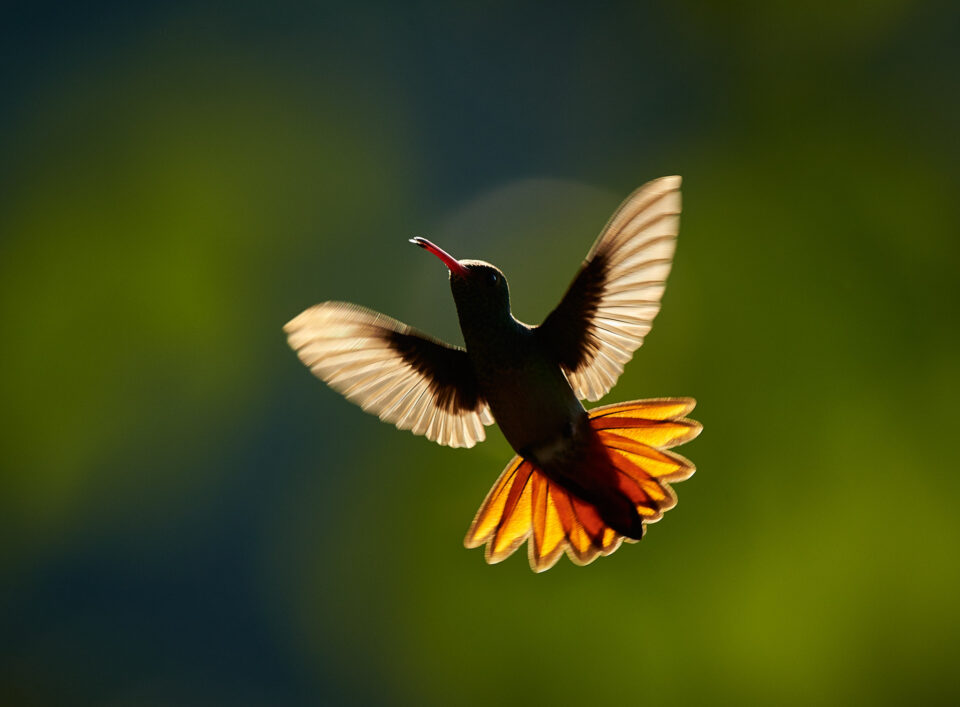
Many birds, of course, are happy to eat food that we prepare for them. The prevalence of bird feeders and little old ladies on benches feeding the pigeons are proof of that. For better or worse, feeders can offer opportunities to photograph birds that may be difficult to find otherwise. I bet about 99% of all hummingbird photos are taken at a manmade feeder, and most of the remaining 1% are taken at flowers that attract these hummingbirds (which is itself a kind of feeder).
Regardless of the particular source of food, if there’s one that you scout out, you’ll quickly learn to anticipate the birds’ movements and patterns. For example, hummingbirds often visit individual flowers facing in the same direction every time. Hummingbirds also often hover near a flower for a few moments, then fly back a short distance to dip their long tongues into the sweet nectar again the next second. Try to capture both moments, in which these speedy little guys are relatively still.

Although sources of food – whether manmade or natural – often allow for static shots as the bird is eating, it’s also a good opportunity to photograph birds in flight as they approach the food. This is often the best way to photograph small songbirds that are otherwise difficult to capture in flight.
To be specific, birds often like to perch somewhere nearby before coming to the food source (potentially a good time to photograph them on a branch, but that’s not the topic of this article)! From this perch, the bird will check the situation for a few moments, then take the shortest route to the food.
If you watch them fly like this over a period of time, you’ll get a very good sense of the expected flight path for the incoming bird. You’ll have a (comparatively) easy time tracking the bird with your composition and autofocus system. You may even be able to pre-compose and pre-focus with manual focus, then take the photo at the moment the bird crosses where you want it to be.
Later in this article, I’ll talk about the camera settings I recommend for situations like this.

The final principle of bird behavior I’ll discuss is flight path. A brief glance at the sky gives us the impression that birds fly in all directions and that predicting their flight direction is about as reliable as an April weather forecast. But this isn’t entirely true.
In fact, the two most photographically attractive phases of flight – i.e. take off and landing – are guided by certain rules. Birds like to perform both of these flight phases against the wind. So, if you have the wind at your back, you can hope for attractive photographs of landing birds from a frontal view.

In addition to wind direction, birds use a magnetic compass for their navigation. Unless this fundamentally conflicts with the wind direction, waterfowl prefer to land in a north-south direction. This makes it relatively easy to figure out where to stand to get the best possible angles for your shot.
Photographers always mention that it’s important to understand your subject, but these are some of the concrete things that refers to when photographing birds in flight. You can also go more in depth by reading about birds and spending time in the field, especially if there are some specific species you’re trying to photograph.
But as crucial as it is to know a bird’s behavior, as a photographer, you should also get familiar with your gear. That’s what I’ll cover on the next page of this guide.
Get Familiar with Your Gear
You can get good photos of birds even with inexpensive lenses and other bargain equipment. But at minimum, you need to know how to use it. So, let me go through how to set up your camera to get the most out of its capabilities when photographing birds in flight.
1. Autofocus Settings
Few genres of photography place such demands on focusing speed as photographing birds in flight. How should you set your camera to keep up with them?
First, keep continuous focus (AF-C) active at all times. This will allow the camera to constantly react to the changing distance between you and the flying bird.
If you haven’t done so already, I recommend setting your focus activation to back-button focus, AKA the AF-On button. This gives you full control over when your camera stops and starts autofocusing. Bird sitting on a branch? Short press of the AF-On button, then take your photo instantly – no need to focus again – whenever the bird’s pose is ideal. Bird spreads its wings and flies? Press and hold, and the camera will track focus the whole way.
Back button focus is simple and intuitive, and that’s why we always talk about it so highly on Photography Life. But it takes some getting used to. Therefore, if you’re not used to AF-On yet, I recommend practicing it on city pigeons, seagulls, or other birds that are plentiful and easy to photograph.

You can also experiment with adjusting the speed at which the camera will react to a situation where a flying bird is temporarily out of range of the focus points. On Nikon, this feature is called focus tracking with lock-on. The higher the value (1 to 5), the more the camera will hesitate before refocusing elsewhere. This comes in handy when you can’t keep the focus point exactly on the head, or the head is briefly obscured by something (such as a wing, branch, or other passing bird). In general, I recommend values between 3 and 5. Similarly, lean toward the higher values on non-Nikon cameras.

The next question involves focusing modes. Which one is the most suitable for photographing birds in flight? This is where things get a little complicated, and it depends on what camera you have.
Let me use as an example the Nikon models that I have been shooting with for a long time and therefore have the most experience with. Depending on the camera model, you have a different number of autofocus points that you can use. The most advanced DSLRs from Nikon have 153 (Nikon D500/D850/D5) or 105 (Nikon D6). Mirrorless cameras generally have more total points, but that doesn’t make them faster.
These cameras all give you control over two things: the size of the focus area, and whether the focus area is allowed to move to track subject motion.
Unless you are a skeet-shooting champion, forget about the single point option (where you select one autofocus point that doesn’t track movement across the frame). Manually keeping a single focus point on the head of a fast-flying bird is not only unrealistic, but also unnecessary.
Instead, use the autofocus points to help each other. If you don’t follow the bird’s eye perfectly with the main focusing point, one of the neighboring points can take over its task. How many of these “helpers” you assign to the main point is up to you. On Nikon DSLRs, these are the Dynamic Area mode options, and you can choose something like D-9, D-25, D-72, or D-153 to figure out how many helpers you want for the main autofocus point. Nikon’s mirrorless cameras are a bit more limited in their Dynamic Area choices but usually offer at least D-9.
I tend to select a value on the smaller side of this range, usually D-25. Why not choose D-153 to use all focus points at once and increase your chances of getting the right shot? Because autofocus points act similarly to your colleagues in your company. The more you include in the decision-making process, the longer it takes them to reach a result.
Another popular mode for photographing birds in flight is Group AF. In my experience, this mode is most useful when photographing birds that fly directly towards you. This is because Group AF, unlike Dynamic Area, tends to favour close subjects. If a bird is flying in your direction, it is usually the head that is closest to your camera. Group AF is found on Nikon’s newest DSLRs. On Nikon mirrorless, something similar can be achieved by selecting medium or large area AF boxes.
Often, Group AF (or medium/large area AF) is very useful for bird in flight photography. The exception is if a bird flies laterally rather than straight toward you, at which point Group AF may lock onto the bird’s wingtip instead of the eye (again, because it prioritizes nearer subjects).
The remaining mode is called 3D Tracking. This is when you allow your focus point to move across the frame automatically to track your subject. It sounds very tempting, but for photographing birds in flight I’d rather avoid it. Although 3D tracking is getting faster and faster these days, with most cameras on the market, it still can’t keep up with the fastest-moving birds in flight. I would rather use Dynamic Area or Group AF most of the time.

When I said that choosing focus depends on the camera, though, that’s especially true with mirrorless. There’s a huge range of focus performance and tracking capabilities depending on which mirrorless camera you use, ranging from terrible to better than any DSLR.
For example, on the Nikon Z9, Sony A9/A9 II/A1, and Canon R6/R5, the 3D Tracking focusing mechanism may be fast enough to track a bird in flight without issue. It may even be able to automatically select your subject, sometimes down to the level of your subject’s individual eye. In my article on the Nikon Z9, I already wrote that this feature works great in practice. Admittedly, pros may still get a higher keeper rate with dedicated practice in the other modes, but this is the closest to “set it and forget it” tracking that is possible for photographing birds in flight today.
2. Exposure Settings
Even in the era of the latest digital cameras, the holy trinity of exposure remains the pillar upon which the technical aspect of photography is built. That is, the three big settings of shutter speed, aperture, and ISO.
Shutter speed plays a major role in whether a fast-moving bird will be sharp or have motion blur. Aperture determines your depth of field and also allows you to capture more light in dim conditions. And finally, ISO brightens the photo further as needed, but will reveal unsightly noise if your shutter speed and aperture didn’t capture enough light.

To freeze movement, you will usually need a shutter speed in the range of 1/1250 to 1/8000 of a second. This is largely determined by the type of bird and the nature of its flight. Smaller birds, typically songbirds, tend to have faster and less predictable movements. For that reason, we would do well to set a fast shutter speed. In contrast, a gliding pelican, a condor or a slow-flying heron will allow a relatively longer shutter speed without increasing the risk of motion blur.
It also depends upon the exact moment you take the photo. For example, a hummingbird can flap its wings at about 80 strokes per second. This is so fast that even at 1/4000 of a second, you can end up with a very obvious blur in the wings. If you want to freeze this completely, you could take a photo perfectly timed when the hummingbird’s wings are pointed straight ahead or backwards. Of course, this isn’t something any photographer can time through skill, but it’s possible to time with luck and a high number of frames per second on your camera!

As for aperture, I personally consider the sweet spot to be somewhere between f/5.6 and f/8. This range of aperture values will provide an acceptable depth of field to compensate for any focusing inaccuracies as well as get most of the bird in sharp focus. On the other hand, wider apertures like f/2.8 to f/4 are popular among some bird photographers because they let in more light and give very creamy out-of-focus backgrounds. I usually steer away from those apertures if a maximally sharp subject is my priority.
Then it simply comes down to ISO. Once I’ve set my shutter speed and aperture to a value that I’m happy with, I want my camera to float ISO to the level that gives me a properly-exposed photo. As a result, I use manual mode in combination with Auto ISO. I keep an eye on my ISO and make sure it doesn’t get too high for my comfort (roughly about ISO 4000); if it does get that high, I will usually open up my aperture a bit if possible. If not, I’ll extend my shutter speed and hope not to get motion blur.
The only slight concern with this approach is shooting in very bright conditions, where Auto ISO may want to use a value lower than base ISO. For this reason, some bird photographers who work in bright light prefer to use aperture priority mode in combination with Auto ISO, instead of manual. The aperture priority + Auto ISO approach is a more difficult technique, but it fixes the base ISO problem and otherwise functions similarly to manual mode + Auto ISO.

Keep in mind that in the real world, the resulting exposure settings are always a matter of compromise. Technically perfect results would be achieved in many cases with a shutter speed of 1/8000 second, aperture of f/8, and ISO of 100. But I don’t even need to look at the exposure statistics of the photos in my archive to tell you that I’ve never taken a photo with those settings, because I don’t live on the sun. So, everything is a compromise.
Finally, there are times when no matter what camera settings you use, you still won’t be able to get sharp photos. I’m not just talking about shooting at night, but even on a bright, sunny day – if there is atmospheric distortion. In fact, the billowing mass of warm air between you and the flying bird can make sharp photography virtually impossible. Sometimes even the heavens themselves conspire against us, and there’s nothing to do but stretch out in a hammock and have a drink.
3. Metering Modes
Your camera’s meter informs it about the amount of light passing through the lens. Metering mode can be set to at least three modes on most cameras: spot, center-weighted, and evaluative (AKA matrix) metering.
For photographs of birds in flight, center-weighted and evaluative metering are my recommendations. However, unusual subjects like a white egret against a dark background – or a dark raven flying against sand or snow – can be improperly exposed in these situations.
On most cameras, spot metering is the way to go in cases like this, since it will prioritize the exposure of your focus point itself. (Note that on some older cameras, spot metering only measures a point at the very center of the frame rather than your focus point, making it effectively useless for birds in flight.) Spot metering is more sensitive than the other metering modes, and it’s likely that you’ll need to use exposure correction to fine-tune it, but it’s sometimes the best way to meter a complex scene.
If you don’t have a specific subject in mind like that, I recommend always keeping your camera settings – metering mode and everything else – as “generalist” as possible. For example, set metering to matrix, switch to manual mode, turn on Auto ISO, set your shutter speed to 1/2000, and set your aperture to f/5.6. Those settings won’t be optimal for every photo of a bird in flight, but they’re universal enough that you’ll usually get something sharp and can react immediately to any situation in front of you (and quickly change to something like 1/4000 or f/4 if the situation calls for it).
Tripod vs Handheld
It’s an eternal question in bird photography: Should you shoot from a tripod or handheld?
In the case of older generations of supertelephoto lenses (400 to 600mm), your quivering biceps, aching back, and inability to accurately compose a fast-moving bird will answer it after a few seconds. But with lighter, modern versions of telephoto lenses – especially lenses with shorter focal lengths or narrower maximum apertures – the answer is not so straightforward.

The tripod will be most useful when you’re waiting for a shot. Typically, this is somewhere close to a bird nest, or alternative in a hide. With a tripod, you can point your lens permanently where you expect action, such as a flower, river, or nest. The instant a bird appears, within a fraction of a second you can get the first shot. This isn’t possible handheld.
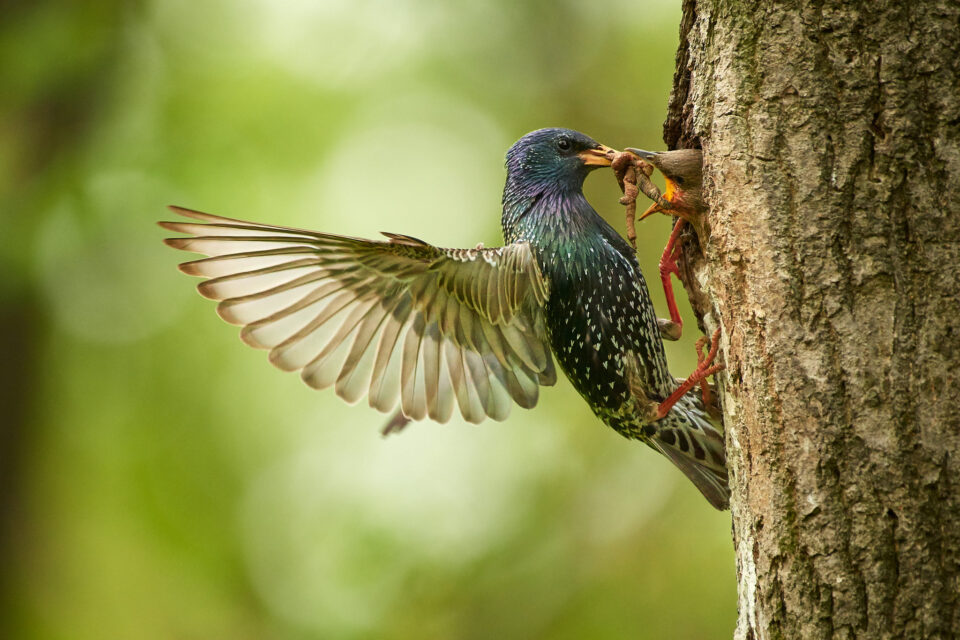
Sometimes, with a tripod, you can even pre-plan the exact shot and wait with the perfect composition for however long it takes. That’s what I did with the photo below. I set my shutter speed and aperture to sufficient values for a sharp photo (in this case, 1/1250 second and f/5.6). I even turned off autofocus, choosing instead to pre-focus on the place where I knew the bird would be. The moment the common starling flew into place, all I needed to do was press the shutter and pray. A high-FPS burst helped, but 99% of the work went into this photo long before I actually took it. Shooting in this way is unthinkable without a tripod.
It is moments like this that are reminiscent of hunting just as much as photography. It’s not for nothing that the verb “to shoot” is used as a synonym for “to photograph.” When you sit and wait for your subject to arrive, you can get some great images, and a tripod is crucial to that process. Again, practice makes perfect.
A tripod can also be useful if you plan to stay in one particular spot and use a gimbal head for composition. If you’re at a location where a large number of birds are gathered, like Bosque del Apache, this is often the ideal approach. A gimbal head gives you much of the compositional flexibility as shooting handheld, but it takes the weight off your back. However, a gimbal is large and heavy, making it harder to hike around with your tripod long distances.
So, shooting handheld (or with a monopod) is always the backup option when you need to cut down on weight. With lighter telephoto lenses, your arms won’t be too tired shooting handheld even for a few hours at a time, and leaving the tripod at home makes it much easier to hike long distances with your setup. For photographing birds in remote areas, or on the go when you don’t have time to set up a tripod, shooting handheld is certainly possible.

Now you’ve set your camera properly and understand the basics of bird behavior. The final steps are to find a good location to photograph birds and then compose an interesting photo. I’ll cover those on the next page of this tutorial.
Understand the Environment and Good Locations
Knowing a good spot to photograph birds can dramatically increase your chances of getting successful photos. You could be in the most bird-rich corner of the planet and not see a single feather. Sometimes it’s literally meters that separate success from failure. How can you increase the chances that a birding expedition will pay off? There are basically two ways.
The easiest way is to entrust yourself in the hands of a reputable travel agency that specializes in birders or, better yet, bird photographers. Similarly, it is possible to hire a local guide on the spot to take you to the birds.
The other option, which is not nearly as easy but which I personally find more satisfying, is to study the available resources before the trip itself. Read field reports of birders and photographers who have visited the area you are going. By doing so, you’ll discover specific locations where the chances of seeing your dream species are the best.

Set your priorities and key species, then plan your itinerary accordingly. Do you want to capture the widest variety of species, or will you focus on a smaller number that you want to document as best you can? If you don’t want to use a guide, it’s definitely worth learning to recognize the sounds of the birds you want to photograph. Without this skill, you will find it very difficult to locate them in the field.
Also, be aware of the best time of the year to go to your destination. Rainy or dry season? Spring or autumn? When shooting on the seashore or in the mountains, you should also be concerned about the direction of the winds and thermal currents. This is because many birds like to take advantage of rising air currents to be carried along cliffs. Look for such birds on the cliff edges. That way, you can get close to birds that would otherwise be flying far below you in other climatic conditions.
Don’t forget about your own safety, transportation and of course accommodation options. There is a lot to consider when planning your trip, but the time invested is well worth it.
And with all that background knowledge, there is only one thing left to take amazing photos of birds in flight. If you want your photos to be aesthetically pleasing, you should…
Master Composition
Composition in wildlife photography is quite a challenging thing. Apart from our aesthetic sense, the stumbling block is the low willingness of the subjects to cooperate in the creation of the shot. Sometimes it feels like deliberate sabotage. With birds in flight, this is even more true than usual. Nevertheless, there are some general rules that we can follow and that can shift our work to an aesthetic level.
One of my first recommendations to participants of my wildlife photography courses is: “Don’t get too carried away with the animal itself. Always try to perceive the scene as a whole.” Your brain can perfectly filter out the distracting parts of the scene in front of you, yet those elements will show up clear as day in your photo. Therefore, in addition to the flying bird itself, try to think about the background, which contributes significantly to the final impression of the photograph.
Another amazing ability of our brain – and, again, something that is unfortunately in conflict with the quality of our photos – is a phenomenon that could be called “brain zoom.” A bird that fills barely ten percent of the viewfinder will be perceived as filling the entire frame. It seems great at the time, but when you load the photo on your computer, the bird is tiny! Your 45+ megapixel supercamera will suddenly turn into a historical artifact with a resolution of 10 megapixels or less, thanks to all the cropping you need to do. Therefore, do everything you can to compose more tightly to get the most out of your camera’s potential.
Where in the frame should you place the bird? Every composition tip you’ve ever heard or read about applies here. We have a complete guide to composition on Photography Life, as well as several individual articles that can be found in the Composition section halfway down our list of all PL tutorials. I’ll go through a few of my favorite pointers below.
First, try to leave some space in front of the bird for it to “fly into,” compositionally speaking. This isn’t always needed, but it helps give the photo a story – specifically, where is this bird going and what is it up to? Telling a story is an important part of composition, since it helps your viewer feel attached to the image.
Another way to interest your viewer in a photo is to do something different or unexpected. For example, most bird photographs are by definition taken with the photographer down on the ground and the bird up in the sky. Try to find a location that will help you break this stereotype. It could be a bridge over a river, a rock wall, a cliff over the sea, or an observation tower. Your photos will get a fresh angle and a different background than the sky. Plus, the upperside of the wings is often more interesting than the underside.

If the passing bird gets to about your eye level, try to capture the surrounding landscape as well. This may require a lens with a shorter focal length, and/or using a narrower aperture to gain more depth of field. Both approaches will show more details in the background and give greater context to your subject.

The direction the bird is flying also plays a big role in a successful or unsuccessful composition. For example, a bird flying toward us or directly sideways can have an interesting shape and make a great subject. But when the bird starts to fly away, I almost always stop shooting. The image of a disappearing bird is rarely as impressive, other than special cases like a silhouette where it’s a small element in your composition.

This brings me to my next recommendation. If conditions allow, you don’t need to shoot every bird-in-flight photo with a telephoto lens! You can also get much closer and use a shorter focal length with good results. I’ve recently been taking bird in flight photos with a 24-120mm zoom, and I’m at the 24mm end much more often than you’d think.
For the photo below, I went even further and chose an 11-16mm zoom. Robert Capa’s statement “If your pictures aren’t good enough, you’re not close enough” can clearly be applied to bird photography, too. Not all birds let you get this close, but for the ones that do, the results can be pretty unique.

Then there’s the question of light. As photographers, we use the palette of light and color provided by nature. It’s important to learn to perceive their qualities. Harsh midday sun often has deep shadows and overexposed highlights, and it’s rarely our ally as bird photographers. (Even the birds seem to know this and are not very active at this time of the day!)
The birds that break this trend and look good in harsh light are usually species that have structural colors. Structural colours are the result of light reflecting off microscopic structures on the surface of the bird’s feathers. They’re found on hummingbirds, many ducks, pheasants, and even some songbirds. In general, structural colours look best in the diffuse light of a semi-cloudy sky, but they can work better than usual in sunlight, too.

If you don’t want to lounge in the shade and wait for the sun to go behind the clouds or for the golden hour, you can try to photograph bird silhouettes. The sun’s rays passing through the delicate structures of bird feathers can produce interesting effects. Just be careful that the sun itself is not in your frame if you’re shooting with the optical viewfinder of a DSLR.
After all I’ve written above, my final recommendation about composition rules is, “Don’t be afraid to break composition rules.”
Summary
Throughout this guide to photographing birds in flight, I’ve introduced you to the most important facts about bird behavior, camera settings, bird environments, and composition. That’s the background you need to know in order to start off on the right foot and capture some great images of birds in flight.
With a little practice, great photos of this difficult-to-capture subject will land on your memory card, and you’ll be allowed to admire the aerial skills and elegance of birds. Without a camera, many of these breathtaking moments plucked from the flow of time would have eluded our eyes, so it’s a special thing to preserve them for others to see.
If you have any tips on how to photograph birds in flight, or questions about the information in this guide, please let me know in the comments section on the following page!

