

")
When light rays coming from a bright source(s) of light (such as the sun or artificial light) directly reach the front element of a camera lens, they can reflect and bounce off different lens elements, diaphragm and even off the sensor, potentially degrading image quality and creating unwanted objects in images.
Better known as “lens flare”, the effect can impact images in a number of ways: it can drastically reduce image contrast by introducing haze in different colors, it can add circular or semi-circular halos or “ghosts” and even odd-shaped semi-transparent objects of various color intensities. Flare is not always undesirable in photography though – sometimes it is used creatively to add artistic elements to images. In fact, lens flare is often deliberately added to movies and computer games to add a sense of realism and boost the visual experience of the viewer.
To help decide whether to use flare in images, it is a good idea to understand why it happens in the first place. Let’s go over the causes of flare in detail, then discuss ways to use, reduce or perhaps completely avoid it.
What is Lens Flare?
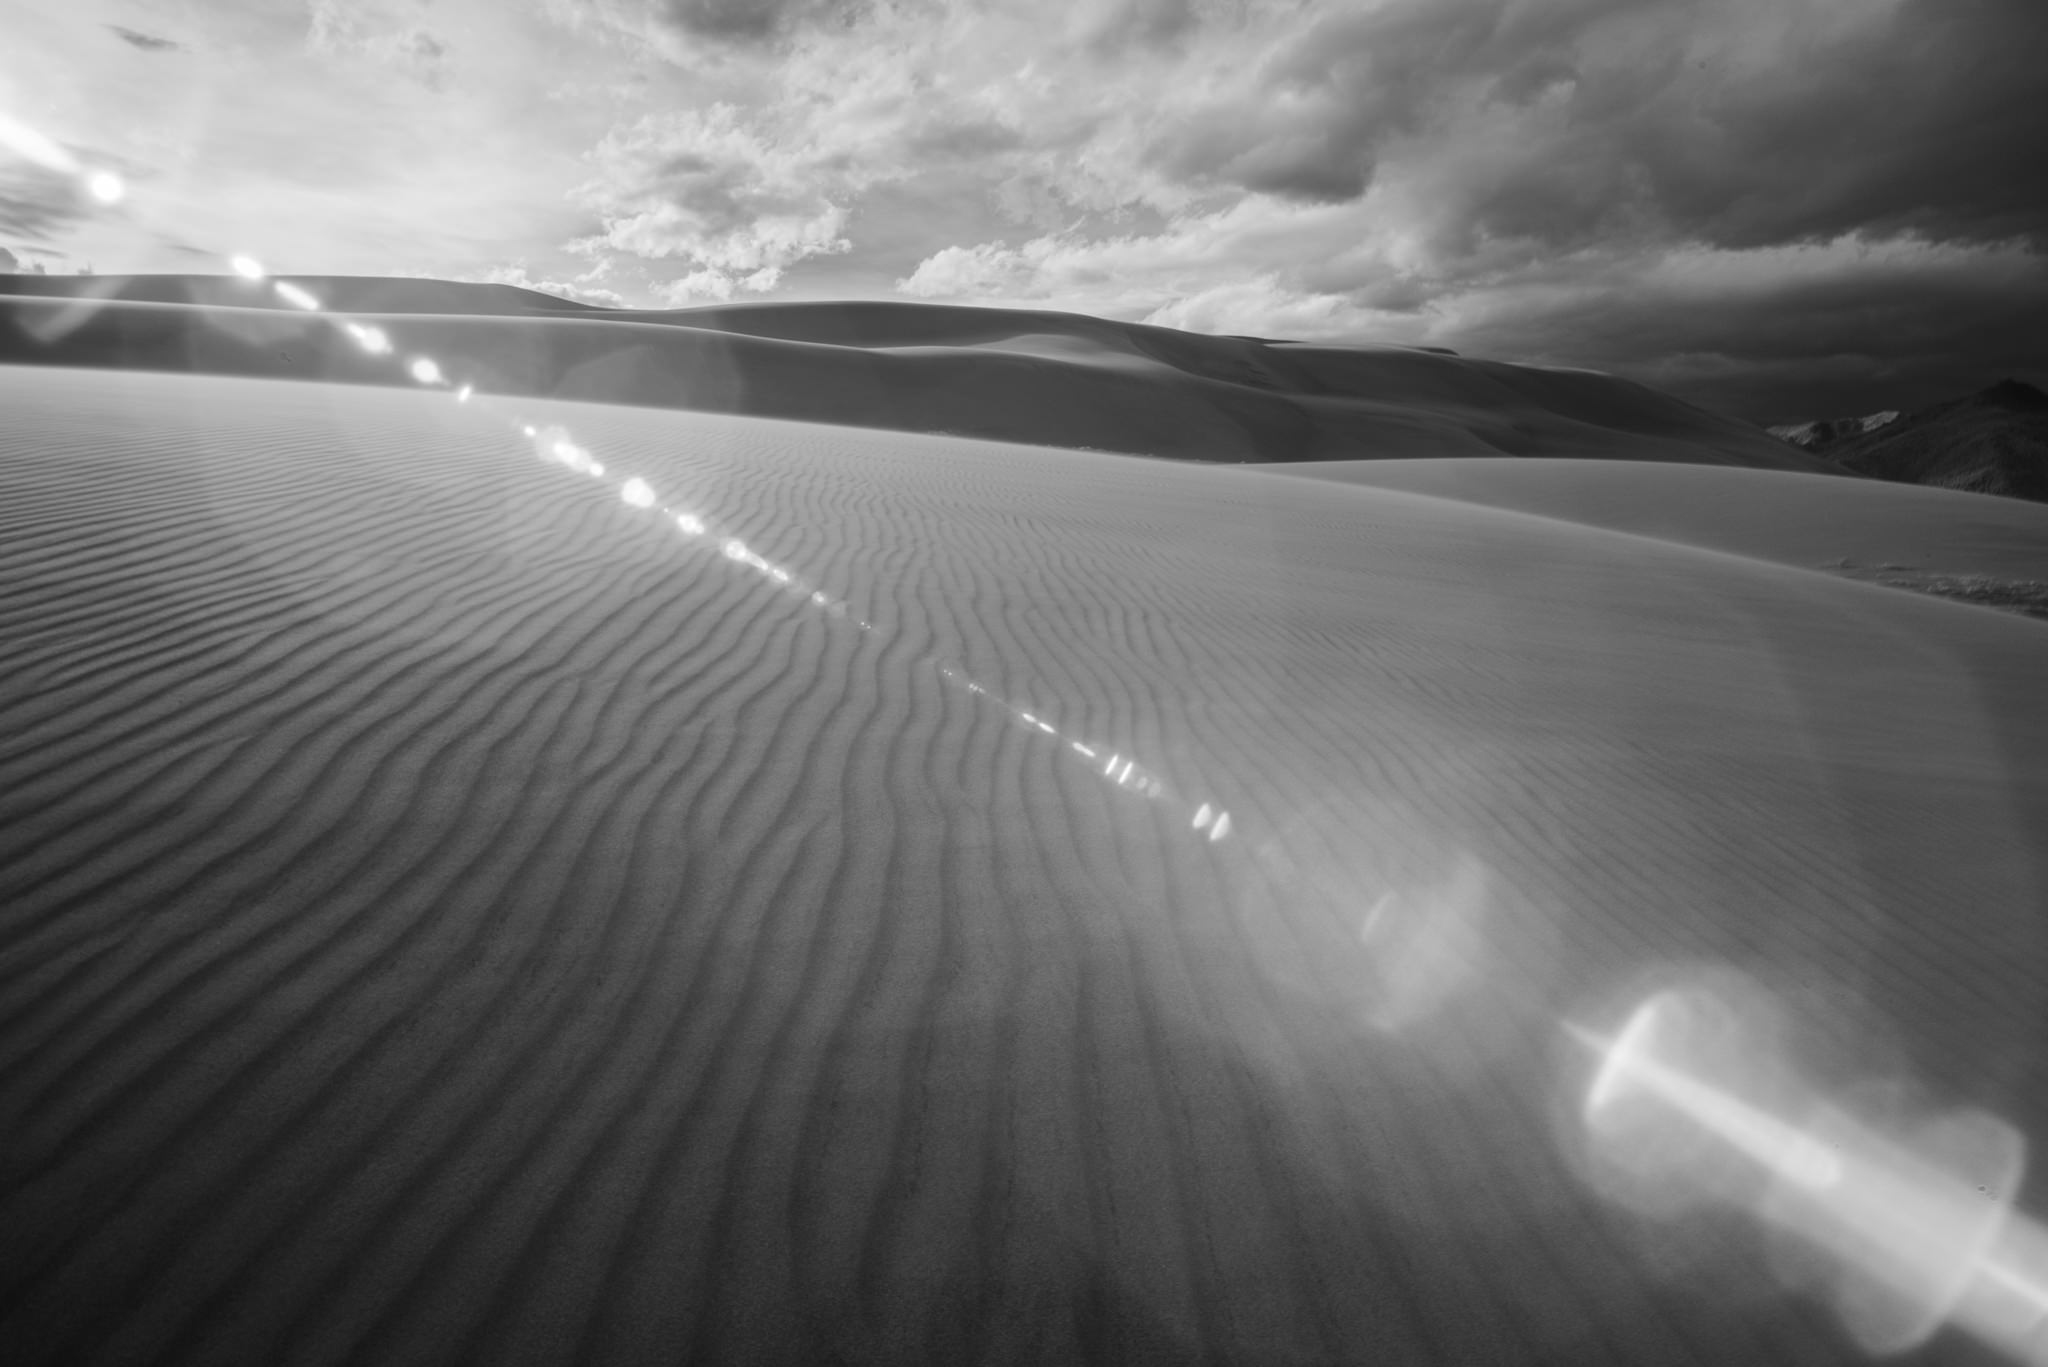
Lens flare occurs when a point of light source such as the sun is much brighter than the rest of the scene, and it either happens to be in the image (within lens angle of view), or simply hits the front element of a lens without being present in the image. Depending on the position of this bright light source, it can result in a lot of haze/lack of contrast, orbs and polygon artifacts scattered throughout the image, semi-round shapes with rainbow colors, or a combination of all of the above. This happens due to internal reflections that take place inside the lens and even between the imaging sensor and the lens (more on that below). Take a look at the below illustration:
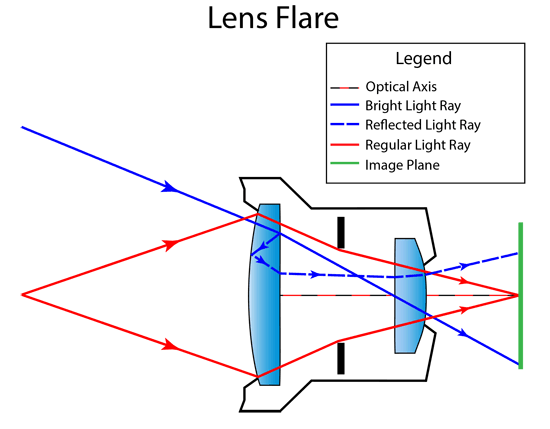
As you can see, regular light rays (red) follow their normal path, directly reaching the image plane (green), whereas bright light rays (blue) can split and reflect off lens surfaces and end up in different parts of the frame (dotted blue). While traveling through the lens, light can also be reflected off the lens diaphragm if it is stopped down, resulting in even more noticeable flare.
Although the above illustration shows lens flare in general, manufacturers and photographers usually identify two types of lens flare: veiling flare and ghosting flare. While both typically go hand in hand, good lenses with multi-coated lens element surfaces can significantly reduce veiling flare in images.
Veiling Flare
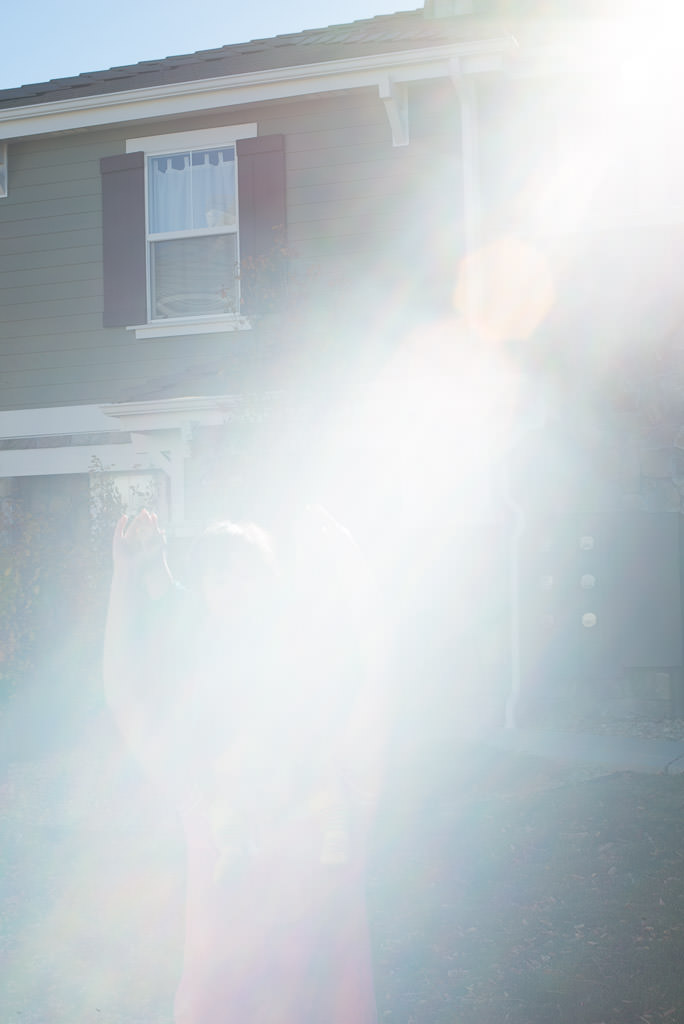
Veiling flare usually occurs when the bright light source is outside the lens angle of view, i.e. absent from the image, but its light rays still reach the front element of the lens. This results in very noticeable haze/lack of contrast, where dark areas of the frame become brighter with bleeding colors and appear washed out. High-quality lenses with multi-coated lens elements can help in reducing veiling flare. For example, Nikon’s proprietary Nano Crystal Coat technology used on professional-grade lenses helps a great deal in keeping veiling flare under control. Take a look at the below portrait that was captured using the Nikon 58mm f/1.4G lens:

You can see that the sun was right above the subject and outside the image area, but its light rays still reached the lens and created veiling flare around the child in the photo. The veiling flare not only impacted the area surrounding the sun, but also had a drastic effect on the hair, face and even clothing of the child, resulting in reduced contrast. In this case, veiling flare was actually allowed on purpose, providing a moody, bright shot.
Unfortunately, veiling flare can get intensified by a number of factors, such as dust inside the lens, dirty front element, dirty/low-quality lens filter, lack of anti-reflective multi-coating technologies, etc. In some cases, the effect can look pretty bad in images. Take a look at an image produced by a very old manual focus Nikon NIKKOR-S 50mm f/1.4 Ai lens:
As you can see, this lens was just not a good candidate to shoot against the sun – it made the whole image look hazy, with practically no visible details of my wife and daughter in the shot. Part of the reason was lack of multi-coating technologies and another part was micro dust that accumulated over the years inside the lens that caused additional reflections.
Ghosting Flare
Unlike veiling flare that makes images appear hazy with very little contrast, ghosting flare or just “ghosting” represents all the artifacts that are visible in the image, whether it is reflections of the bright source or shapes that are similar to the lens diaphragm. These orbs of different colors and shapes usually appear in a direct line from the light source and can span the whole image, with dozens of different artifacts. Take a look at the below comparison of 4 different 70-200mm zoom lenses:
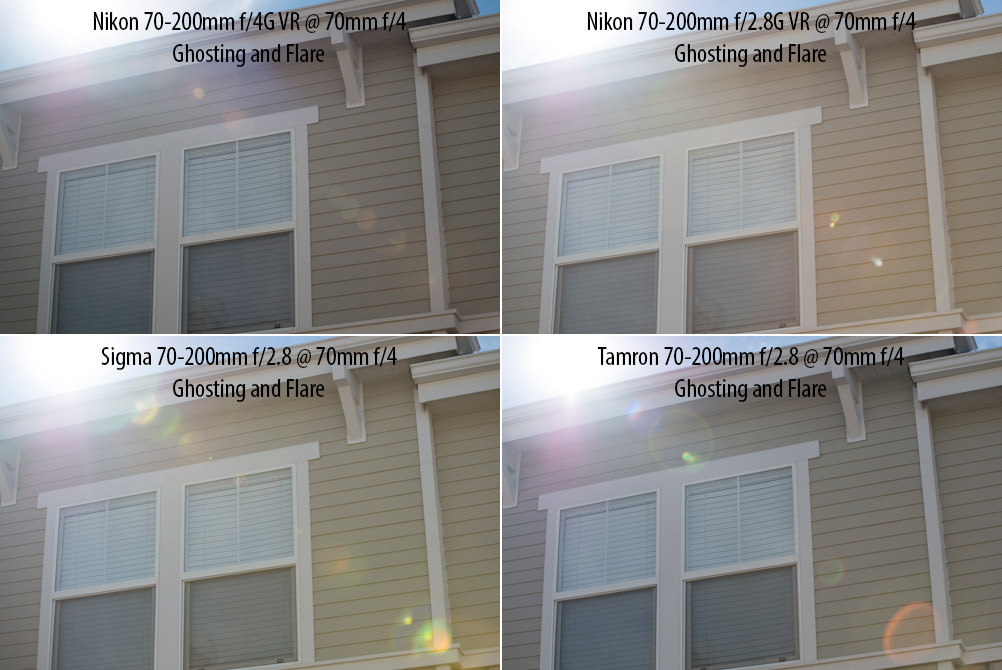
Aside from the visible veiling flare visible in the images, you can also see various circular artifacts/orbs in each image – those are referred to as “ghosts”. The total number of these ghosts varies by how many elements there are within each lens. Typically, the more elements, the more ghosts will appear in images. Since 70-200mm zoom lenses have a complex design with a dozen or more elements, you can see that pretty much every lens suffers from veiling flare and ghosting, with Nikon 70-200mm lenses leading the game with a minimum amount of ghosting in images.
In addition, as I have already pointed out above, when a lens is stopped down, the lens diaphragm can cause internal reflections. The effect is greatly amplified when the lens is stopped down to its minimum aperture, which is why aperture ghosting is typically not visible at large apertures like f/1.4, but quite noticeable at something like f/16. So if you see polygon-shaped ghosts in your shots, just know that those are coming from the lens diaphragm.
Sensor / Red Dot Flare
I have been referring to flare occurring as a result of light bouncing between the imaging sensor and the lens elements as “red dot flare”, but it could be called “sensor flare” as well. Unlike lens flare, the red dot flare is not just light getting reflected by lens elements and diaphragm, but also light getting reflected from the imaging sensor to the lens, then back to the imaging sensor. Unfortunately, it seems like the newer mirrorless cameras with short flange distances are particularly prone to this problem, as described in detail in my “red dot flare issue” article. Here is how the red dot/sensor flare looks like in images:

Aside from the polygon-shaped aperture ghosts, you can also see a bunch of red dots surrounding the sun – those are microlenses on the digital camera sensor that are amplified in the image.
Factors Impacting Lens Flare
While most modern lenses are designed with special multi-coating technologies to reduce flare, even some of the best professional-grade lenses can render images with visible ghosting and even veiling flare. That’s because the position of the light source in the frame and the angle at which the light reaches the lens (and subsequently camera film/sensor), have a drastic effect on how flare shows up in images and at what intensity. In addition, there are other factors I have mentioned above that could also seriously affect images. Let’s take a look at these in more details:
- Lens Elements – the more lens elements, the more ghosts will show up in images
- Focal Length – wide-angle lenses are not only designed to handle flare well but also, the shorter focal lengths make the light source appear smaller. Telephoto lenses, on the other hand, are much worse performers because they amplify everything and hence have huge/long lens hoods
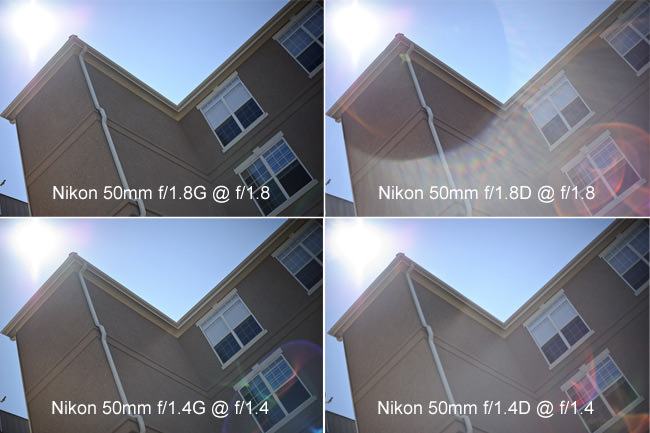
- Lens Design – good lens design can definitely impact lens flare. For example, Nikon has been designing lenses with recessed front elements, which can greatly reduce flare and ghosting without even using expensive coating technologies. Take a look at the below 50mm lens comparison and you can see that the latest generation 50mm lenses visibly outperform their AF-D counterparts in handling flares and ghosting:
- Multi-Coatings – multi-coated (MRC) lens elements definitely have a huge impact on flare performance
- Filters – low-quality filters are known to create more flare and ghosting issues in images
- Lens Dust – all lenses accumulate dust over time and the internal dust can cause more veiling flare issues
- Front Element Cleanliness – greasy fingers and other particles on the front element can also create more flare/ghosting issues

SLT-A65V + DT 16-80mm F3.5-4.5 ZA @ 20mm, ISO 100, 1/400, f/11.0
How to Avoid Lens Flare
If you do not want to see flare in your images, you can take some simple steps to prevent it from showing up in your images:
Below are the steps you can take to avoid lens flare
- Use a lens hoodThat’s right – there is a reason why those lens hoods exist. They help a great deal in blocking direct sunlight rays from reaching the front element. We’ve written more about lens hoods here.
- Use your hand or another objectJust putting your hand over the lens to block off sunlight can completely eliminate ghosting and flares. A very simple method that works!
- Use high-quality lensesHigh-quality, pro-grade lenses are expensive, but they most often come with amazing coating technologies that help significantly reduce or even eliminate flare issues.
- Use prime lenses instead of zoomsGenerally, prime lenses have simpler optical formulas than zooms and definitely less optical elements. The fewer elements you have to deal with, the fewer flare will show up in images.
- Change perspective/framingSometimes just changing the position of the light source in your shot can make a huge difference.

Unfortunately, while it is a good practice to keep the lens hood on and know that you can block off the light with your hand or another objects, shooting directly into the sun and including it in the image will render those efforts useless. For those situations, either change the perspective/framing completely or only use high-quality lenses with multi-coated lens elements.
Lens Flare FAQ
Below are some of the frequently asked questions related to lens flare:
What Causes Lens Flare?
Lens flare is typically caused by a bright light source. The effect of lens flare can vary depending on the location of the light source in the frame. If the light source is very strong (such as the sun), its light rays can reach the front of the lens and cause lens flare, even if the light source itself is not included in the image.
Is Lens Flare Bad?
Lens flare can be damaging to your images, especially when they cover up a big part of the image. However, not all lens flare is bad – some photographers and videographers even use it intentionally in their images and footage to make them look cinematic.
How Do You Get Rid of Lens Flare?
Excluding bright sources of light from your frame, as well as not letting their light rays reach your lens can eliminate lens flare completely. When taking pictures in daylight conditions, make sure to use the lens hood in order to block sun rays from reaching the front of your lens.
How Do You Stop Lens Flare at Night?
If you want to reduce lens flare when shooting at night, you should avoid using small apertures that can increase the effect of lens flare in your images. Additionally, try to use a high-quality prime lens with good coatings, which should help deal with lens flare. Lastly, make sure to remove all lens filters from your lens.
Should I Use a Lens Hood at Night to Avoid Lens Flare?
A lens hood is designed to block sun rays from reaching the front of your lens. However, if you are shooting at night and you have a moon or bright street lights overhead, you should use your lens hood.
If you are interested in reading more, below is the list of articles on other types of aberrations and issues that we have previously published on The Photographers:

