


Vignetting, also known as “light fall-off” (sometimes spelled “light falloff”) is common in optics and photography, which in simple terms means darkening of image corners when compared to the center. Vignetting is either caused by optics or is purposefully added in post-processing in order to draw the viewer’s eye away from the distractions in the corner, towards the center of the image.
Depending on the type and cause of vignetting, it can be gradual or abrupt. There are a number of causes of optical vignetting – it can naturally occur in all lenses, or can be caused or increased/intensified due to use of external tools such as filters, filter holders and lens hoods. In this article, I will talk about each type of vignetting and also discuss ways to reduce or increase the amount of vignetting in photographs using post-processing software like Lightroom and Photoshop.
Types of Vignetting
As I have already pointed out in the introduction of this article, there are different types of vignetting that one might encounter when taking pictures or viewing images. Some types of vignetting are naturally caused by the optical design of lenses, others can occur when using third party accessories such as filters and extended hoods and some are artificially added by the photographer in post-production. Let’s take a look at each type in detail.
Optical Vignetting
Optical vignetting naturally occurs in all lenses. Depending on the optical design and construction of the lens, it can be quite strong on some lenses, while being barely noticeable on others. Still, vignetting occurs on most modern lenses, especially on prime / fixed lenses with very large apertures. There are two causes for this. First, at the widest apertures, the light than enters the lens is partially blocked by the lens barrel, as indicated by the below diagram:
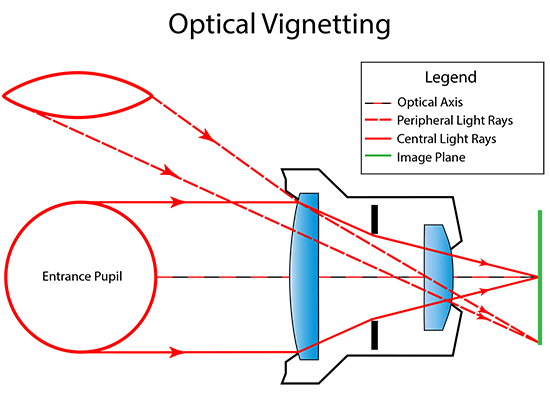
Due to the length of the lens barrel and its relative size of the front and back frames, peripheral light rays that travel at extreme angles are partially blocked. As a result, the light that reaches the image plane at such angles naturally falls off (decreases in brightness) towards the extreme corners of the frame.
Note that such vignetting is mostly evident at large apertures, since it is the physical lens barrel that mostly blocks the peripheral light from the front and back of the lens barrel. Once stopped down, the smaller size of the aperture in the center is visible even from the corners, allowing the light to pass through. That’s why most fast aperture prime lenses have plenty of vignetting at the widest aperture and dramatically improve as the aperture is stopped down.
Pay a close attention to the entrance pupil in the above example. As you can see, it is circular in the center, but takes a different shape that some call “cat’s eye” in the corners. If you have a fast aperture prime lens, you might have seen this effect on the lens bokeh – the bokeh shapes stay circular in the center, but gradually change in shape towards the corners, just like you see in the below crops:
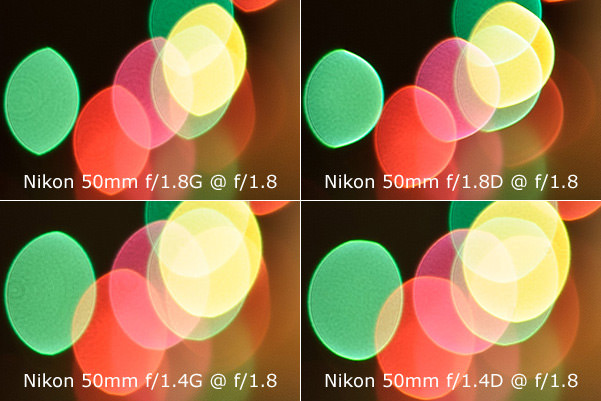
The above is a bokeh comparison between 4 different Nikkor 50mm lenses. Since the crops were taken from the same part of the image frame, this is a good example of optical vignetting in action. As you can see, all lenses render highlights in the corners differently. Here, what impacts the shape is the physical size of the front and rear elements, the length of the lens barrel and the size of the aperture.
Second, when light travels through any lens, light rays at the periphery of the lens travel longer than in the center. This is especially noticeable on wide angle and super wide angle lenses. In this case, the cosine fourth law of illumination falloff kicks in, which states that light falloff is proportional to the fourth power of the cosine of the angle between the peripheral light ray and the optical axis. I won’t go into the details here, since it can get quite complex and technical. Just remember that rays away from the optical axis will always travel longer, so by the time they reach your digital camera sensor, more vignetting will show up in your images.
Pixel Vignetting
Digital cameras also suffer from pixel vignetting. Compared to optical vignetting, this type of vignetting is only applicable to image sensors. Since digital sensors are flat, their pixels are all built the same way and face the same direction. Pixels in the center of the sensor receive light rays head on at 90 degrees, while pixels in the corner receive them at a slight angle. Because of this, the sensors in the corners will receive slightly less light compared to the center, causing pixel vignetting. Unfortunately, pixel vignetting cannot be cured by stopping down the lens, since it is purely the result of the angle at which light reaches individual pixels on the digital sensor.
Mechanical / Accessory Vignetting
Due to sometimes extreme angles at which light enters the lens, especially on super wide-angle lenses, manufacturers often design lenses with some slack to allow mounting of various accessories such as filters and lens hoods. If you pay a close attention to your lenses, their lens hoods are always much larger than the front element of the lens. That’s because the idea is to block bright sources of light such as sunlight from entering the lens at extreme angles to prevent flares, ghosting and reduced contrast due to internal reflections, without blocking the needed light, which would obviously result in vignetting.
Therefore, manufacturers pay very close attention to the size of lens hoods and make sure that they are large enough to pass light without adding vignetting. This is the reason why lens hoods come in so many different sizes and shapes and it is also the reason why one should always use manufacturer-supplied lens hoods, rather than generic third party versions.
Since lens hoods are carefully crafted for each lens, they are typically not the source of vignetting. Most of the time, mechanical / accessory vignetting is caused by filters, filter holders and other third-party tools. Most manufacturers design their lenses to accommodate a single filter, whether used for protection or other purposes. However, some lenses can introduce heavy vignetting if filters are used, especially circular polarizing filters that tend to be thicker than regular ones.
One such lens is the Nikkor 16-35mm f/4G VR, which has vignetting issues at 16mm even without filters when shot at its widest aperture of f/4. The effect of vignetting gets much worse when a filter is attached and if the filter is thick enough, even stopping down the lens to f/8 does not reduce it. Other lenses might be better at handling filters, but they also start showing issues when more than one filter is used, or a filter holder system is used.
The Nikkor 24-70mm f/2.8G handles vignetting quite well with a circular polarizer but suffers quite badly at 24mm when using the Lee filter holder system with a standard ring. A special wide-angle ring must be used to reduce vignetting. If the filter holder is attached to another filter, vignetting gets very heavy, requiring cropping later. And if a filter system is too thick, vignetting can be really bad, as in the example below:

In the above case, the Hitech 100mm Modular Filter Holder was used in full configuration, causing very well defined vignetting from 24mm all the way to 45mm. The only way to reduce vignetting in such cases is to use thinner filter holders that do not protrude as much.
To reduce mechanical / accessory vignetting, it is recommended to use manufacturer-supplied hoods and use thin rings and adapters for holding larger filters. Stacking of filters should be avoided, especially when using wide angle lenses.
Artificial Vignetting
Vignetting is not always a nuisance or a problem. In some cases, the effect of vignetting can be pleasing to the eyes of the viewer, drawing attention away from the corners of the frame, towards the center of the image. In fact, some photographers tend to leave optical vignetting in images without correcting it, while others specifically add vignetting or increase its effect during post-processing. Vignetting can be easily added in both Lightroom and Photoshop. Here is an example of vignetting that was specifically added to the photograph in order to draw the attention of the viewer towards the main subject in the frame:

In-camera Vignetting Reduction
Some modern cameras offer in-camera vignetting reduction. Both Nikon and Canon, for example, have lens-specific data pre-loaded in camera firmware to reduce vignetting and other lens aberrations. While this feature is certainly useful for JPEG images, they have practically no effect on RAW images. Proprietary, manufacturer-specific data that is written to RAW files is unfortunately discarded by third party tools such as Lightroom, Aperture and Photoshop. To retain camera-specific settings for vignette control, one has to use manufacturer-supplied post-processing tools such as Capture NX, which is capable of reading this header data and applying it to RAW images upon import.
How to Correct Vignetting in Lightroom / Photoshop
Optical vignetting can be easily removed in Lightroom and Photoshop. If the lens you are using is supported, both Lightroom and Photoshop can easily take care of vignetting with a single click using the Lens Corrections module of Lightroom or Camera RAW. In Lightroom, this setting can be saved into a template, which can be applied to photographs when they are imported. To find out more about the lens corrections feature, check out my Lightroom Lens Corrections Explained article, where I explain the sub-module in detail. If you use Adobe Photoshop, the same thing can be done in Camera RAW.
To Vignette or Not to Vignette?
To vignette or not to vignette? It depends on whether it is optical vignetting or vignetting caused by use of accessories. When photographing living beings and other life, I often end up leaving optical vignetting in images, since they tend to produce images with more depth. In some cases, as I have shown above, I sometimes intentionally add vignetting to draw the attention of the viewer to the subject in the frame.
For landscape and architectural photography, however, I mostly get rid of vignetting in my images, since I want the viewer to focus on the entire image, rather than on parts of it. As you take pictures and work on your images, I would recommend to experiment with vignetting. See how your lenses vignette and decide if that’s something you want to keep or get rid of.
If vignetting is too light, try to add more via your favorite post-processing tool and see how it turns out. I would not recommend to apply heavy amounts of vignetting and I certainly would not recommend using anything other than the black color. Some people like to use white or other colors for gradual vignetting and I am yet to see an image that turned out good as a result. And if heavy vignetting is caused by an accessory, it is always a good idea to remove it during post-processing. Unfortunately, no lens profile will be able to cure that, so it might be best to simply chop off the image corners by cropping the image.
If you are interested in reading more, below is the list of articles on other types of aberrations and issues that we have previously published on The Photographers:

